There has been discussion on the web (here) of unsharp Leica M240 images made with live view. Now that I have a tool to measure vibration-induced lack of sharpness, I thought I’d take a look.
When you’re in live view mode on the M240 the shutter is open. When you press the shutter release, the shutter closes, then opens, then closes again after the exposure, then opens again so you can see through the EVF or the back panel LCD. The theory is that the first closure causes significantly more vibration than the first opening, and the resultant camera shake causes fuzzy images. As with any shutter or mirror-induced vibration, the effect is more visible the longer the lens.
So that this post can more-or-less stand alone, I’ll explain the testing methodology. Those of you who have been following this thread may wish to skim the next few paragraphs.
I mounted a 135mm f/3.4 APO Telyt on an M240. I clipped the camera into a RRS TVC-34L Versa Series 3 tripod with RRS BH-55 ball head using the RRS M240 bottom plate/handgrip/L-bracket. I pointed the camera at an oscilloscope with no vertical input, and the time base set to 1/10 second per division. I set the camera shutter speed to half a second, so that it could capture five divisions of trace movement. . I used the same distance as in the previous posts, so that the diameter of the focused phosphor dot would be close to one pixel. Actually, I thought it might be larger than that, since I used a 100mm lens for the previous work, but I couldn’t back up any further. As you will see, there were some surprises there.
As the front of the camera moved down the image of the dot on the sensor would move up, and as the front of the camera moved up, the image of the dot would move down. Having the dot move from left to right during the exposure would allow me to see during what portion of the shutter’s open period the vibrations occurred, and to see how long it took them to damp out.
Here’s what the camera saw with the room lights on.
I used live view to focus, with the lens wide open. It was difficult; tiny motions in the focusing ring produced immense changes in sharpness. Then I stopped the lens down to f/8. I set the ISO to 200. I set the intensity of the oscilloscope phosphor dot to a low level to make it as small as possible. For those you who have been following along, I left it where it was; I don’t want to introduce another variable. That resulted in severe underexposure, but not as severe as in the previous D800E tests, where I used ISO 100.
I turned off the room lights and made horizontal and vertical exposures with live view on and off.
Ideally, I would have tripped the shutter with a cable release. However, the M240’s cable release threads, although they look similar to standard ones, don’t fully engage my releases. I have heard that there are M240-compatible releases available, but I don’t know how to get one. So, I tripped the shutter manually. I figured any vibration introduced by my hand would be of low frequency compared to the vibration caused by the shutter, and I’d be able to sort out which was which by looking at the images.
In order to eliminate interpolation and demosaicing artifacts, I converted the DNG files to un-demosaiced TIFFs in Rawdigger 1.0 (newly released and highly recommended). I brought the images into Photoshop as layers, lined up all the oscilloscope traces, added a couple of adjustment layers to compensate for the underexposure, enlarged the images by 300% using nearest neighbor, and took a look. You can do the same now.
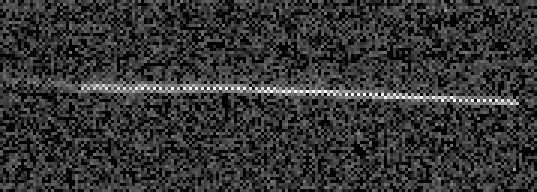
Here’s a horizontal image with live view on:
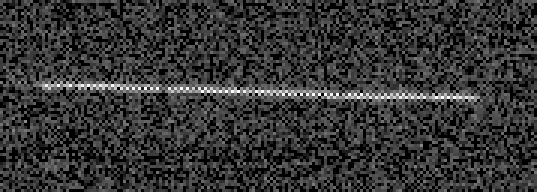
A horizontal image with live view off:
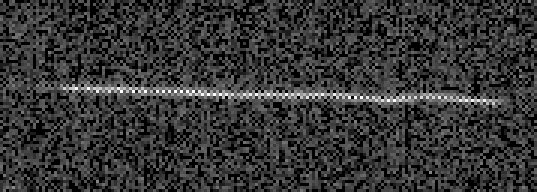
A vertical image with live view on:
A vertical image with live view off:

You can see the trace falling from left to right in all instances. That’s because the camera and the oscilloscope weren’t perfectly lined up. You can also see low-frequency (about 5 Hz) variations from my hand on the shutter release. What you can’t see are any indication of 10 Hz or higher vibrations that damp out during the exposure, which is what you’d expect with shutter-induced vibration. There is no evidence that live view causes any more vibration than just releasing the shutter normally.
As an aside, the expected larger dot size didn’t show up at all; in fact, the dot looks to be smaller than with the D800E and the Zeiss 100mm f/2 ZF. Why? Well, for starters we’re looking at actual camera pixels here and in the D800E case, and the size of the pixels are different with the two cameras. The D800E has a 4.88 micrometer pixel pitch, while the M240 has a 6 micrometer pixel pitch. The pixels on the M240 are 23% larger on each side than those in the D800E. However, the lens I used on the M240 is 35% longer than the lens I used on the D800E, so, if the size of the dot on the screen is the principal determination of the size of the dot in the image, the dot, measured in pixels, should be bigger with the M240. It’s not. Therefore, I think that the APO-Telyt is focusing the dot better than the Zeiss lens.
Why didn’t the expected live view vibration rear its head? Maybe people who saw the effect are:
- Using lenses longer than 135mm
- Using lenses that mount to the tripod directly, rather than mounting the camera to the tripod. More on why this causes more vibration later.
- Using non-M lenses with an adapter, which might be a source of mechanical sloppiness.
- Not using as sturdy a tripod and head as I am.
I will repeat the testing in the next post using the self-timer to release the shutter.
Leave a Reply