I have a much better test than this one now. Here it is.
I’m leaving this post up for historical reasons, but I strongly recommend that you use the new test.
From the mailbag:
I just found your blog and have been really enthralled by all the data you’ve got! I had a question I was hoping you may be able to help with. I’ve got a Sony 16-35 lens, and am worried it’s decentered. Trying most of the standard decentering tests @ 16mm seem like they are super sensitive to test setup issues. For example, even though I got a test chart printed at 20×30, that only allows me to put the camera ~10 inches away which leads to a lot of false-positives if the lens isn’t perfectly parallel with the chart. Do you have any other good methods to check on such a wide lens? Thanks for the help, and please keep up the blog!!
I have published some semi-complicated decentering test methods that don’t require precise alignment:
And some quite complicated ones that don’t require precise alignment:
Roger Cicala has published a pretty simple test using a Siemens star chart.
But there’s an even easier way, for which I am indebted to Professor Hank on DPR. All credit to him. I’m going to give you my version, so, if there’s a problem, it’s most likely my fault.
You’ll need a dark room — thankfully, not a darkroom (those are getting harder and harder to find), just a room that’s dark. Ideally, you want to get at least 50 times the focal length of the lens you’re testing away from the target — more on that in a sec — and, within reason, the farther away you can get, the better.
You’ll probably want a tripod, although it’s not strictly necessary.
And you’ll need a small LED flashlight. Within reason, the smaller the better. The ones that operate from a single AAA cell are good. The ones that use just one AAAA cell are harder to find. If the flashlight has power settings, set it to the dimmest setting. It’s easy to get one that’s too bright, and I’ve never found one that’s too dim. The flashlight should have only a single LED, not a group of them.
- Put the flashlight at the far end of the room facing the camera.
- Turn the flashlight on.
- Go back to the camera
- Turn it on, too.
- Douse the lights
- Set the camera’s ISO knob to base ISO.
- Open the lens all the way.
- Focus it to as close as it will focus. That’s right, set the camera to the minimum focusing distance.
- Center the out of focus image of the flashlight.
- If you’ve got a mirrorless camera, adjust your shutter speed until the zebras go away and/or the right side of the histogram comes off the end about a stop.
- If you don’t have a mirrorless camera, take pictures, look at the histogram, and adjust exposure until the right side of the histogram comes off the end about a stop.
- For other cameras, take pictures and adjust the shutter speed until that happens.
- Is the blurry disk all within the frame? If so, you’re done. If not, adjust the focus until there’s a fair amount of black around it.
With a mirrorless camera, you don’t even have to take a picture. Just look at the disk.
- Is it evenly illuminated?
- Is it round?
- Are the edges well defined and the same all the way around the disk?
If yes, congratulations; you have a well-centered lens. If no, you’ll have to do additional testing, like the tests I linked to above, to find out if the decentering is going to damage your photographs.
I’ve been waiting to post this until I found an example of a decentered lens. Unfortunately, or fortunately, depending on how you look at things, I haven’t found such a lens. I suspect that decentering is not as common as it is portrayed on the ‘net, and that many perfectly good lenses get returned because their owners don’t set up their tests precisely.
Here are a couple of sample images. One has been cropped, because the OOF flashlight didn’t com anywhere near filling the frame.
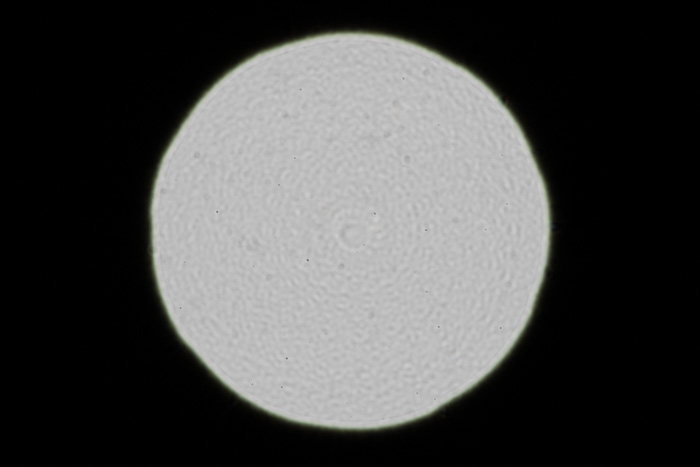

You will notice, if you look carefully, that the Sony image is not quite as circular as the Otus one. This is a departure from perfection that I would not call decentering, or at least, the kind of decentering that would motivate one to send the lens back. In other testing the Sony shows that it’s not decentered in a way that might significantly affect normal photography. The non-circular opening is a result of the diaphragm not fully opening when the lens is set to wide open; you can see the image of the edges of the blades.
You’ll also notice some patterning in the disk. Don’t worry about that. Some of it maybe from fine details in aspherical elements in the lens (you’re actually looking at magnified marks left by the machines that milled the lenses or the molds). Some of it may have to do with the light source, if it’s not small enough or you’re too close. And, of course, this is an excellent way to discover dust.
Also, don’t worry if there are flattish edges equally distributed around the periphery of the disk. The diaphragm may not be completely out of the way, even though you’ve opened up the lens as far as it will go. You’re looking for bulges, or an ovoid shape.
Occasionally, you may see a strip across the image, like this:
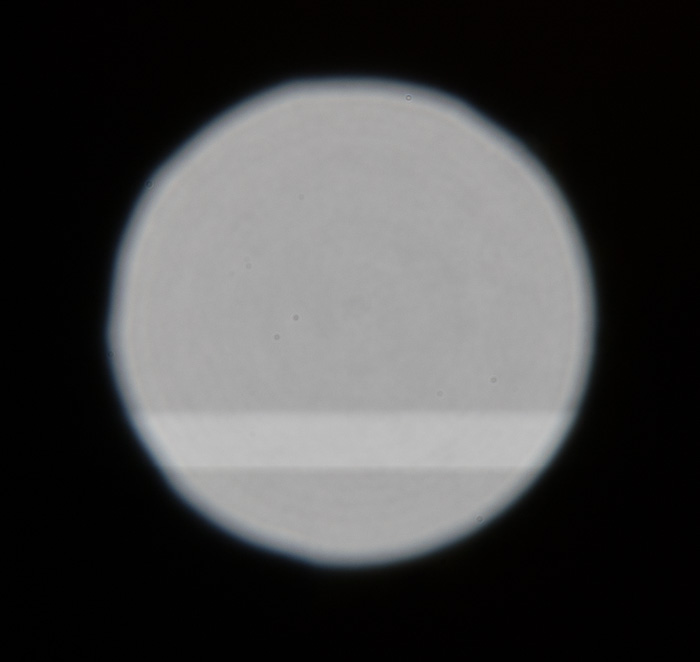
Of that happens, don’t worry. It’s just the flashlight pulsing the LED at high frequencies. Ignore it.
Thanks for putting this together Jim!
I have a couple of questions about it:
1. as I understand it, the tests that compare the corner crops do not work when using lenses designed for full frame on APSC bodies. Since this test assumes nothing about the edges, I assume this does not suffer from the same limitation
2. you mention that the LED needs to be not too bright. How does a too bright LED affect this?
I have tried the above mentioned test for a FE 35 f2.8 on an a6000 and I think the LED that I have is too bright since I don’t see any detail in the image (like the ones in this post) for an exposure at ISO 100, 1/4000. Bringing the exposure down by 4 stops in LR does bring out some details, but I was wondering how/if this might affect the decentering test.
I’ve uploaded the original ARW file here: http://wikisend.com/download/888942/DSC04832.ARW
And 100% (http://wikisend.com/download/345414/DSC04832_100.png) and 200% (http://wikisend.com/download/224122/DSC04832_200.png) crops.
Would greatly appreciate, if you have time to take a a quick look, your opinion on this. To me it seems that it’s acceptable (not perfectly round, but not too distorted either), but I’m not sure how the bright LED might affect it.
Thanks!
I don’t think that there’s anything wrong with doing corner sharpness test on FF lenses on APS-C bodies if the lenses are gong to be used exclusivly on APS-C bodies. As long as you can see the whole defocused blur circle, this test should work.
If the LED is too bright, detail in the blur circle will be clipped. You want the blur circle to be properly exposed. Zone V or Zone VI, if the Zone System means anything to you. A bit to the right of the center of the histogram, if you don’t speak Zone System.
I’ll look at your files.
Jim
Yes, I was not very clear on 1. There is nothing wrong if the lens will only be used on APS-C, but if I understand correctly, it won’t easily tell you how it will behave on full frame.
On the other hand, since this test only cares about the central part of the lens, it should tell you if the lens is centered no matter what camera you use (APS-C or full frame).
Please correct me if I’m misunderstanding this.
You understand this perfectly.
I’ve look at the raw file. I think you’re lens looks fine. Next time, see if you can get further from the LED.
Thanks for taking the time, Jim! I’ll try a few more further away and compare.
Let me know…
Thanks for putting this up. I did a test with my FE 2.8/35mm on the Sony A7R2 with this result:
https://www.dropbox.com/s/mcfukjna9sfid1b/20160720-010.ARW?dl=0
The brightness distribution looks a bit uneven to me, would you think this indicates decentering?
Ad, the file is locked,
Ad,
I think you need to get a lot closer. I also think the flashlight could be lined up better.
The farther away, the better, if you can achieve sufficient exposure.
I have a Keyring style Fenix E01 AAA LED flashlight. It is quite bright. If I back off far away the light source is like a tiny extremely bright pinpoint with the lens focused as near as possible at F2.8 and ISO 50 on an A7RII testing a Batis 18. Can you suggest a modification other than finding a weaker flashlight?
If your light is too bright, you need to back up further, or find a LED light that has a dimmer setting (many have two or three brightness levels).
If your circle is too small, you could add an extension tube (this OOF LED test is not sensitive to tilt), but you shouldn’t have too; I’ve seen 18/2.8 Batis tests with sufficiently large circles, though I’ve not tested that lens myself.
Jim
Thanks I got it. Thanks for your comments re: my Batis 18 test submitted to DPReview. I think the copy of the Batis 18 I received is a keeper. And moving forward, based on related reading, I think I’ve worried too much about this issue. First world problems 😉
Jim,
I’m having trouble finding a flashlight that works. I’ve bought a couple and they are all too bright. Do you have a link to the one you bought (perhaps on Amazon)?
How far away are you?
Jim,
I can be as close or as far as needed, within reason. I’m testing a 24-70mm zoom.
Looking your crops if those are posted at 100% you are quite a bit closer than the example posted by Ad. What distance would you suggest for say a 24mm lens, 50mm, and 70mm lens? You obviously want to be close enough to see enough detail…
The farther the better. I normally try for at least 20 feet. Longer is better. This is independent of the focal length of the lens. You can’t tell how far away the target is by looking at a blur circle. Just back way up, defocus as much as you can.
Jim,
Maybe it would help to see your original uncropped photo? That way we could see how much of the frame was filled by the flashlight.
The flashlight is a point source. The blur circle size is related to the amount of defocusing, not the distance to the light.
Oops. I see in the article that you recommend 50X the focal length. So for a 50mm lens that would be 250. Do you convert that number into inches, feet, meters?
Never mind. I should not post on migraine days. 😉
50 X 50 = 2500mm. 2500mm is 8.2 feet, roughly.
Farther is better, remember.
Thanks for these articles on testing for de-centering.
Have you been able to get examples of de-centered lenses, perhaps from readers?
I’m also wondering if the defocused full moon would work as a target. Too bright?
OT?
I’m pondering whether the full moon (or maybe half to 3/4) could serve as a target for sharpness testing:
* How does the centered image at f/5.6 or f/8 compare to more open apertures?
* How do the images at the 9 APS-C edges compare to the center, and to each other? You would shift the aim to put the moon at the different points.
* How do the 4 extreme corners of full-frame compare?
* One series of tests would use the center focus, which would test for flat-fieldness / focus curvature.
* Another series would refocus with the moon positioned at the 13 non-center points.
* Compare to see how much degradation from the presumed best at the center with f/5.6 or f/8.
* BTW, MagicLantern has automated “focus bracket” for Canon DSLR’s, oriented to use with macro-photography.
Hi! I tried this new method and wanted your opinions on the 2 raws for the FE 16-35 f4 (35mm and 16mm). I see a blue lining around the ring but that may be due to the source of light (phone led). The 16mm looks more like an octagon too. Should I be concerned?
https://drive.google.com/open?id=0B496zA1KG6f3YmhMVS1iTVRadzA
https://drive.google.com/open?id=0B496zA1KG6f3akRmXzA3cU5Kbkk
Next time, try to get the exposure more like the exposure you used for the 35mm image, so the details are dimmer and easier to see. I think this lens is properly centered. The ring around the disk is the result of the corrections baked into the lens design, and will cause bokeh that is a bit jittery, but you probably knew that already. I’m not sure what’s causing the octagonal shape in the 16mm image, but it may be that the diaphragm is not opening up all the way — you can check that with a flashlight and visual inspection.
By the way, I am considering a simple test for tilt, but I’m not there yet.
Jim
Jim
Thanks! I tried testing the 16mm again and it looks okay. Something must have been off in the settings.
Maybe the aperture wasn’t all the way open.
Jim,
Do you have any sample pics of a decentered lens yet using this test? The 16-35mm pics posted by a user above seem pretty uneven so I’d like to see a truly decentered lens. Do you think this test detects minor decentering or a fairly severe case?
Nope. Prof Hank says he does. I’m beginning to think that most of the defects that people call decentering are actually tilts. But I don’t buy many zooms, and buy pretty good lenses.
Jim
Hmm, I understand the test on paper, but I’m not entirely clear what to look for that would indicate decentering or alignment issues… Would the uneven lighting or the lack of roundness/edges just be incredibly obvious?
I don’t have any decentered lenses, so I don’t really know. From the images I’ve seen posted, mild decentering is apparent, but not striking in its effect on the out of focus point spread function (OOF PSF), which is what you’re looking at here.
I swore I have read your article more than 10 times but still fail to get it done.
Would you happen to have any chance to make a video and post on your blog/youtube so we can have a visualised instructions to follow?
Sorry, I don’t do videos. If you send me a link to a few images you’re getting (use the contact form), I can probably tell you what you’re doing wrong.
I usually do a quick and dirty test on lenses (especially zooms at the wide end) which is to photograph trees with bare branches in winter, to get branches into the corners. In order to cover the top half of the visual field (you can invert the camera if you’re interested in the lower half, which I usually am not because the lower half doesn;t usually stress the lens as much) the trees cannot be at infinity.
Because you can see branches at different distances in the same part of the image (no leaves, remember), this test shows up a lot of faults:
– CA (lateral and axial)
– curvature of field
– softness /sharpness
– achromatic/apochromatic behaviour
– decentring (at least I assume this when field curvature is different on each side)
Any comments or suggestions?
I should have added, that field curvature is very common at the wide end of zooms (at least the cheap ones I can afford!), and IMHO lenses are often falsely accused of softness in the corners which is actually due to some combination of field curvature, decentreing, and CA (often axial for fast lenses). The essentially 3-D nature of bare-branch test makes it quite easy to distinguish these without any issues of alignment.
I prefer the Siemens star because it provides a fixed reference standard for judging sharpness, a focus check in the form of aliasing (which can’t always be seen, heck, can’t often be seen by me) in tree branches. It also provides a clear differentiation between sagittal and tangential effects. I do you tree branches myself (with foliage) for some purposes, and they are useful, but I don’t think they are the best target for sample variation testing.
I’ve had people send me pictures of tree branches and have been unable to sort out what’s going on, and I can almost always do that with Siemens star pictures.
Hello – I just had a Sony 16-35 2.8 GM and Sony 55 1.8 delivered, and whilst the 55 seems great, the 16-35 exhibits noticeably decentered vignetting (heavier vignetting on the right of the frame), so I have done the test described above. Here are my results :
https://www.dropbox.com/sh/zslsxly65wkg0dh/AAA4SOfTgsBslbeu9M_FPDZPa?dl=0
I’m wondering what the diagonal artefact is on the right hand side of the circle? it’s most clear on the 35mm image. Also are there any other things I should be looking at? I’m tempted to send it back for another copy…
Thanks
The diagonal line is interesting. I don’t know what to make of it. If you want to try this test:
https://blog.kasson.com/lens-screening-testing/
and send me the raws, I’ll be happy to look at them for you.
A 16-inch target should be sufficient with those lenses.
Thanks for the response – I have done the test you linked to as best I can – I don’t have a large format printer but have printed cropped versions of the epson-80-block star at the correct size (410mm / 16″ for the full star) I hope there is enough detail. All shot on tripod, Manual Focus, IBIS/OSS Off, Electronic First Curtain Shutter On, Same focus, shutter and aperture for each set.
I have done the test 3 times, producing 9 shots for each, with the following settings :
Sony 16-35 2.8 GM – at 16mm f2.8 – 17m from cropped 410mm target
Sony 16-35 2.8 GM – at 16mm f4 – 12m from cropped 410mm target
Sony 16-35 2.8 GM – at 24mm f4 – 17m from cropped 410mm target
Here are links to the RAW file results, and a JPEG composite showing the crops laid out in a 3×3 grid as described, with no sharpening or lens profiles applied in the RAW developer :
https://www.dropbox.com/sh/yiu96bg98v5wa0c/AAA1WKxvaX2a99LgL-JlG9n5a?dl=0
https://www.dropbox.com/sh/t97hr1yd51bb145/AABx8FtqYj2MfFraJ65wCRNAa?dl=0
https://www.dropbox.com/sh/zyoqga2bue8qq9e/AABqQL3hxRfIiVByaKFEzurja?dl=0
Thanks for your help
16mm f/4, 12 m: Top-center is slightly softer than bottom center. The other opposites look pretty close. Very sharp on-axis.
16mm f/2.8, 17 m: Top-center is softer than the bottom center. The other opposites look pretty close.
24mm f/4, 17 m: Top-center is slightly softer than the bottom center. Right-center slightly softer than left-center. Corners not so great, but fairly symmetrical
I’d say that this is a pretty well-assembled lens, albeit not a perfect one. You might try a series at 16mm, f/2.8 focusing on the target when it’s at the top-center to see if the top-center softness is field flatness/tilt, or something else.
I’ve attempted to do this oof test with some of my lenses, but followed Dr Hank’s instructions to set the focus at 1 meter. You mention setting it at the closest focus possible. That’s quite a difference. I have the 90mm sony macro….it focuses a lot closer than 1 meter…obviously. And what about a fisheye lens? That’s an awful small point if focus is left at 1 meter. So…I will retry using your method of setting the focus as close as the lens allows.
I think this test is better for lens screening:
https://blog.kasson.com/lens-screening-testing/
my printer can do 13″ x 19″…do I need 16″ square? If so, where do I get those targets?
Not if you’re testing long slow lenses.
https://blog.kasson.com/lens-screening-testing/target-size-on-sensor-at-minimum-distance/
https://blog.kasson.com/lens-screening-testing/printable-siemens-star-targets/
Okay, I found the Zeiss Siemens target at B&H. That said, I rather print my own.
This is so interesting. I never of thought of this when buying new lenses. Glad I stumbled upon this. Do you mind taking a look at some of the test I did? I used your flashlight method but I also went outside and focused on a building in the distance, put the lens into manual focus (so as to not change focus), and took pictures of the same building in all four corners.
Sony 55mm f/1.8 (all photos were taken at 1.8)
-Flashlight photo: https://drive.google.com/open?id=1mZQVloWeCV-UNVy2MLt-30igU1vGpsDa
-Original building photo (for context): https://drive.google.com/open?id=1g9XL67F8ak11sTIS_19-XHjpHtaiXF7C
Corner test 1: https://drive.google.com/open?id=1tYGUp62YLBHlDxEIGv5oq9aeuI2HYWy9
Corner test 2: https://drive.google.com/open?id=1LTNooPnzzgJ7_eQ5YWRgbW_DLBuuJ3DO
Sony 24mm gm f/1.4 (all photos were taken at 1.4)
-Flashlight photo: https://drive.google.com/open?id=1JjlfqEH2_VtX6UpUoUUmes0sgFCRUrva
-Original building photo (for context): https://drive.google.com/open?id=1eL1W-68nwSUSdnKi-WXgFjgp8-hYnl1c
Corner test 1: https://drive.google.com/open?id=1vt0CgTKk0CRMdhh79XP_uUdfU4v-PvBx
Corner test 2: https://drive.google.com/open?id=1vSN8LQCtwg2A3dbBjd_J5Hlf1flxbFtV
If you do this test and send me the raws, I’ll take a look:
https://blog.kasson.com/lens-screening-testing/
I no longer think the flashlight test is very good; it’s too specific for decentering.