• site home
  • blog home
  • galleries
  • contact
  • underwater
  • the bleeding edge

the last word

Photography meets digital computer technology. Photography wins -- most of the time.

You are here: Home / The Last Word / Simulating Sony a7II camera motion blur

Simulating Sony a7II camera motion blur

April 24, 2015 JimK 7 Comments

I few days ago, I posted the results of simulating camera motion blur in a Sony alpha 7R (a7R), showing how the modulation transfer function, as measured by MTF50, varied with camera motion blur measured in pixels, and also showing simulated photographs with their motion distances and MTF50 values, so that you could see what the various MTF50 values translated to in terms of subjective impression of images.

Today, I’m doing something similar for the Sony alpha 7 Mark II (a7II). It’s turned out to be a little tricky because of the way that the a7II anisotropic antialiasing (AA) filter works. If you take a picture of a test chart like the ISO 12233 one, you’ll notice that the a7II doesn’t suffer any loss in resolution in the vertical direction (horizontal lines) due to the AA filter, but there’s a small amount of loss horizontally (vertical lines).

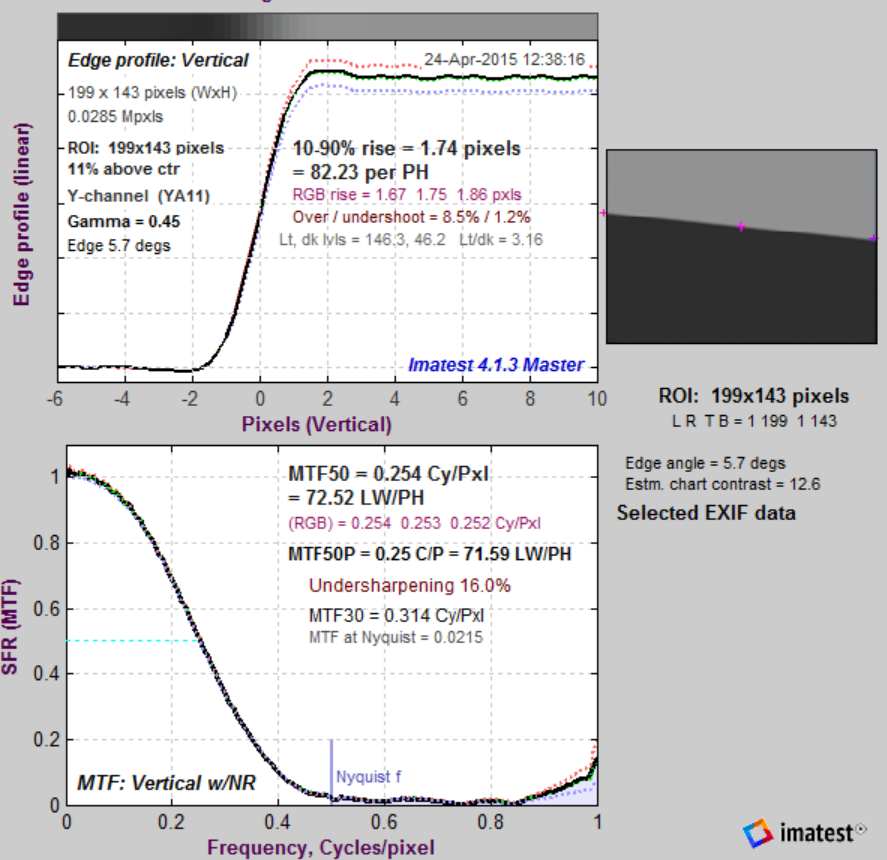
I added some features to the model so that I could emulate the behavior of the a7II’s AA filter. Here’s what Imatest‘s SFR function looks like for a conventional 4-way phase-shift AA filter and a horizontal edge with the 6um pixel pitch of the a7II and a simulated Zeiss Otus 55/1.4 set to f/5.6:

imatestboth

And here’s what it looks like with a vertical 2-way phase-shift AA filter:

imatestVAA


Almost identical, because the filter runs almost perpendicular to the slanted edge.

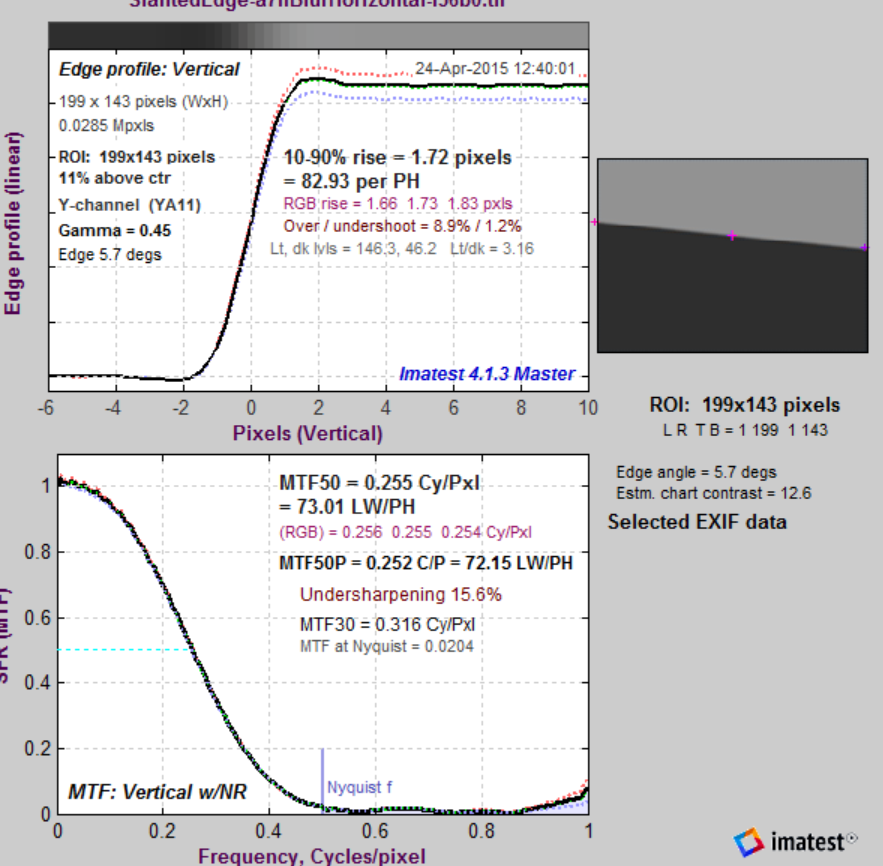
But things change if we simulate a horizontal 2-way phase-shift AA filter:

imatestHAA

Now the lens is resolving so much detail that there is significant aliasing. Not the overshoot. This is not due to deconvolution filtering, since I’m not using any. It is strictly a property of the Matlab implementation of the gradient-corrected linear interpolation demosaicing algorithm that I’m using.

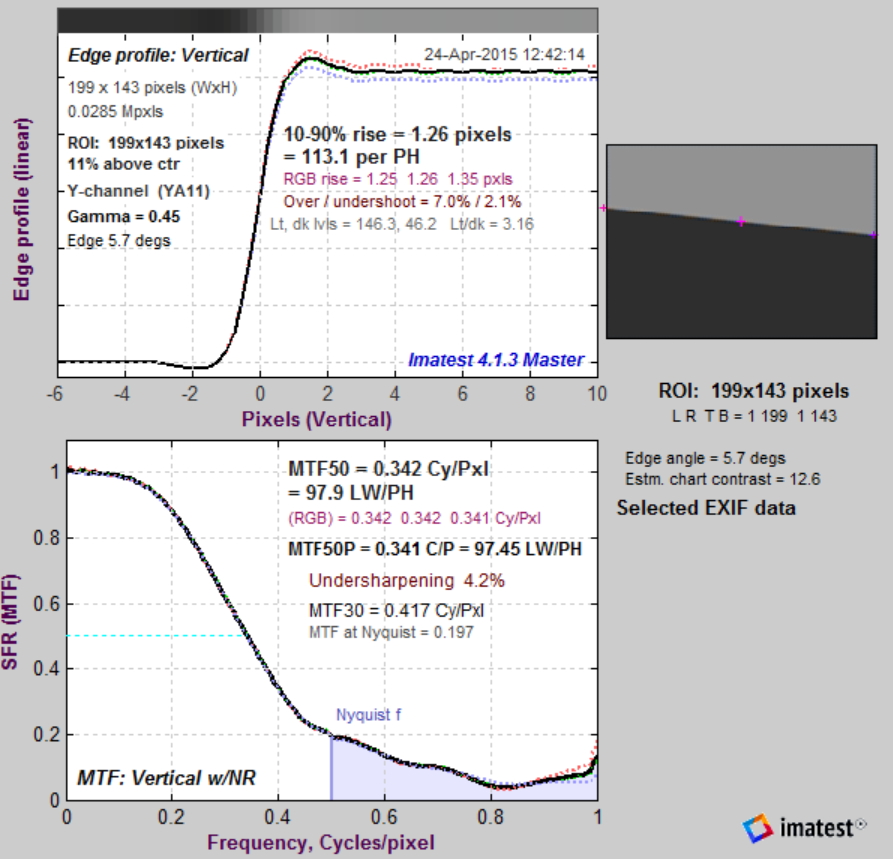
I set up a run of the simulator with various amounts of motion blur, modeled as linear, constant speed movement of the image across the sensor at a forty-five degree angle.  By the way, these things take a long time to run:

a7IIAAtiming

Here are the MTF50 numbers in cycles/picture height for a horizontal edge with displacements from 0 to 8 pixels at a 45 degree angle:

a7iiNtfstats
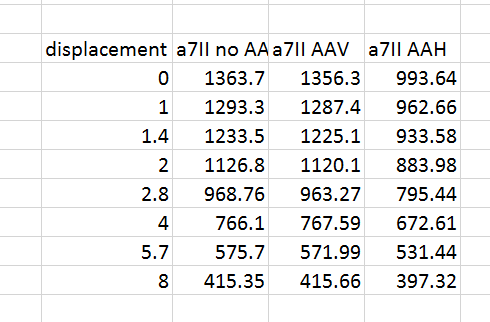
You can see that with a vertical AA filter (AAV), the results are essentially the same as with no AA filter. With a horizontal AA filter (AAH), the MTF50 is reduced considerably. That’s the price you pay for reduces aliasing.

Here are the 1:1 crops from the photographic scene enlarged 300%:

No motion blur -- MYF50V = 1356, MTF50H = 004
No motion blur — MYF50V = 1356, MTF50H = 1004


1 pixel motion blur -- MTF50V = 1287, MTF50H = 963
1 pixel motion blur — MTF50V = 1287, MTF50H = 963

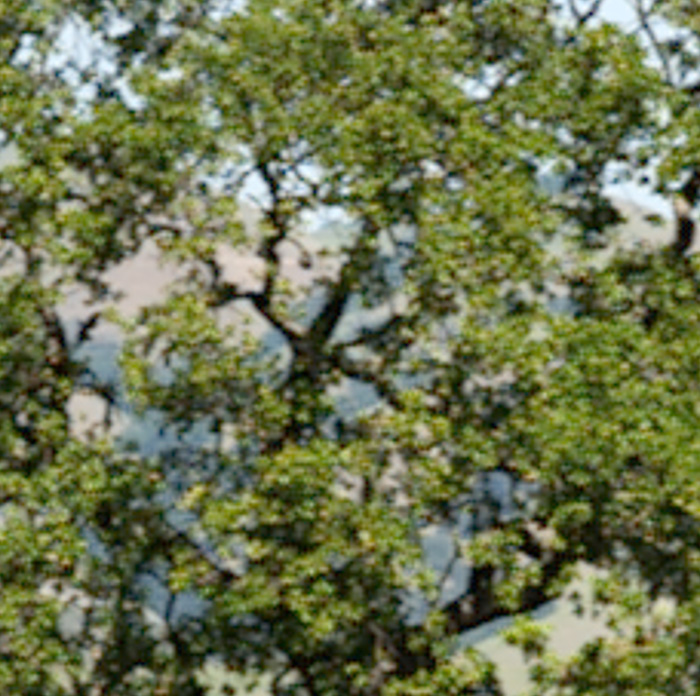
It’s really hard to see the effects of one pixel of camera motion blur in the a7II.

1.4 pixels motion blur -- MTF50V = 1225, MTF50H = 934
1.4 pixels motion blur — MTF50V = 1225, MTF50H = 934
2 pixels motion blur -- MTF50V = 1120, MTF50H = 884
2 pixels motion blur — MTF50V = 1120, MTF50H = 884
2.9 pixel motion blur -- MTF50V = 963, MTF50H = 795
2.8 pixel motion blur — MTF50V = 963, MTF50H = 795
4 pixel motion blur -- MTF50V = 769, MTF50H = 873
4 pixel motion blur — MTF50V = 769, MTF50H = 873
motion blur = 5.6 pixels == MTF50V = 572, MTF50H = 531
motion blur = 5.6 pixels — MTF50V = 572, MTF50H = 531
8 pixel motion blur -- MTF 50V = 416, MTF50H = 397
8 pixel motion blur — MTF 50V = 416, MTF50H = 397

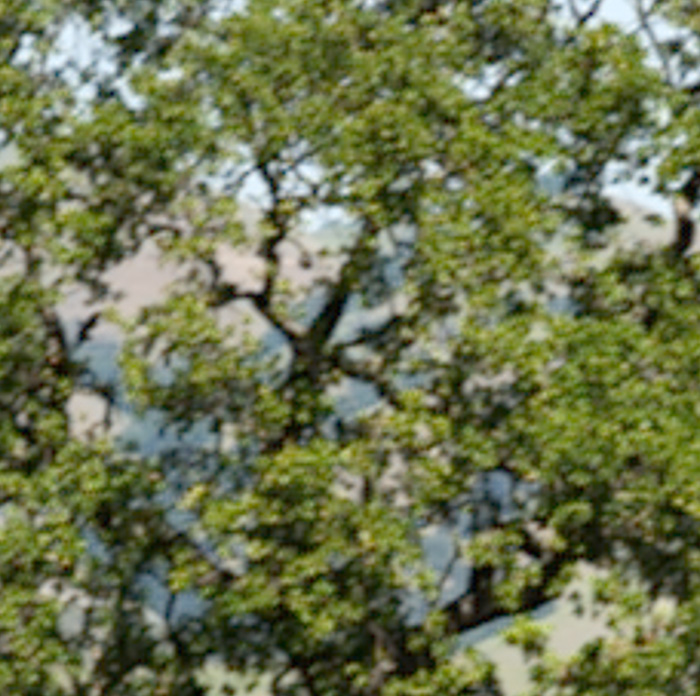
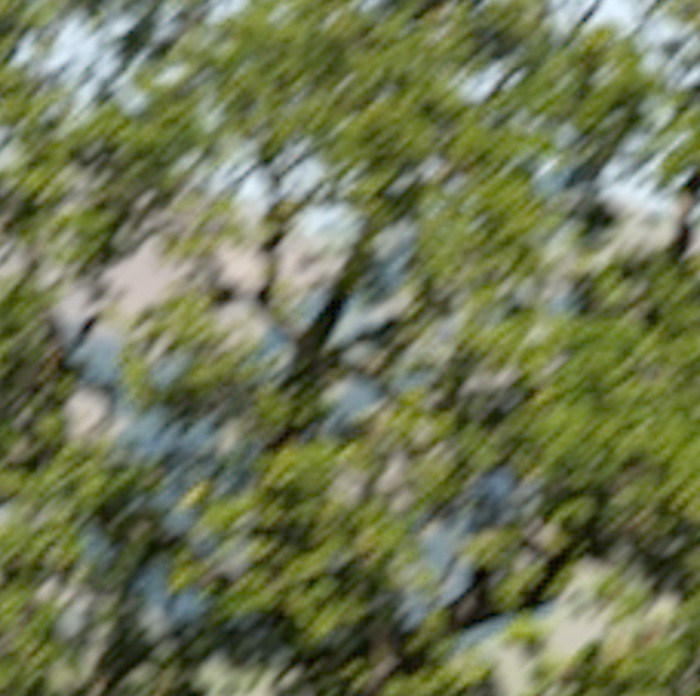
If you compare these images to the a7R motion blur images, remember that the pixels is the a7II  are 6 um apart, while the pixels in the a7R are 4.88 um apart. Therefor, one pixel blur represents more camera motion in the a7II case than for the a7R.


The Last Word

← The visibility of a7R shutter shock Sony a7II IBIS and sloppy technique →

Comments

  1. Chris Livsey says

    April 25, 2015 at 1:04 am

    I presume, always a dangerous extension of too little knowledge, that the MTF reduction is also seen with the D800 v D800E, but does the “two way zeroing” of the E filter reduce MTF compared to the 810?
    Apologies if you have already addressed this.

    Supplemental: Is the ZM 35mm f1.4 on its way, mine just arrived and physically it looks like it means business 🙂

    Reply
  2. Jack Hogan says

    April 25, 2015 at 4:06 am

    Hi Jim,
    wrt the over/undershoot, it’d be interesting to take a look at that demosaicing algorithm under the hood to see whether it does something similar to low-level deconvolution somewhere along the process. As a reference there is no sign of over/undershoots in ESFs from dcraw AHD (lmmse) and VNG or RT Amaze:
    http://www.strollswithmydog.com/raw-converter-sharpening-with-sliders-at-zero/

    Reply
    • Jim says

      April 25, 2015 at 7:15 am

      Jack, here’s a description of the algorithm:

      http://research.microsoft.com/en-us/um/people/lhe/papers/icassp04.demosaicing.pdf

      Jim

      Reply
    • Jim says

      April 25, 2015 at 7:17 am

      Jack, I have a Matlab implementation of AHD. Maybe I’ll give that a try. It’s not well documented…

      Reply
    • Jim says

      April 25, 2015 at 12:00 pm

      Jack, here’s all I can find about Matlab’s implementation, — essentially nothing:

      http://www.mathworks.com/help/images/ref/demosaic.html

      Jim

      Reply
  3. Max Berlin says

    May 14, 2015 at 8:33 am

    I’m old fashioned about these things.

    If I can carry the Zeiss 21mm, Otus 55mm and Apo-Sonnar 135mm then I can carry an RRS and use it most every shot. It just works.

    One spends thousands on good equipment and thousands getting to a destination and then leaves IQ to ‘sloppy technique’ just doesn’t make sense to me.

    It’s like storing and preserving a nice bottle of wine for 2 decades then leaving it in a hot car the day you plan to drink it.

    Reply

Trackbacks

  1. Modeling camera motion | The Last Word says:
    May 11, 2015 at 12:21 pm

    […] this post, I’d like to hark back to the simulations that I did of camera motions, and try to glean from slanted edge testing of handheld cameras whether I’m on the right […]

    Reply

Leave a Reply Cancel reply

Your email address will not be published. Required fields are marked *

May 2025
S M T W T F S
 123
45678910
11121314151617
18192021222324
25262728293031
« Apr    

Articles

  • About
    • Patents and papers about color
    • Who am I?
  • How to…
    • Backing up photographic images
    • How to change email providers
    • How to shoot slanted edge images for me
  • Lens screening testing
    • Equipment and Software
    • Examples
      • Bad and OK 200-600 at 600
      • Excellent 180-400 zoom
      • Fair 14-30mm zoom
      • Good 100-200 mm MF zoom
      • Good 100-400 zoom
      • Good 100mm lens on P1 P45+
      • Good 120mm MF lens
      • Good 18mm FF lens
      • Good 24-105 mm FF lens
      • Good 24-70 FF zoom
      • Good 35 mm FF lens
      • Good 35-70 MF lens
      • Good 60 mm lens on IQ3-100
      • Good 63 mm MF lens
      • Good 65 mm FF lens
      • Good 85 mm FF lens
      • Good and bad 25mm FF lenses
      • Good zoom at 24 mm
      • Marginal 18mm lens
      • Marginal 35mm FF lens
      • Mildly problematic 55 mm FF lens
      • OK 16-35mm zoom
      • OK 60mm lens on P1 P45+
      • OK Sony 600mm f/4
      • Pretty good 16-35 FF zoom
      • Pretty good 90mm FF lens
      • Problematic 400 mm FF lens
      • Tilted 20 mm f/1.8 FF lens
      • Tilted 30 mm MF lens
      • Tilted 50 mm FF lens
      • Two 15mm FF lenses
    • Found a problem – now what?
    • Goals for this test
    • Minimum target distances
      • MFT
      • APS-C
      • Full frame
      • Small medium format
    • Printable Siemens Star targets
    • Target size on sensor
      • MFT
      • APS-C
      • Full frame
      • Small medium format
    • Test instructions — postproduction
    • Test instructions — reading the images
    • Test instructions – capture
    • Theory of the test
    • What’s wrong with conventional lens screening?
  • Previsualization heresy
  • Privacy Policy
  • Recommended photographic web sites
  • Using in-camera histograms for ETTR
    • Acknowledgments
    • Why ETTR?
    • Normal in-camera histograms
    • Image processing for in-camera histograms
    • Making the in-camera histogram closely represent the raw histogram
    • Shortcuts to UniWB
    • Preparing for monitor-based UniWB
    • A one-step UniWB procedure
    • The math behind the one-step method
    • Iteration using Newton’s Method

Category List

Recent Comments

  • bob lozano on The 16-Bit Fallacy: Why More Isn’t Always Better in Medium Format Cameras
  • JimK on Goldilocks and the three flashes
  • DC Wedding Photographer on Goldilocks and the three flashes
  • Wedding Photographer in DC on The 16-Bit Fallacy: Why More Isn’t Always Better in Medium Format Cameras
  • JimK on Fujifilm GFX 100S II precision
  • Renjie Zhu on Fujifilm GFX 100S II precision
  • JimK on Fuji 20-35/4 landscape field curvature at 23mm vs 23/4 GF
  • Ivo de Man on Fuji 20-35/4 landscape field curvature at 23mm vs 23/4 GF
  • JimK on Fuji 20-35/4 landscape field curvature at 23mm vs 23/4 GF
  • JimK on Fuji 20-35/4 landscape field curvature at 23mm vs 23/4 GF

Archives

Copyright © 2025 · Daily Dish Pro On Genesis Framework · WordPress · Log in

Unless otherwise noted, all images copyright Jim Kasson.