the last word

Photography meets digital computer technology. Photography wins -- most of the time.

  • site home
  • blog home
  • galleries
  • contact
  • underwater
  • the bleeding edge
You are here: Home / The Last Word / Slit scan image processing

Slit scan image processing

September 2, 2014 JimK Leave a Comment

My silence over the last few days has not been because I’m on vacation. On the contrary, I’ve been really busy figuring out how to process the succulent slit-scan images. Doing it all in Matlab offers the most flexibility, but there’s not much interactivity. I create a set of parameters, process a bunch of images with them, wait a few minutes for the computer to do its work, look at the results, and think up a new set of parameters to try.

That works OK, but not really well, if there’s no clipping of the sharpened images to deal with. If there is, I’m at sea. I haven’t found a automagic way to deal with clipping like Topaz Detail 3 does, and messing around with some algorithms has given me great respect for the people who invented the Topaz Detail ones. It’s clear to me that I could spend weeks or months fiddling with code and still not come up with anything as good as Topaz has.

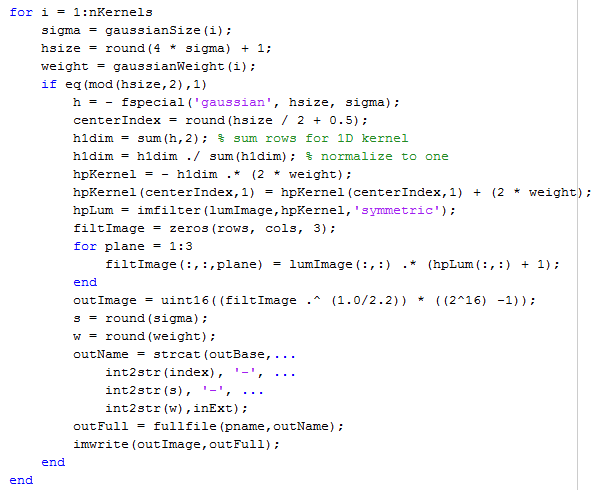
Therefor, I’ve redefined success. I’m just doing the higher-frequency (smaller kernel — say, up to 15 pixel sigma) sharpening one-dimensionally. I use Topaz Detail for the lower-frequency work. One reason I can do that is that the noise in the image is so low, and another is that I’m using the first pass of Topaz Detail on 56000×6000 pixel images, and I’ll be squishing them in the time (long) dimension later, so round kernels become elliptical after squeezing. Doing the 1D sharpening with small kernels makes visible clipping less likely.

Another important reason for my progress was that I’ve found a way to make the adjustments of the 1D image sharpening interactive. Rather than have the Matlab program construct the entire 1D filtered image, I’m having it write out monochromatic sharpened images at each kernel size, with aggressive (amazingly — at least to me — high) weights:

1dlumcode


Then I bring the original image plus layers for all the sharpened ones into Photoshop, and set the layer blend modes for the sharpened images to “Luminosity”:

1dlumlayers

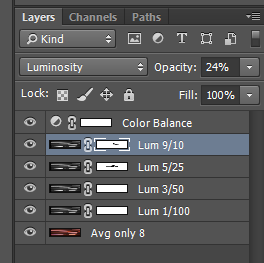
Then I adjust each layer’s opacity to taste. 

Finally, when I see objectionable clipping, I brush black into the layer mask for the layer(s) that are making it happen. 

Not mathematically elegant. Not really what I was looking for at all when I started this project. But it gets the job done, and well. 
I may run into a problem with this method down the road, but it’s working for me on the one image I’ve tried it on.

One thing I tried that sort of worked for dealing with highlight clipping was scaling the floating point image file so that the brightest value in any color plane was unity, saving that as a 32-bit floating point TIFF, importing that into Lightroom, and using that program’s tone mapping functions. Lr treats the data in 32-bit FP files as scene-referred, so the tools are appropriate for dealing with clipping. For example, Lr’s Exposure tool produces non-linear saturation.

The technique worked moderately well, but I had some problems in the shadow areas. I decided to abandon it, and so I never got to the more difficult problem of what to do about black clipping. I did notice that Lr truncates negative values in 32-bit FP TIFFs.


The Last Word

← One-dimensional sharpening Matlab meets a new slit-scan image →

Leave a Reply Cancel reply

Your email address will not be published. Required fields are marked *

March 2023
S M T W T F S
 1234
567891011
12131415161718
19202122232425
262728293031  
« Jan    

Articles

  • About
    • Patents and papers about color
    • Who am I?
  • Good 35-70 MF lens
  • How to…
    • Backing up photographic images
    • How to change email providers
  • Lens screening testing
    • Equipment and Software
    • Examples
      • Bad and OK 200-600 at 600
      • Excellent 180-400 zoom
      • Fair 14-30mm zoom
      • Good 100-200 mm MF zoom
      • Good 100-400 zoom
      • Good 100mm lens on P1 P45+
      • Good 120mm MF lens
      • Good 18mm FF lens
      • Good 24-105 mm FF lens
      • Good 24-70 FF zoom
      • Good 35 mm FF lens
      • Good 60 mm lens on IQ3-100
      • Good 63 mm MF lens
      • Good 65 mm FF lens
      • Good 85 mm FF lens
      • Good and bad 25mm FF lenses
      • Good zoom at 24 mm
      • Marginal 18mm lens
      • Marginal 35mm FF lens
      • Mildly problematic 55 mm FF lens
      • OK 16-35mm zoom
      • OK 60mm lens on P1 P45+
      • OK Sony 600mm f/4
      • Pretty good 16-35 FF zoom
      • Pretty good 90mm FF lens
      • Problematic 400 mm FF lens
      • Tilted 20 mm f/1.8 FF lens
      • Tilted 30 mm MF lens
      • Tilted 50 mm FF lens
      • Two 15mm FF lenses
    • Found a problem – now what?
    • Goals for this test
    • Minimum target distances
      • MFT
      • APS-C
      • Full frame
      • Small medium format
    • Printable Siemens Star targets
    • Target size on sensor
      • MFT
      • APS-C
      • Full frame
      • Small medium format
    • Test instructions — postproduction
    • Test instructions — reading the images
    • Test instructions – capture
    • Theory of the test
    • What’s wrong with conventional lens screening?
  • Previsualization heresy
  • Privacy Policy
  • Recommended photographic web sites
  • Using in-camera histograms for ETTR
    • Acknowledgments
    • Why ETTR?
    • Normal in-camera histograms
    • Image processing for in-camera histograms
    • Making the in-camera histogram closely represent the raw histogram
    • Shortcuts to UniWB
    • Preparing for monitor-based UniWB
    • A one-step UniWB procedure
    • The math behind the one-step method
    • Iteration using Newton’s Method

Category List

Recent Comments

  • JimK on Fujifilm GFX 100S pixel shift, visuals
  • Sarmed Mirza on Fujifilm GFX 100S pixel shift, visuals
  • lancej on Two ways to improve the Q2 handling
  • JimK on Sony 135 STF on GFX-50R, sharpness
  • K on Sony 135 STF on GFX-50R, sharpness
  • Mal Paso on Christmas tree light bokeh with the XCD 38V on the X2D
  • Sebastian on More on tilted adapters
  • JimK on On microlens size in the GFX 100 and GFX 50R/S
  • Kyle Krug on On microlens size in the GFX 100 and GFX 50R/S
  • JimK on Hasselblad X2D electronic shutter scan time

Archives

Copyright © 2023 · Daily Dish Pro On Genesis Framework · WordPress · Log in

Unless otherwise noted, all images copyright Jim Kasson.