In the last post, I went through the reasoning that made me decide that the Betterlight scanning back isn’t the right tool for the firehouse project. Thinking about a scanning back got me onto another way to get really high resolution: stitching. I figure for macro work, I’m not restricted to the usual “swing the lens around the nodal point” approach. I could try lateral and vertical shifts of the camera. That should be easier to stitch than rotations. I could use a tripod column for the vertical shifts and a long rail for the lateral ones.
However, if I’m to use available light, there’s a potential problem: all that shifting gear – and even rotating gear – makes the rig unsteady, and thus prone to having vibration affect image sharpness. So I need a camera that doesn’t vibrate much. I have an ancient (by digital photographic standards) Hasselblad H3D-39 that I haven’t used in years. With its leaf shutter, it shouldn’t shake much. I dug it out of an infrequently accessed cabinet, and attempted to fire it up. The camera part appears to work, but not the back. I’ll see if it’s fixable at a price that’s not almost what it’s worth when working.
Then I thought of another possibility, the Sony alpha 7, henceforth known as the a7. Not the R version, but the cheaper 24 megapixel camera with the electronic first curtain shutter. It should be nearly vibration-free. I could shoot three by three arrays, and with generous overlap I’d have 100 or 120 megapixels. I could probably expose such an array in a minute or two. I might even be able to focus stack two or three layers, but that’s a low-probability thing because the stitching will probably introduce distortion that varies from array to array.
Anyway, it’s worth a try. I got an a7 to experiment with. The first thing I did was check for shutter shock using the ISO 12233 target. Those of you you’ve been reading this blog for a while know the drill, but I’ll repeat it here for newcomers.
I set up this gear: Leica 135mm f/3.4 APO Telyt on an a7 with a Metabones adapter, RRS a7 L-bracket, Arca Swiss C1 Cube, RRS TVC-44 legs. Release was with the 2 second self-timer. ISO 100, lens set at f/5.6. ISO 12233 target with the camera at a distance to yield an active area 775 pixels high. Thus, the lines labeled “8” represent 1 line pair per pixel pair.
Target illumination for the continuous lighting images was provided by a single Fotodiox LED-200WA-56 lamp, using the supplied reflector. Lighting for the strobe images came from a Paul Buff Einstein 640 watt-second flash set to 2.5 watt-seconds. At this power setting, the flash duration is about 1/13000 second. As a further measure to mitigate shutter shock affecting the strobe images, the camera was set to trailing curtain synch and the shutter to 2 seconds.
For the continuous-lighting pictures, the camera was set to 1/400 second with Fotodiox at maximum output. An exposure was made. Then the shutter was set 1/3 stop slower, the Fotodiox adjusted to give the same meter reading, and another shot taken. That process was repeated all the way to the lowest non-zero Fotodiox output and 1/3 second.
I processed the images in Lightroom with the default settings, corrected for minor exposure differences, and exported the files to Lightroom as layers. I labeled the layers with the exposure times and compared them. The images that I’m posting here are crops from the upper right-hand corner, enlarged 3x using nearest neighbor, and JPEG’d. Because of the way that Photoshop handles EXIF data from images composed of multiple layers, the EXIF data for the posted images is bogus. If anyone would like to see the Photoshop stack, please contact me.
Here’s the strobe-lit image:
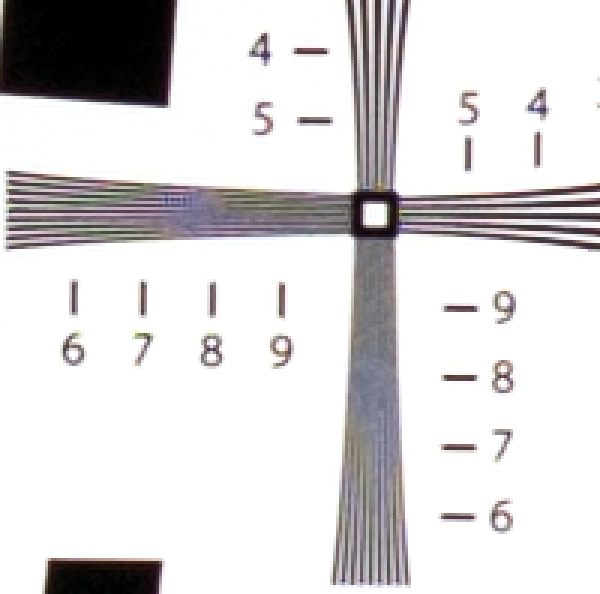
There are a few things worth noting:
- Because this is a 24 megapixel camera, the pixels are bigger than the pixels of the a7R or the D800E. If you’re going to compare these ISO 12233 images to those of the other two cameras – and I encourage you to do so – you should keep that in mind. The a7 appears sharper than the a7R under similar strobe-lit circumstances, but that’s because it’s got bigger pixels.
- There is much less aliasing than with the a7R, even with the bigger pixels, because of the a7’s anti-aliasing filter. However, there are still some muted false color artifacts (look above the “6” and the “7” in the horizontal lines) and some luminance errors (look what appears to be vertical black lines above the “8”).
- The horizontal lines are better resolved than the vertical ones. Since the strobe duration is so short, I put this down to an anti-aliasing filter that operates more strongly in one orientation than the other.
- On the horizontal lines, the camera/lens combination is resolving at the sensel level, albeit with moderate contrast. This is very good performance, especially considering the presence of the anti-aliasing filter.
- On the vertical lines, the camera/lens combination is just barely resolving at the sensel level.
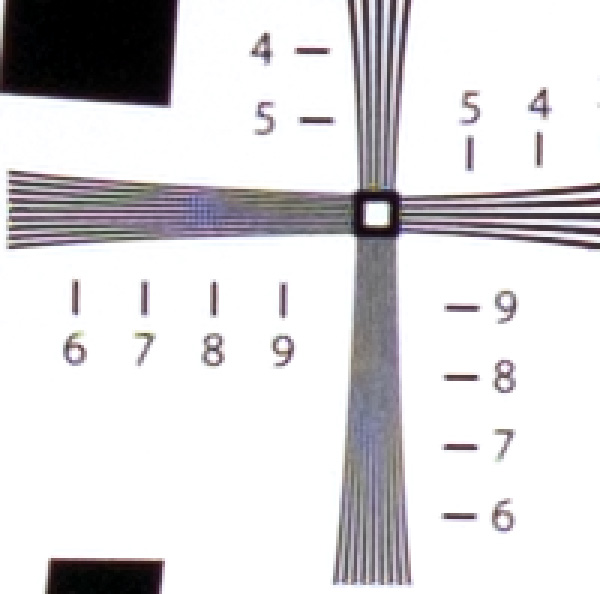
At 1/400 second, the image is very close to the strobe-lit image, with slightly lower contrast that is probably the result of the different lighting angles:
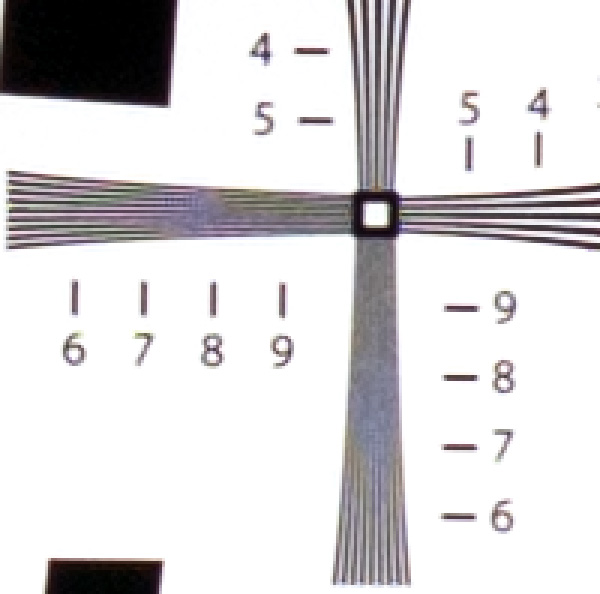
At 1/100 second, usually a bad shutter speed for the a7R, we’ve lost a tiny bit of resolution. That results in less aliasing in the horizontal lines above the “8”. You’d never see this in a photograph of something other than a test target:
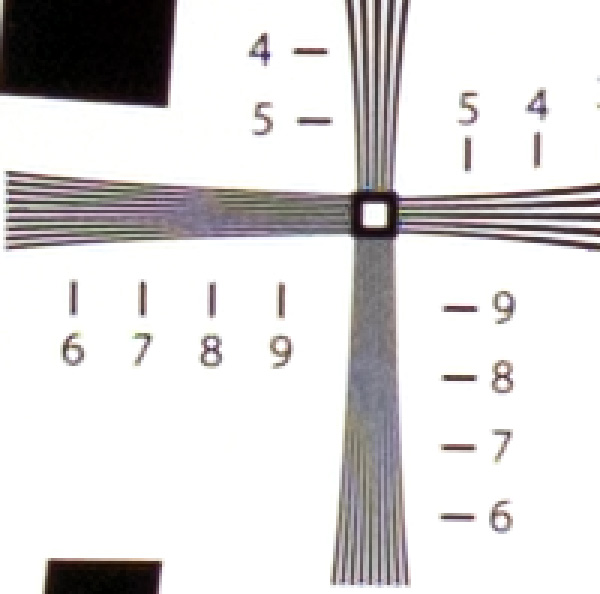
1/3 second is slightly better in the horizontal lines and slightly worse on the vertical ones. Again, you’d never see this in a photograph of something other than a test target:
This is remarkable performance. The a7 is less prone to vibration blur than the D800E with the mirror locked up. However, the D800E starts off with a disadvantage, since by virtue of its greater pixel density it takes less motion to cause the same amount of blur when you’re pixel peeping. And, of course, the a7 is less prone to vibration blur than the a7R.
Leave a Reply