• site home
  • blog home
  • galleries
  • contact
  • underwater
  • the bleeding edge

the last word

Photography meets digital computer technology. Photography wins -- most of the time.

You are here: Home / The Last Word / Traveling with the Leica M240, part 5

Traveling with the Leica M240, part 5

October 20, 2013 JimK Leave a Comment

Ray-angle problems

Because of the short flange distance of the M-series Leicas, there have been difficulties with situations where the light from the lens intercepts the sensor at angles greatly different from ninety degrees. This occurs at the edges (normally mostly the short edge) and corners of the image, and can be pronounced for short lenses. The effect can be seen as magenta or green color shifts in those regions, or occasionally, the “Italian flag” effect, where one side gets a green tinge and the other a magenta one. Leica has been on top of this since the beginning, and in the M9, for lenses that the camera recognized, the firmware did a credible job of producing a corrected raw file.

Has there been any backsliding with the M240? It appears not. The 18mm Super-Elmar is about as difficult a lens as Leica makes – the 16/18/21 Tri-Elmar is easier, even at 16mm, because it is a retrofocus design – so I was interested in seeing if there were any problems.

Here’s a challenging image, with the contrast kicked up to emphasize any problems:

L1003355-Edit

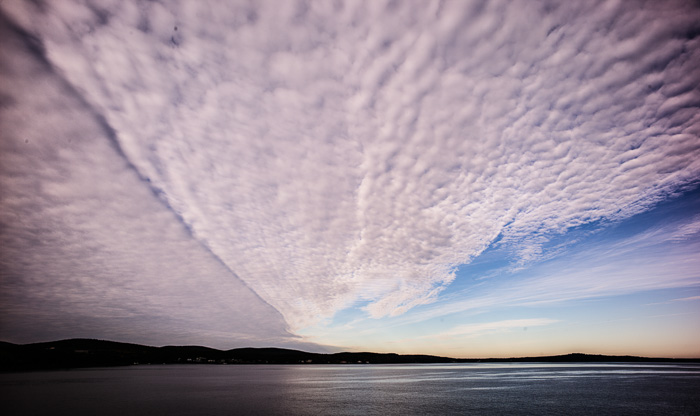
Bar Harbor Sunrise. 18mm SE, f/8 @ 1/350, ISO 200

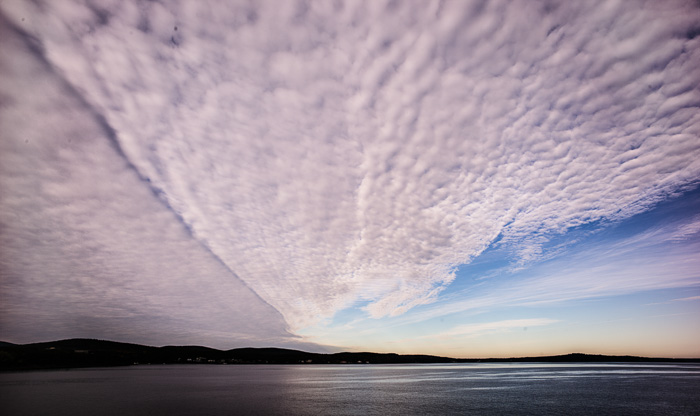
There’s very little corner color shift. There’s quite a bit of light falloff, but that would occur even with film. It’s pretty easy to fix with a curves layer (I like to leave some to draw the eye to the center of the image):

L1003355-Edit-2

Good job, Leica. I haven’t done much testing on other wide-angle lenses, but I would expect comparable results. Note: the Canadian images were made with firmware version  1.1.0.2. There’s a new firmware image out: 2.0.0.11. Among other things, it’s supposed to have better lens profiles. I’ve updated my camera, but have done no testing since.

The Last Word

← Traveling with the Leica M240, part 4 Traveling with the Leica M240, part 6 →

Leave a Reply Cancel reply

Your email address will not be published. Required fields are marked *

May 2025
S M T W T F S
 123
45678910
11121314151617
18192021222324
25262728293031
« Apr    

Articles

  • About
    • Patents and papers about color
    • Who am I?
  • How to…
    • Backing up photographic images
    • How to change email providers
    • How to shoot slanted edge images for me
  • Lens screening testing
    • Equipment and Software
    • Examples
      • Bad and OK 200-600 at 600
      • Excellent 180-400 zoom
      • Fair 14-30mm zoom
      • Good 100-200 mm MF zoom
      • Good 100-400 zoom
      • Good 100mm lens on P1 P45+
      • Good 120mm MF lens
      • Good 18mm FF lens
      • Good 24-105 mm FF lens
      • Good 24-70 FF zoom
      • Good 35 mm FF lens
      • Good 35-70 MF lens
      • Good 60 mm lens on IQ3-100
      • Good 63 mm MF lens
      • Good 65 mm FF lens
      • Good 85 mm FF lens
      • Good and bad 25mm FF lenses
      • Good zoom at 24 mm
      • Marginal 18mm lens
      • Marginal 35mm FF lens
      • Mildly problematic 55 mm FF lens
      • OK 16-35mm zoom
      • OK 60mm lens on P1 P45+
      • OK Sony 600mm f/4
      • Pretty good 16-35 FF zoom
      • Pretty good 90mm FF lens
      • Problematic 400 mm FF lens
      • Tilted 20 mm f/1.8 FF lens
      • Tilted 30 mm MF lens
      • Tilted 50 mm FF lens
      • Two 15mm FF lenses
    • Found a problem – now what?
    • Goals for this test
    • Minimum target distances
      • MFT
      • APS-C
      • Full frame
      • Small medium format
    • Printable Siemens Star targets
    • Target size on sensor
      • MFT
      • APS-C
      • Full frame
      • Small medium format
    • Test instructions — postproduction
    • Test instructions — reading the images
    • Test instructions – capture
    • Theory of the test
    • What’s wrong with conventional lens screening?
  • Previsualization heresy
  • Privacy Policy
  • Recommended photographic web sites
  • Using in-camera histograms for ETTR
    • Acknowledgments
    • Why ETTR?
    • Normal in-camera histograms
    • Image processing for in-camera histograms
    • Making the in-camera histogram closely represent the raw histogram
    • Shortcuts to UniWB
    • Preparing for monitor-based UniWB
    • A one-step UniWB procedure
    • The math behind the one-step method
    • Iteration using Newton’s Method

Category List

Recent Comments

  • JimK on Sony 135 STF on GFX-50R, bokeh visuals
  • Manu on Sony 135 STF on GFX-50R, bokeh visuals
  • John Griffin on The 16-Bit Fallacy: Why More Isn’t Always Better in Medium Format Cameras
  • JimK on How Sensor Noise Scales with Exposure Time
  • Štěpán Kaňa on Calculating reach for wildlife photography
  • Štěpán Kaňa on How Sensor Noise Scales with Exposure Time
  • JimK on Calculating reach for wildlife photography
  • Geofrey on Calculating reach for wildlife photography
  • JimK on Calculating reach for wildlife photography
  • Geofrey on Calculating reach for wildlife photography

Archives

Copyright © 2025 · Daily Dish Pro On Genesis Framework · WordPress · Log in

Unless otherwise noted, all images copyright Jim Kasson.