This is the 35th in a series of posts on the Fujifilm GFX-50S. The series starts here.
In the previous post, I did some testing of manual focus on-axis sharpness with the Fuji 120 mm f/4 macro lens, and compared the results with autofocusing. Now I’m going to so the same thing for the 63 mm f/2.8 “normal” lens.
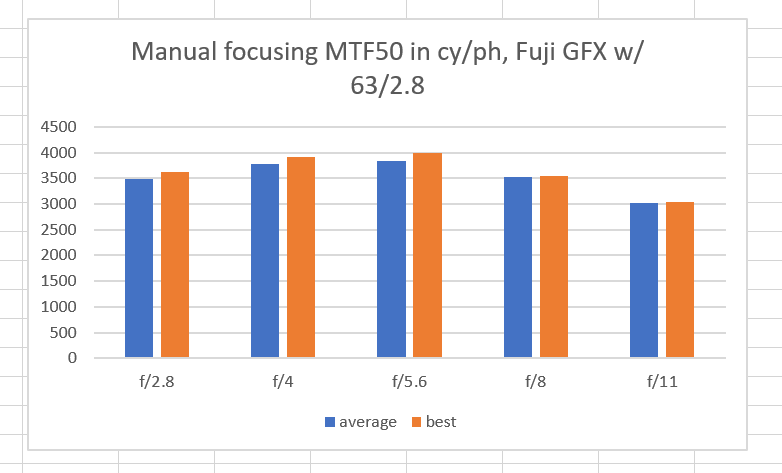
I focused using maximum magnification and the low red setting for focus peaking. Focusing was performed at the taking aperture. Here are the results of four sets of three shots at each aperture, with each of the three shots with identical focus averaged, with two obvious misfocusings thrown out.
This looks about like what you’d expect. It was easier to focus the 63 in this situation than the 120, because the 63 is not as sharp as the 120, and the zone plate focus target was smaller. Still, I did blow the focusing twice.
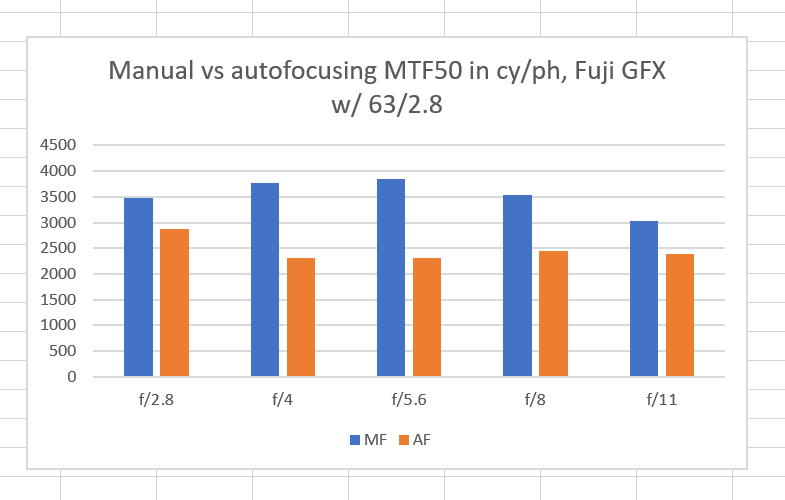
Let’s compare the average results to those for autofocus:
With the 63, manual focusing is better everywhere on the graph, and it is especially better at the three problematical autofocusing apertures identified previously: f/4, f/5.6, and f/8.
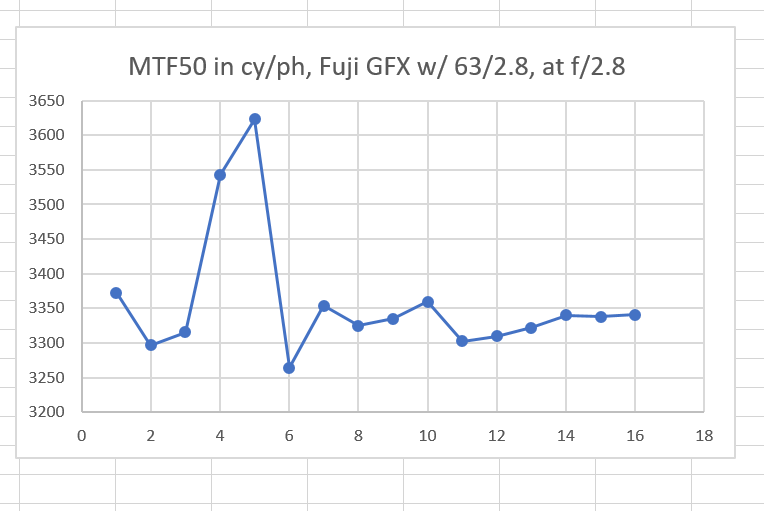
When I was making the tests, I did observe that the focus point shifted slightly sometimes from the beginning to the end of the three-shot sequences that followed each focus attempt. In order to get a handle on that, I opened up the lens all the way, focused once, and made 16 shots:
You can see that there was a shoift of focus for the 4th and 5th shots, and — Murphy being on vacation today — it was in a direction which corrected for some of my initial focusing error. The difference between 3600 and 3300 cycles per picture height is not something you’re likely to notice in real-world photographs, but I think this is one of the downsides of focus-by-wire.
A few details follow.
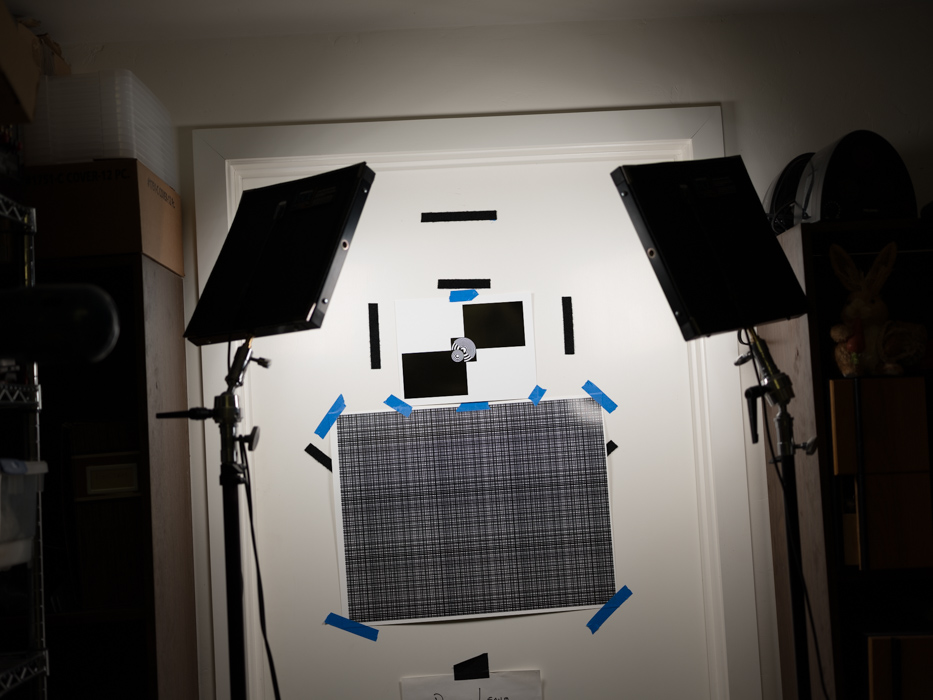
Here’s the scene:
The chart is straight and the camera is tilted to get the right slanted edge angle. Note the zone plate focusing target.
Here are the test conditions:
- ISO 100.
- 5000K illumination, bright enough so that the f/2.8 exposure was 1/320 second
- Target distance 3 meters
- EFCS on
- Lens set to C mode, and aperture controlled from the camera
- Shutter set to A mode.
- + 2/3 stop exposure compensation
- Internal self timer at 2 seconds
- RRS heavy-duty legs
- Arca-Swiss C1 head
Images developed in Lightroom with default settings except for custom white balance to the target white. Lightroom does provide some sharpening under those conditions, which explains why some of the MTF50 values are beyond the Nyquist frequency for the camera.


Jack Hogan says
I know it may be a bit late now but does it make sense to look at sharpened images? The sharpening may paint over some of the subtleties of what’s actually going on. I think it may also be worthwhile to try these tests on a camera/lens combination known to focus well in order to establish a realistic expectation baseline.
JimK says
Yes, I would have used MTF Mapper, but I can’t get it to deliver reliable results for these tests without a lot of tweaking. The blue channel stopped working for one recent series of images, an I have no idea what is different about them. I think the important part about this series is that the sharpening not change during one series, which means it shouldn’t change with shutter speed or f-stop. I see no evidence that Lr has such changes.
As to the baseline, we have motorized rail results using MTF Mapper for the GFX with both of the native fixed-focal-length lenses and the Otus 85, and for the a7RII with the Otus 85.
Frans van den Bergh says
Hi Jim,
Please do not hesitate to send me an email if you have a problem with MTF Mapper.
To fully automate the test with MTF Mapper, you would have to alter the test chart a little. The manual focusing pattern in the centre will typically be ignored by MTF Mapper, however, your two target rectangles overlap with the focusing pattern, which will cause MTF Mapper to ignore your large rectangles. Of course, if you crop out the edges before sending them to MTF Mapper, it should work (and I’d be happy to help debugging it).
What I would propose is to break up each of the two large rectangles into two smaller bars (one vertical one horizontal), similar to the other bars I see in your photo above. If these bars do not touch the focusing target, MTF Mapper should be able to pick them up. As long as the bars are at least 25 pixels wide (in their narrow dimension), all should be well, since the slanted edge method would not use the rest of the pixels in those large black rectangles anyway.
Then you can automate the process completely with dcraw and MTF Mapper.
-F
JimK says
Thanks for the offer. Right now, I just want to get the bulk of this review done and get back to making photographs, so it may be a while before I take you up on it. That doesn’t mean that I’m not grateful.
I always feed MTF Mapper images cropped to the ROI, so I can use any target I want, I think.
JimK says
Thanks for the suggestion, Frans. I just got back to the program. Lowering the threshold helped, but when I got the blue channel OK with a 160×160 pixel ROI I ran into problems on the green channel. I lowered the ROI to 100×100 pixels, and with a threshold of 0.3, it now works for at least part of the problem dataset. One of the issues I have with these motorized rail images is that there is so much variation in sharpness from the in-focus part to the severely OOF part of the dataset. I may experiment with making the ROI even smaller.
JimK says
Jack, I reran the images of the two AF series through dcraw and Imatest, looking at the Gr channel. I’ve added them to the relevant posts. They are somewhat different (in the case of the 120, I was surprised by how much), but the conclusions about the focusing systems remain pretty much unchanged.
Thanks for keeping me honest on this one. By the way, I run hot and cold about how to calculate the MTF50 in cy/ph from the values in cy/px. In this case I multiplied by the height of the green channel image, but I think it’s fairer to multiply by height of the whole image as I’ve done in the past.
Jack Hogan says
Hi Jim,
1) With demosaiced images the size of the green channel plane is full sized, so if MTF readings are taken off that in units of c/p it is correct to multiply them by the number of pixels in the full image height to get lp/ph.
2) With dcraw -d (or -D) followed by MTF Mapper’s –bayer green (or red or blue) switch, MTF Mapper projects just the green pixels (both Gr and Gb) from the full sized rggb CFA file onto the normal to get the LSF, so its MTF readings in c/p refer to the full sized image and should again be multiplied by the number of pixels in the full image height to get lp/ph.
3) If instead MTF Mapper (or Imatest I presume) is fed an image whose contiguous pixels correspond to every other pixel in the original CFA raw image (e.g. single raw plane green = cfa(1:2:end,2:2:end) or RawDigger/Export/RawChannel/HalfSize) then the readings refer to pixels that were physically squished together by a factor of two, so the resulting resolution in c/p will be twice what it actually was on the full sized image. So you can either divide the relative frequencies by two and multiply the resulting c/p readings by the number of pixels in the full image height to get lp/ph or you multiply them as they are by half the image height 🙂
Imho 2) is vastly superior to the other two for this kind of testing because 1) introduces distortions due to the demosaicing algorithm used and 3) is less precise, because the accuracy of the slanted edge method gets worse with increasing frequency.
Clear as mud?
Jack
JimK says
Imatest does take the undemosaiced image from dcraw and operate on it, but (probably) does the analysis and (certainly) reports the results as if it were looking at the image from one plane. I will make the corrections as you say for consistency.
JimK says
WRT the baseline, you could look at the Batis 85 AF testing I did a while back, the one with the “John Henry” theme. Although it’s not a perfect autofocusing lens, which was the point of the test.