This is one in a series of posts on the Fujifilm GFX 100. You should be able to find all the posts about that camera in the Category List on the right sidebar, below the Articles widget. There’s a drop-down menu there that you can use to get to all the posts in this series; just look for “GFX 100”. Since the last graph compares the GFX 100 to the Sony a7RIV, I’ve also included it in that category.
I somehow injured my left foot (I wish I knew how), and have had to mostly stay off it for the last few days. While I was involuntarily immobile, I wrote Matlab code to automate the number crunching and graphing for the IBIS tests that I had formerly done in Excel. The graphs now have more information, and I find them more useful. I hope that you do, too.
I decided to test the IBIS of the Fujifilm GFX 100 with the Fuji 110mm f/2, and by using lens the way that I think almost everyone doing handheld work with it will: in autofocus mode. Except when I’m testing, I almost never use manual focus with an autofocus lens unless the camera is on a tripod. I also decided to try a new shooting position. I have done all my IBIS testing up to now standing, with my left foot pointed at the target and my right foot 90 degrees clockwise from that orientation. I planned to test the a7RIV, a7RIII, and the GFX 100 in one session, and figured that would mean standing up for about an hour, which is more than I can do with my foot in its present condition, so I decided to sit on an armless rolling secretary’s chair for the captures. I held the camera in a modified Pete Turner grip: right hand on the camera grip, left palm on the bottom of the camera, and left fingers extended to just short of the focusing ring on the lens.
I noticed right away that I was a lot steadier seated than standing — I could keep the target centered much better. I thought that maybe I could forgo the automatic alignment step in post, but it turned out that I wasn’t that steady. Here’s what the camera saw:
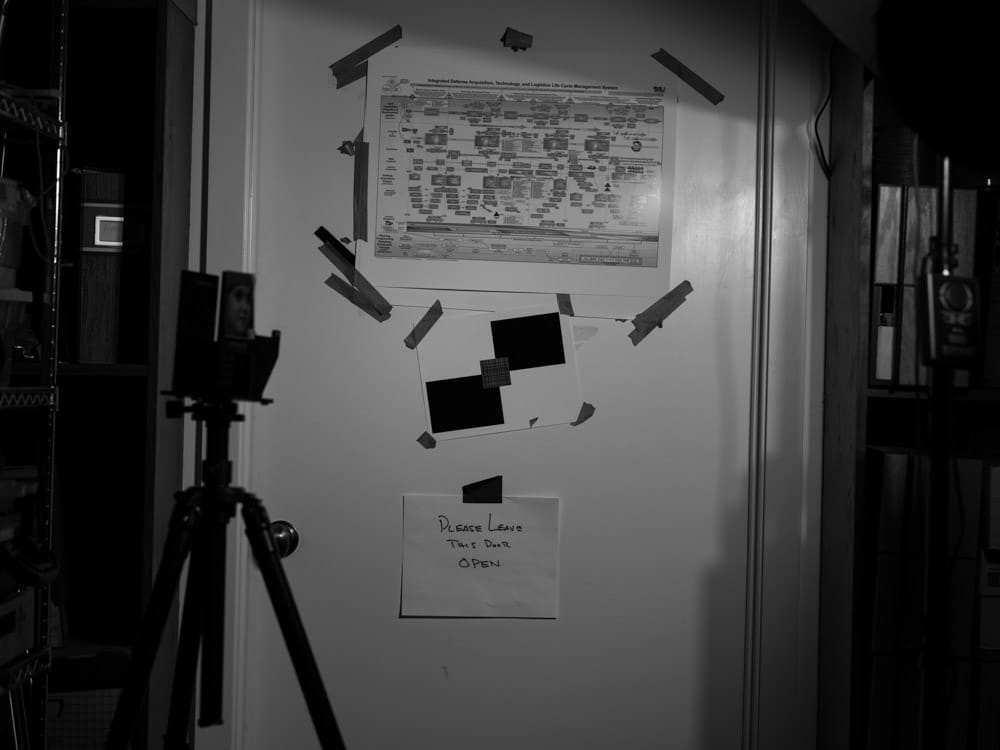
The slanted edge target is in the middle. The crosshatched pattern is one that I got from Horshack, and makes it easy for autofocus systems to acquire accurate focus.
I used the following test conditions:
- AF-C
- Medium spot, centered
- Focus priority
- Continuous low drive mode
- Electronic shutter
- Lossless compressed Raw
- ISO 100
- f/4
- Exposure mode A, center weighting
- Aputure 120d II LED, 12-inch parabolic reflector, remotely controlled
With IBIS on, I turned the light up all the way, which gave me a shutter speed of about 1/400 second. I made about 25 continuous-drive exposures, turned the light down about a stop, and did it again. I kept on doing that until the 1/25 second, then turned IBIS off and ran the series again.
I ended up with about 300 images. I developed them in Lightroom, with default settings except for the following:
- White balance set to flash
- Adobe monochrome profile
- Sharpening turned off
- Noise reduction turned off
Using my automatic registration program, I adjusted the cropping in Lightroom for each image so that they were centered. I computed the MTF50 — a nice proxy for sharpness — for all the images with Imatest with the region of interest being a horizontal edge (Just to make sure, I also looked at vertical edges, with about the same results, but those data aren’t presented here). Imatest spit out the data in cycles per pixel. With my new Matlab code, I converted that to cycles per picture height to put both cameras on more of an even footing.
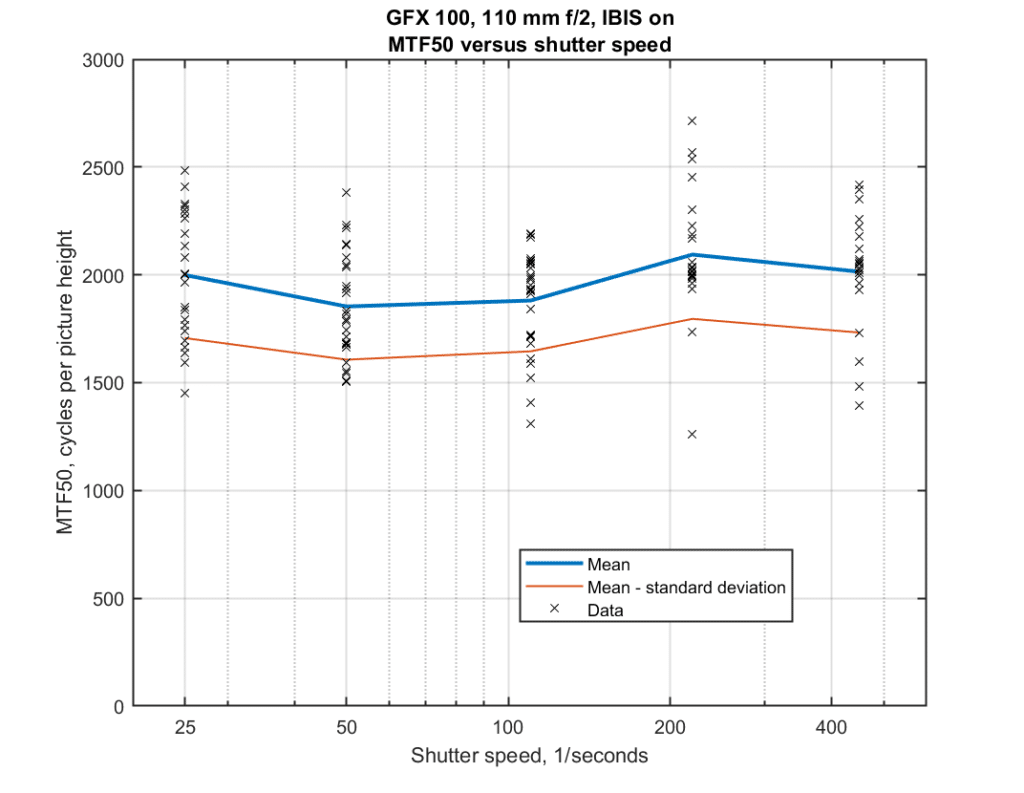
The vertical axis is the MTF50 in cycles per picture height. The horizontal axis is the denominator of the shutter speed — 1/100 second is plotted as 100. The heavy lines are the mean (aka mu, aka average) values. The thinner lines are the mean minus the standard deviation (aka sigma). The black x’s are the individual exposures. This is pretty spectacular performance. Most people are going to consider anything with an MTF50 of over 1500 cy/ph to be very sharp. There is virtually no difference in mean sharpness at all the shutter speeds tested. The same is true of scatter. In this test, autofocus errors are included in the results, which may contribute to the scatter.
With IBIS turned off:

Looks like the camera jumped back and forth between 1/40 and 1/50 second for that set. The results at 1/200 second are pretty sharp, and at 1/100 they’re marginal. Note the outlier at 1/100 second and MTF50 = 2700. You usually think of camera motion causing only blur, but if the planets align just right, it can sharpen a portion of the image. In real life, this is completely irrelevant, but you see it in testing sometimes.
Plotting both IBIS and non-IBIS means and standard deviations:
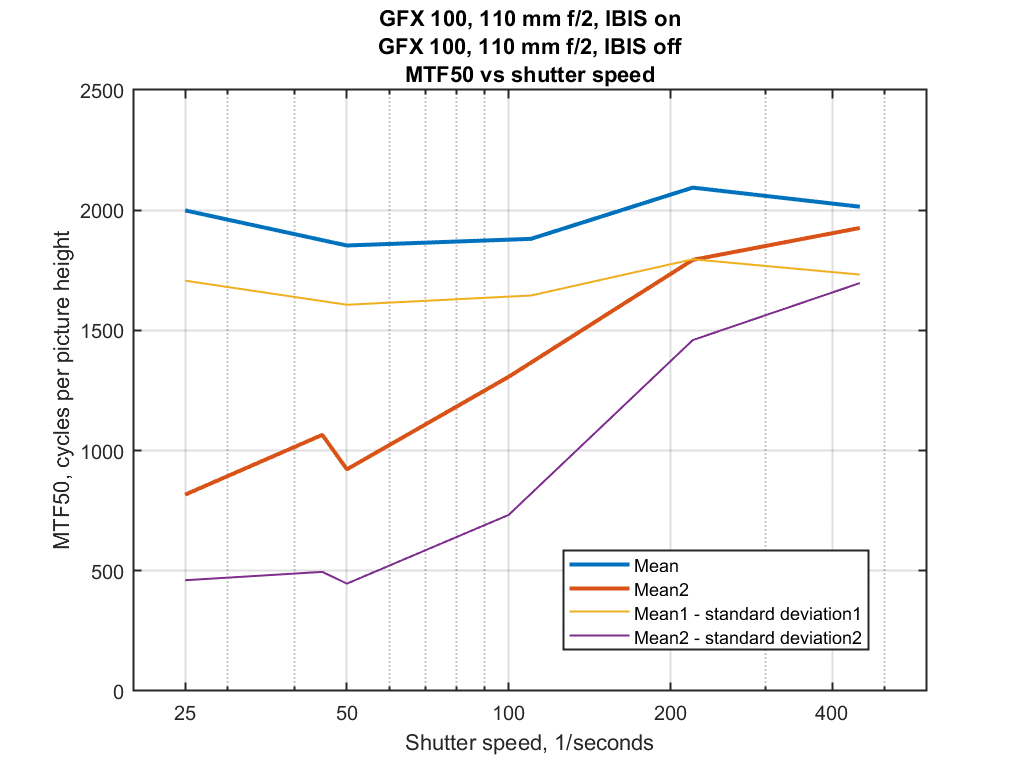
Without IBIS, anything below 1/200 is iffy. With IBIS, all the shots look good.
The Sony a7RIV is known to have excellent IBIS. How does it compare to the GFX 100? Here’s data from a similar test with an equivalent lens on the a7RIV:
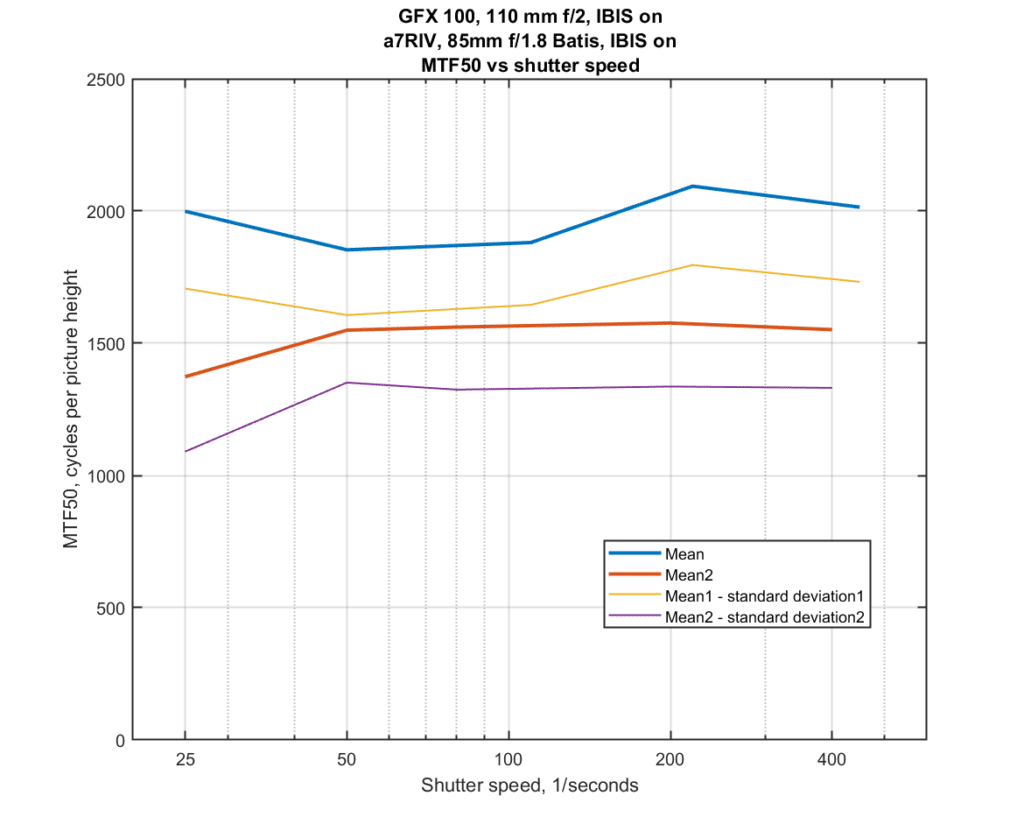
The GFX 100’s absolute MTF50s are higher mostly because the camera has greater resolution, and secondarily because the Fuji 110/2 is a sharper lens than the Batis 85/1.8. But both curves are about the same flatness, indicating that the IBISin both cameras is doing a good job.
I was surprised at the difference in steadiness between standing and sitting. If I’d have known how much steadier I’d be sitting, I would have tested at slower shutter speeds. However, for people shots, even 1/25 second is marginal in many circumstances due to subject motion, and IBIS can’t do anything about that.
I had to look up the specs to find the Batis has OIS: Zeiss doesn’t much feature it. GFX 100 results are quite impressive, methinks. Thanks as always for your work.
I haven’t managed to do a head to head test, but it appears that the only thing that OSS buys you is the ability to handle greater excursions in the projected image than IBIS can. That makes it useful for long lenses (which have a longer pitch and yaw “lever arm”) and for greater unsteadiness. If you stay within the travel limits of IBIS, it should be about as good as OSS.
In the legend for the last chart, the bottom line is described as “mean2 – standard deviation2” which I found a bit confusing as I first read it to mean “mean2 minus two standard deviations”, which I believe, it is not.
Anyway, very interesting data. Many thanks. Wishing your foot well.
Christer
You are right.i need to make that legend more descriptive, yet keep it automatic.
Jim, after hours of searching, I am unable to find any solid confirmation that IBIS in the GFX 100 can in fact operate with dumb lenses and/or adapters. I’ve found conflicting statements so far. The manual shows that we can save setups for a half dozen lenses which include focal length (crucial for IBIS), falloff, color shift from center to each of the four corners, and generic barrel or pincushion distortion. The easy solution in the A7r II and later is to allow the photographer to manually enter the focal length when enabling IBIS with a dumb adapter and/or lens. For me this is a big deal with this system. Have you tried it? I have both Pentax 645 and Mamiya 645 manual aperture control lenses that I want to be able to use, including with tilt and shift for the P645’s.
Thanks very much for the good news in the above test series.
Nice to hear from you, Joe. I haven’t tried IBIS on the GFX 100 with non-native lenses. I will do so.
Thanks a lot Jim. In the meantime I’ve been searching for cases (backpacks) which seem to make the best sense for a GFX 100 outfit with three to five zooms and possibly one fixed lens and my happiest finds so far along those lines are the Think Tank FirstLight 30L (best for comfort under load for longer walks), and their StreetWalker Hard Drive v2 and the StreetWalker Pro v2 for a smaller outfit such as I might prefer for a trip to Europe on account of their quite miserly carry-on 8 Kg/17.6 lb weight limits (excluding British Airways, which has very generous limits. These cases are among the many from Think Tank with the required ~7” depth for fitting a vertical-grip type body with an L-plate on it. I don’t have any of them yet.