the last word

Photography meets digital computer technology. Photography wins -- most of the time.

  • site home
  • blog home
  • galleries
  • contact
  • underwater
  • the bleeding edge
You are here: Home / The Last Word / Another medium tele test — on-axis color fringing

Another medium tele test — on-axis color fringing

February 13, 2016 JimK Leave a Comment

This is a continuation of a test of the following lenses on the Sony a7RII:

  • Zeiss 85mm f/1.8 Batis.
  •  Zeiss 85mm f/1.4 Otus.
  • Leica 90mm f/2 Apo Summicron-M ASPH.
  • AF-S Nikkor 85mm f/1.4 G.
  • Sony 90mm f/2.8 FE Macro.

The test starts here.

I set out to measure longitudinal chromatic aberration for the various lenses. I don’t think that the test I came up with measures exactly that. However, it does measure something useful to photographers, something that I’m going to call on-axis color fringing.

I started out with my LaCA target, but centered in the image, with the camera cocked enough to give Imatest a nicely slanted edge to work with.

_DSC7489

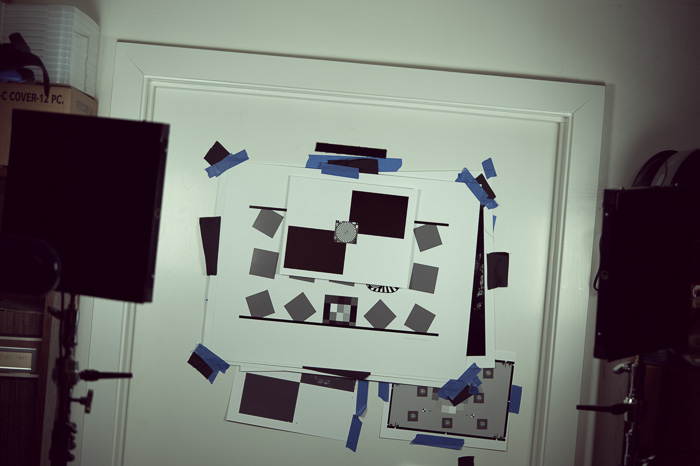
As you can see, there are two horizontal(ish) edges to work with to the right and left of the Siemens star, and two vertical(ish) edges to work with above and below the star.

I set the camera up and aimed it at a target. I lit the target with two Wescott LED panels set to full on and 5000K. ISO was 100. I did an aperture series for each lens. Then I demosaiced all the raw files with DCRAW and the AHD algorithm, exported them as TIFFs, and analyzed the CA in Imatest.

Imatest has a scalar measure of chromatic aberration that I used in the LaCA tests. It is not too good when lenses of quite different sharpness are being compared, since the sharper the lens, the worse the Imatest number gets. This was an irritation when I did the corner LaCA testing. On axis, the results are worse than useless; they are misleading. So, bear with me. I’m going to show you a bunch of curves, all for one particular edge. Fair disclosure: you get different curves when you pick different edges. I’ll spare you that level of detail, but I may go back and show you all four edges for a particular lens at a particular aperture in a later post.

If you twist my arm, I’ll show you the graphs of the Imatest chromatic aberration measure, but I’d rather not (although part of me would like to get something out of the hours I spent creating them).

So, let’s jump in to a few selected curves:

Nikon, f/1.4
Nikon, f/1.4

The Nikon wide open showed some on-axis color fringing in the landscape test that started out this lens comparison, and it looks like we may have found some of the problem here. On the white side of the transition, there is a five or six pixel wide band with a greenish cast.

Otus f/1.4
Otus f/1.4

The Otus not only has a steeper transition, indicating that it’s sharper at this aperture, the transition is pretty much the same for all three color planes.

At f/2, we can show the results for all the lenses except the Sony macro.

Nikon f/2
Nikon f/2

The Nikon is a lot better with respect to fringing at f/2.

Otus f/2
Otus f/2

The Otus looks great.

Batis f/2
Batis f/2

The Batis looks good, too.

Leica f/2
Leica f/2

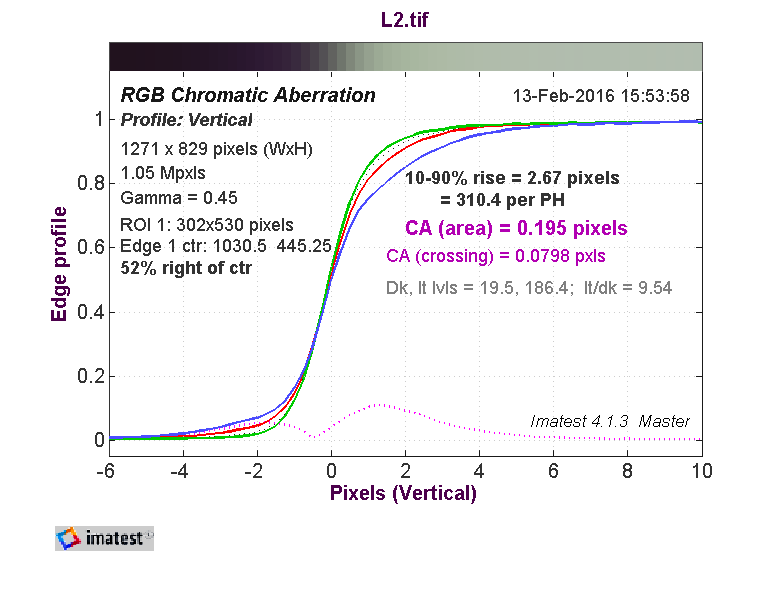
The Leica shows some of the same kind of problems the Nikon had wide open.

At f/2.8, we can bring the Sony into the mix:

s28

Not the sharpest, but materially free of fringing.

Nikon f/2.8
Nikon f/2.8

The Nikon is getting better, but has a ways to go.

Leica f/2.8
Leica f/2.8

The Leica isn’t much better than it was at f/2.

I won’t show you the Otus and the Batis at f/2.8, since the curves are so good.

Leica f/4
Leica f/4

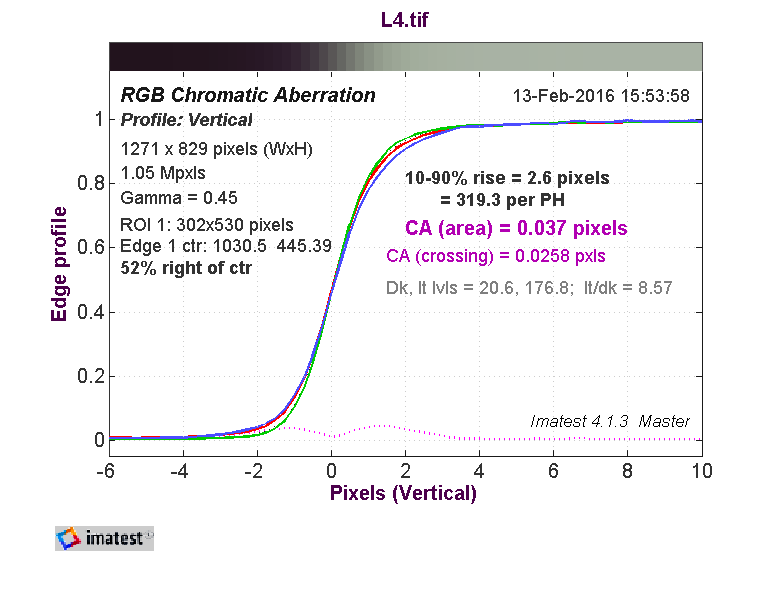
By f/4, the Leica has settled down, and looks good from there on out.


Nikon f/4
Nikon f/4

The Nikon still hasn’t caught up with the Leica, and is the loser of this little battle.


The Last Word

← Another medium tele test — LaCA with dcraw Another medium tele test — MTF →

Leave a Reply Cancel reply

Your email address will not be published. Required fields are marked *

February 2023
S M T W T F S
 1234
567891011
12131415161718
19202122232425
262728  
« Jan    

Articles

  • About
    • Patents and papers about color
    • Who am I?
  • Good 35-70 MF lens
  • How to…
    • Backing up photographic images
    • How to change email providers
  • Lens screening testing
    • Equipment and Software
    • Examples
      • Bad and OK 200-600 at 600
      • Excellent 180-400 zoom
      • Fair 14-30mm zoom
      • Good 100-200 mm MF zoom
      • Good 100-400 zoom
      • Good 100mm lens on P1 P45+
      • Good 120mm MF lens
      • Good 18mm FF lens
      • Good 24-105 mm FF lens
      • Good 24-70 FF zoom
      • Good 35 mm FF lens
      • Good 60 mm lens on IQ3-100
      • Good 63 mm MF lens
      • Good 65 mm FF lens
      • Good 85 mm FF lens
      • Good and bad 25mm FF lenses
      • Good zoom at 24 mm
      • Marginal 18mm lens
      • Marginal 35mm FF lens
      • Mildly problematic 55 mm FF lens
      • OK 16-35mm zoom
      • OK 60mm lens on P1 P45+
      • OK Sony 600mm f/4
      • Pretty good 16-35 FF zoom
      • Pretty good 90mm FF lens
      • Problematic 400 mm FF lens
      • Tilted 20 mm f/1.8 FF lens
      • Tilted 30 mm MF lens
      • Tilted 50 mm FF lens
      • Two 15mm FF lenses
    • Found a problem – now what?
    • Goals for this test
    • Minimum target distances
      • MFT
      • APS-C
      • Full frame
      • Small medium format
    • Printable Siemens Star targets
    • Target size on sensor
      • MFT
      • APS-C
      • Full frame
      • Small medium format
    • Test instructions — postproduction
    • Test instructions — reading the images
    • Test instructions – capture
    • Theory of the test
    • What’s wrong with conventional lens screening?
  • Previsualization heresy
  • Privacy Policy
  • Recommended photographic web sites
  • Using in-camera histograms for ETTR
    • Acknowledgments
    • Why ETTR?
    • Normal in-camera histograms
    • Image processing for in-camera histograms
    • Making the in-camera histogram closely represent the raw histogram
    • Shortcuts to UniWB
    • Preparing for monitor-based UniWB
    • A one-step UniWB procedure
    • The math behind the one-step method
    • Iteration using Newton’s Method

Category List

Recent Comments

  • Brian Olson on Fuji GFX 100S exposure strategy, M and A modes
  • JimK on Picking a macro lens
  • JimK on Picking a macro lens
  • Glenn Whorrall on Picking a macro lens
  • JimK on What pitch do you need to scan 6×6 TMax 100?
  • Hatzipavlis Peter on What pitch do you need to scan 6×6 TMax 100?
  • JeyB on Internal focusing 100ish macro lenses
  • JimK on How focus-bracketing systems work
  • Garry George on How focus-bracketing systems work
  • Rhonald on Format size and image quality

Archives

Copyright © 2023 · Daily Dish Pro On Genesis Framework · WordPress · Log in

Unless otherwise noted, all images copyright Jim Kasson.