It seems to me the most important contribution of the Fujifilm GFX 100 and Sony a7RIV over their immediate predecessors is reduced aliasing, rather than increased sharpness. The GFX 100 is not actually sharper than the GFX 50x cameras, if slanted-edge MTF50 is the sharpness criterion, but the images are dramatically more detailed and more free of artifacts. The differences between the a7RIV and the a7RIII are less striking, partially because both cameras appear to have nearly 100% effective fill factor, and also because the pixel pitches of the two cameras is closer, but there have been well-founded complaints that the a7RIV is not that much sharper, but I like the image detail more.
As lenses get sharper, we have the opportunity to make more realistic images. However, the things that impair resolution — diffraction, depth of field, focus curvature, and the like — become more important. So managing the sharpness of the detail that the sensor can resolve properly (information below the Nyquist frequency) becomes more important.
Camera resolution has increased, and continues to do so, but good lenses used at nearly optimum apertures can still lay down information on the sensor that can’t be resolved without error. It looks like it will be at least a decade before sensor resolution increases to the point where this will no longer be true.
Anti-aliasing filters are partially effective in preventing aliasing, but universally high resolution cameras don’t use anti-aliasing filters. So the things that can prevent aliasing boil down to diffraction, lens aberrations, and defocusing, lighting, and the subject itself. All of those are at least partially under the control of the photographer. That’s the good news. The bad news is that using any or all of these things to reduce aliasing means that you’ll reduce sharpness for detail below the Nyquist frequency. Mitigating aliasing means losing sharpness.
The dilemma for photographers is thus how to optimally balance sharpness and aliasing with the tools available. I’m going to ignore lighting and subject, since they are analytically intractable, and highly situation dependent. I’ve done tests that anecdotally look at the effects of defocusing. I’ll link to some of them in this post. But mostly what I want to pursue today is what can be learned from simulations. Before I begin, I want to acknowledge Jack Hogan, who has done a lot of work on lens simulation and has supplied me with some Matlab code that I’ve modified, extended, and used to generate the graphs that will follow.
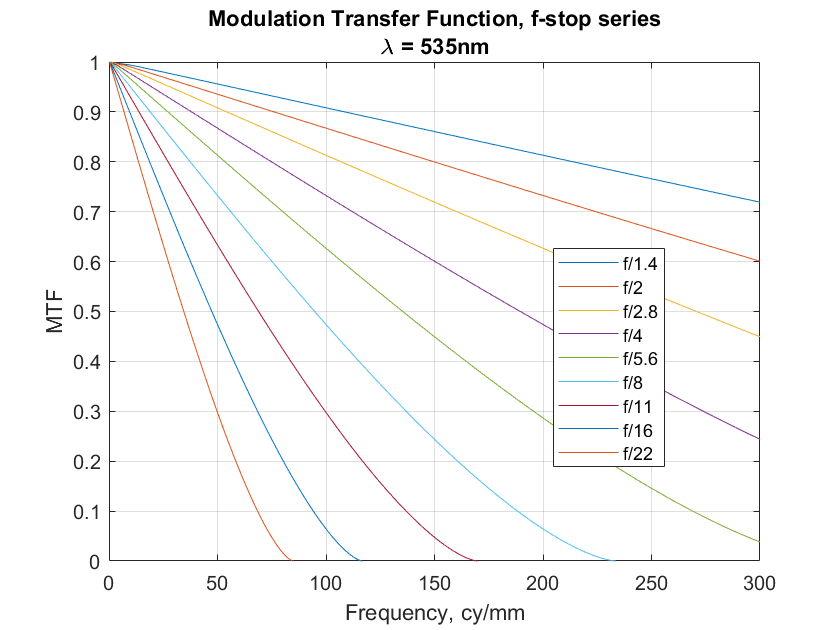
Let’s consider a monochromatic sensor with an ideal lens, and look at the MTF of the images it lays down on a sensor as a function of f-stop-created diffusion.
We can change the horizontal axis to cycles per pixel for a camera with the pitch of the GFX 100 and the a7RIV, which shows what frequencies generate aliasing:
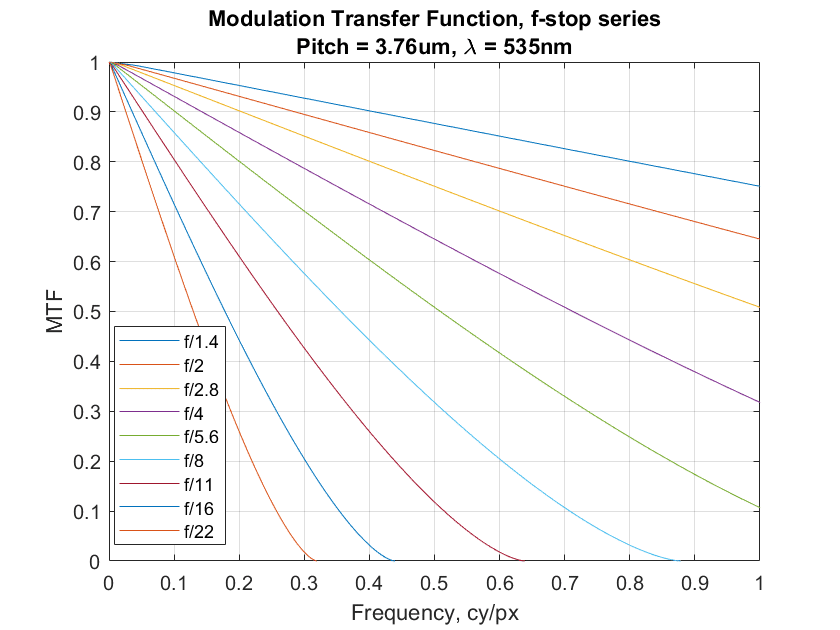
Everything over 0.5 cycles/pixel will cause aliasing. F/16 and f/22 are safe, but everything else will cause at least some aliasing.
The next thing to consider is defocusing. Here’s a look at that:
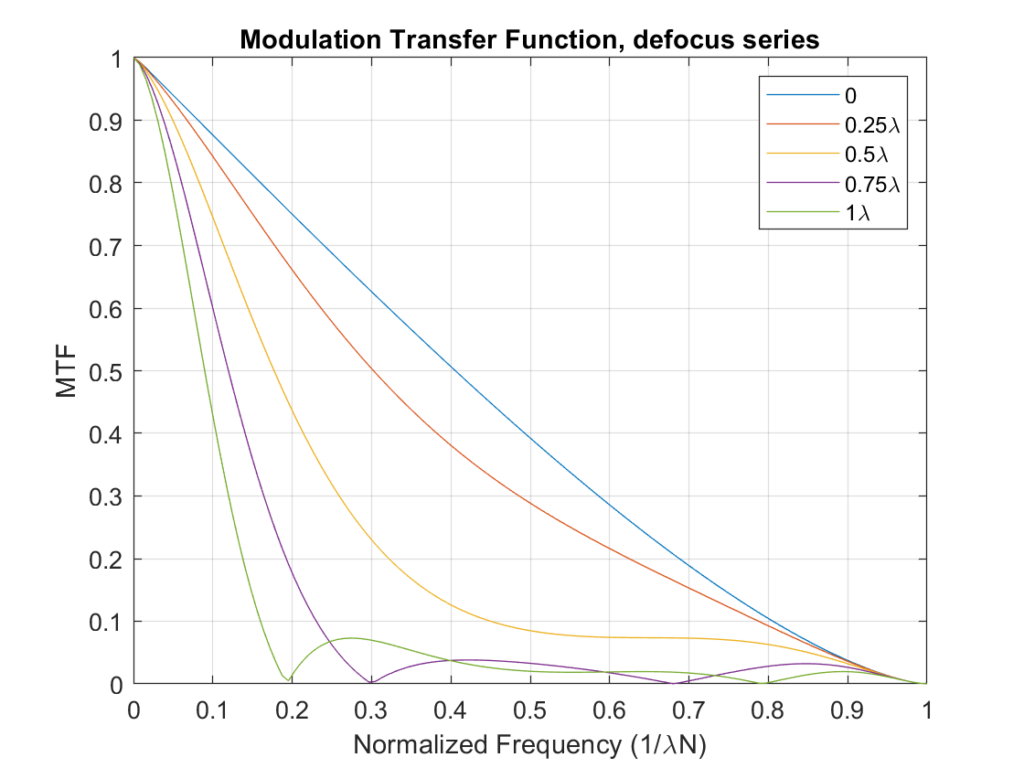
In this case, the horizontal axis is normalized by converting it to cycles per wavelength per f-stop, which has the felicitous effect of making the above set of curves apply to all f-stops. The zeros at 0.2 and 0,3 are intriguing, but they occur with so much defocus that the frequencies below Nyquist might be seriously affected, depending on the f-stop.
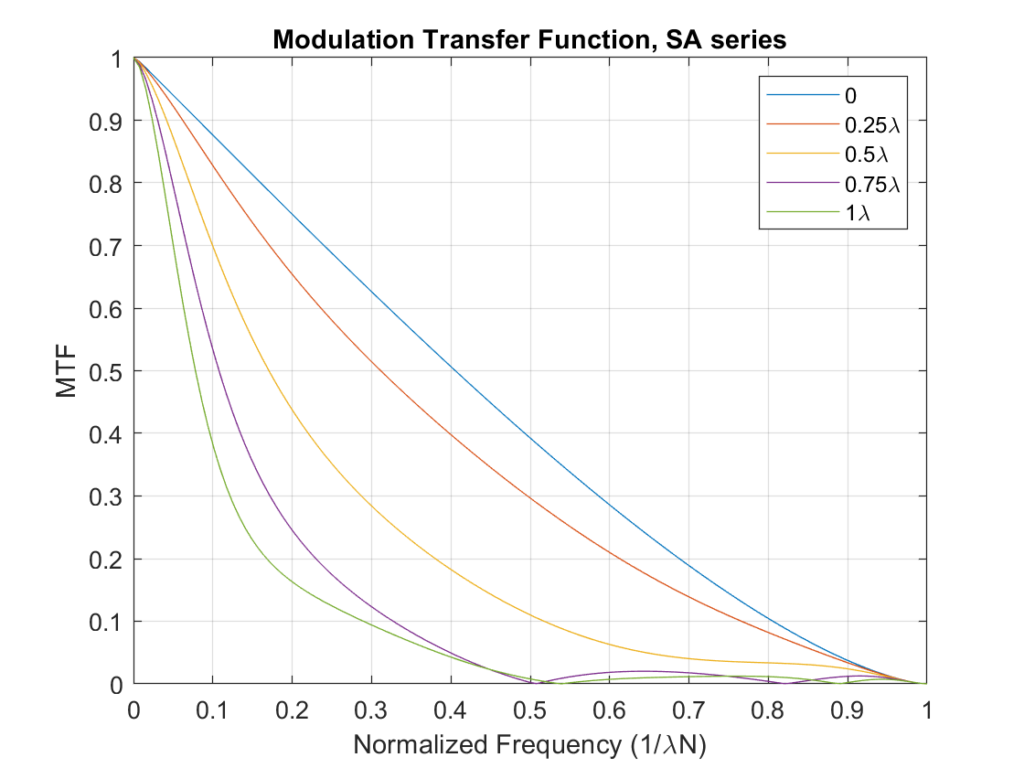
Spherical aberration has a similar effect:
One possible pair of scalar metrics of interest in balancing aliasing and sharpness that results in accurate sampling is the average MTF above and below the Nyquist frequency. Here’s what that looks like for the pure-diffraction case, as a function of f-stop:
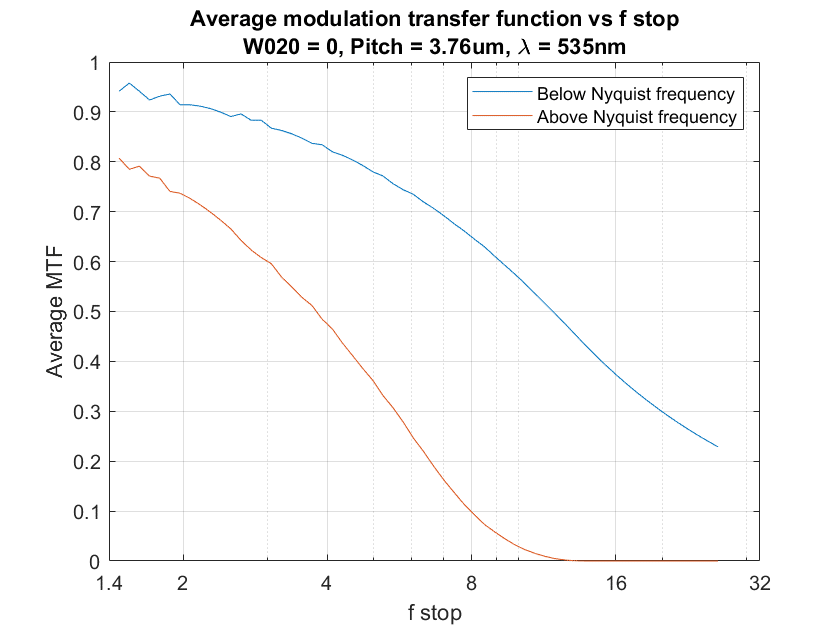
Above f/11, diffraction is negligible. However, setting the lens to f/11 results in quite a bit of degradation to below-Nyquist sharpness. F/8 might be a better compromise.
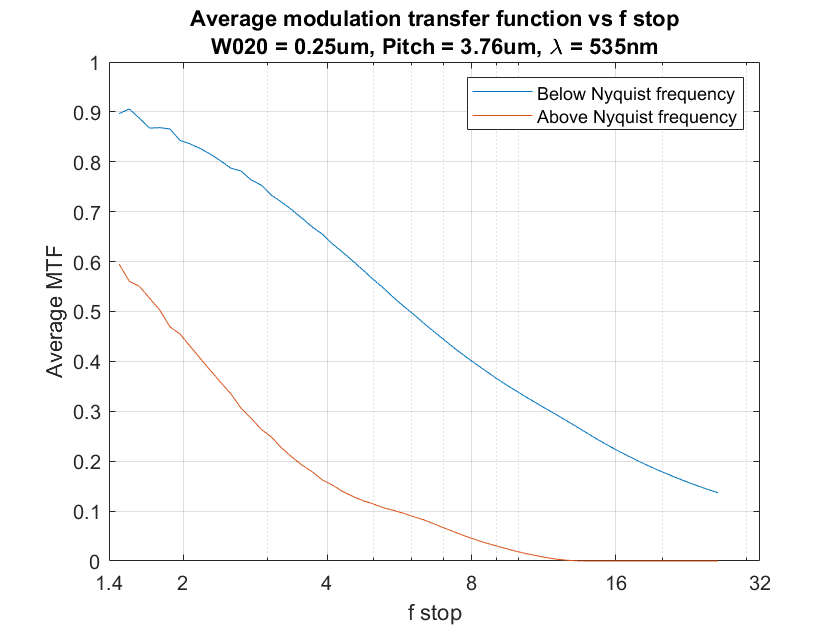
Adding a small amount of defocus (Seidel W020 about half a wavelength) seems to improve aliasing more than it harms sharpness:
If a little is good, is a lot better?
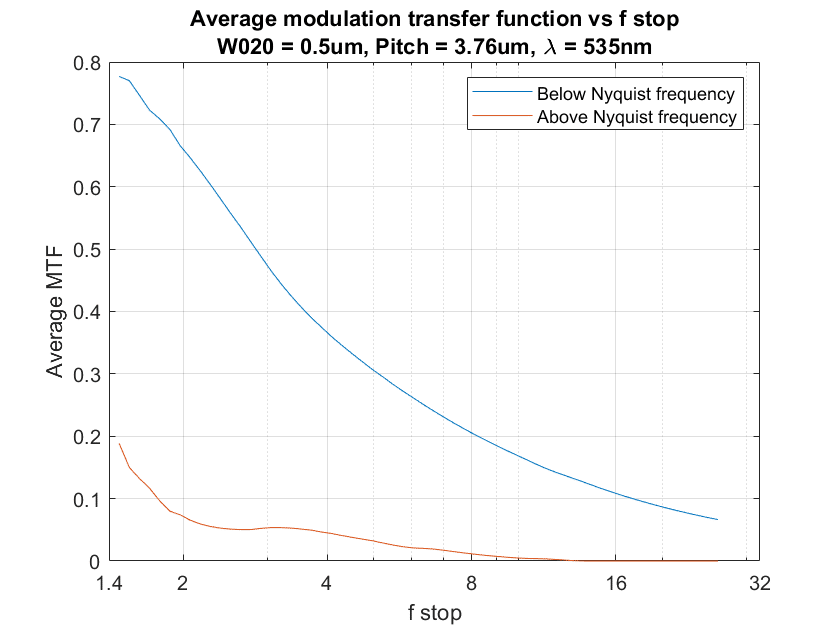
Maybe. How about even more?

Looks like we’ve gone too far, even though aliasing is quite low now.
Can a little spherical aberration help?
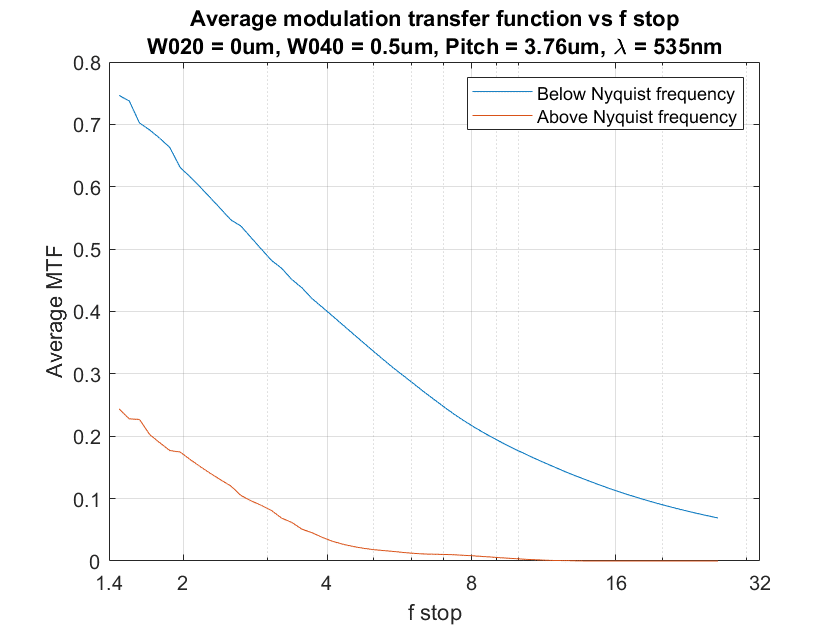
Maybe.
It might be worthwhile exploring combinations of defocusing and spherical aberrations, but before I do that, I need to consider the limitations of the above study.
- It doesn’t apply without modification to a sensor with a Bayer color filter array (CFA)
- It doesn’t take into account the camera’s partial suppression of aliasing by virtue of the finite sampling aperture.
- There are a lot of other lens aberrations to consider.
- If there is little information in the subject above the Nyquist frequency, aliasing won’t occur even with an ideal lens at a wide aperture.
- Not all aliasing is visible or objectionable to all people.
I thought these results were sufficiently interesting for presentation here, even though this cake is maybe 10% baked at this point.
Eli Rosenberg says
Seems like the RAW developers — if they don’t already — should offer strategies based on local image characteristics, potentially applying different low pass kernels locally, dependent on frequency distributions. If two people are in the same image, and one wears a patterned shirt prone to aliasing and the other wears a straight solid, why use a one size fits all approach — which is probably optimal for neither subject.
I do not know enough about signal processing to know if this is viable though, or it is already being done.
CarVac says
RawTherapee has Dual Demosaic.
JimK says
That may be true, but is mostly orthogonal to the point of this post. Once detail is aliased, the information necessary to remove the aliasing is lost.
Eli Rosenberg says
That is a good point, thanks. It is very interesting how the effect of defocus on the relative loss of MTF below Nyquist is aperture dependent. I look forward to your further investigation.
Ilya Zakharevich says
Thanks, Jim!
I think this is a very interesting question, and your approach (of taking average MTF above/below Nyquist) is very sound. On the other hand, I think your visualizations can be made a bit more revealing.
IMO, two important values are
• The aliasing suppression (Average␣MTF␣Above␣Nyquist/Average␣MTF␣Below␣Nyquist);
• The extra noise (1/Average␣MTF␣Below␣Nyquist).
So I would redraw every plot you made as a parametric plot in these two coordinates. (Indicating the ƒ-number/etc. by suitable marks on the plotted curve.)
Moreover, since all the plots now share the same domain, one can combine all the plots into one picture. I suspect that this picture would be much more revealing w.r.t. RELATIVE advantages of every method…
[One final remark: can you highlight the words “ideal lens” before the first plot? For me, it was a bit confusing until I understood that these are pure-diffraction MTFs… Thanks!]
Erik Kaffehr says
Hi Jim,
I may ask: What is acceptable MTF at Nyquist?
One thing I feel uncertain about is demosaic artifacts, like incorrect colors at the pixel level, what Lloyd Chambers sometimes calls ‘christmas tree artifacts’. Moiré is very visible, but it seems to relate to having some regular repetitive factor in the image.
Just to say, the first day I did shoot my P45+ on my Hasselblad, I got monochrome moire on a grey patch on a test target that was said to have extremely high resolution.
If I shoot with my P45+ (37×49 mm at 39 MP at f/11) a normal day , I will see some demosaic issues.
With the A7rII (24×36 mm at 42 MP), I can see demosaic errors in some shoots. But moiré is more like an exception.
My impression is that large pixel sensors, like the P45+ at 6.8 microns, are very prone to moiré, at least with a proper workflow.
On the other hand, 4.5 microns on my on my A7rII are perfectly capable cause artifacts, but much of that may be eliminated by workflow errors.
Sooner or later the photographer enters in the equation.
Best regards
Erik
Eli Rosenberg says
So this post gave me some inspiration to try a bit of aperture bracketing on a scene including a large building with small bricks. I am sure this technique is already known but I never really tried it.
By combining three exposures at different apertures I was able to generate a final image with a better balance of sharpness and aliasing/moire than any of the individual exposures alone.
Already we see this is useful information for architectural photography, or someone shooting a furniture or clothing catalog!
JimK says
I never thought of that. Sounds like a great idea.
Den says
The Sony RX1R II has a Variable Low-Pass Filter. This tech should have been used in the A7RIV ideally.
JimK says
Assuming that it works well, I agree.
CarVac says
Speaking of fancy low-pass filters, the 1Dx Mark III seems to have two stacked four-way birefringent splitters to achieve a more uniform blur pattern (page 43 of their whitepaper).
It claims that moire intensity is reduced better, especially in diagonal lines, with less impact on sharpness than a conventional low-pass filter.
I wonder how true their claims are.
Also, now that I’m reminded that the low-pass filters are based on birefringence, I wonder if a linear polarizer would have an effect on sharpness in one direction or another, because birefringence divides up light by polarization.
Erik Kaffehr says
Hi,
Jack Hogan has a nice write up on the Canon filter.
https://www.strollswithmydog.com/canon-high-res-gd-lpf-aa/
Best regards
Erik
CarVac says
Neat. So it should cut down on false colors at roughly equivalent sharpness.