The announcement of the 61 MP a7RIV has reignited the oft-heard arguments that photographers don’t need any more resolution in their cameras than they have now. There is a variation on this argument that says that a reason why greater resolution brings no benefits is diffraction.
It is undeniably true that there are pixel pitches and apertures beyond which diffraction will limit resolution. A relevant question is: “What pitches and what apertures?”
I constructed a spreadsheet to answer that question, using the criterion the the pixel pitch should be the same as the Sparrow distance, which is the distance at which the sum of two Airy disks develops a flat top.
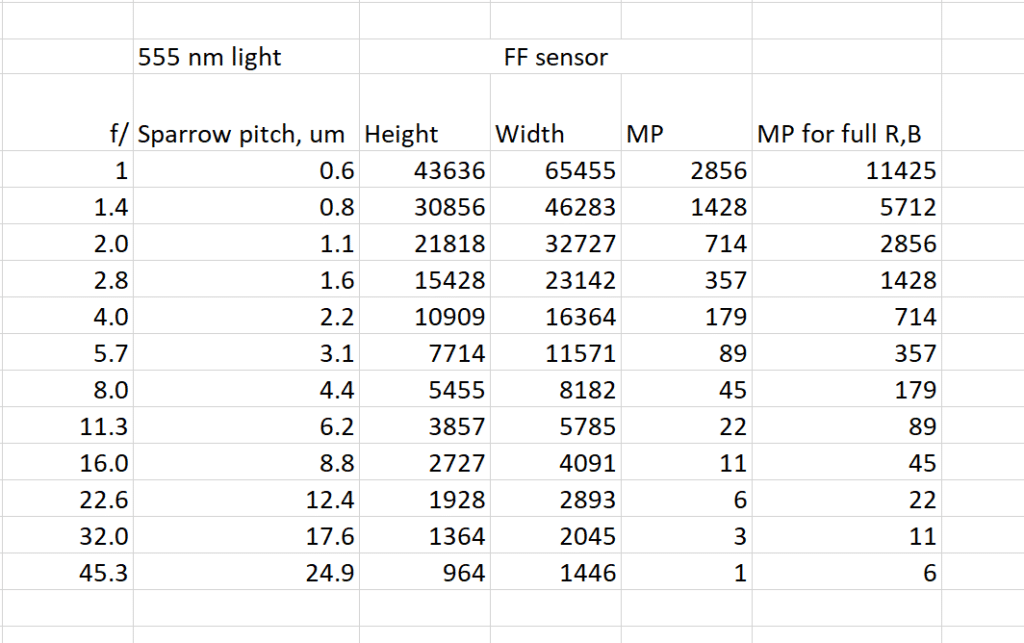
I assumed 555 nm (green, mid-visible spectrum) light, and computed the Sparrow distance. Then I calculated the number of Sparrow distances that would span a FF sensor horizontally and vertically. I multiplied those two together to get how many MP a FF sensor would have to have to sample a diffraction-limited lens at the Sparrow distance. That’s the column labeled “MP”. Finally, to get adequate sampling of the diffraction-limited image by the red and blue pixels of a Bayer color filter array camera, I created the far-right column.
Then I looked at a more stringent measure.
The people designing and building satellite-based earth imaging systems have diffraction-limited lenses at their disposal. They are interested in those lenses being light in weight and small in size, so they don’t want to put into orbit a lens which is faster than it needs to be given the pitch of the sensor. They have devised a criterion that requires the diffraction to act as a anti-aliasing filter with zero response at the Nyquist frequency of the sensor. The criterion is twice as stringent as the one I used for the table in the first post of this thread. Here’s the table that that criterion implies:
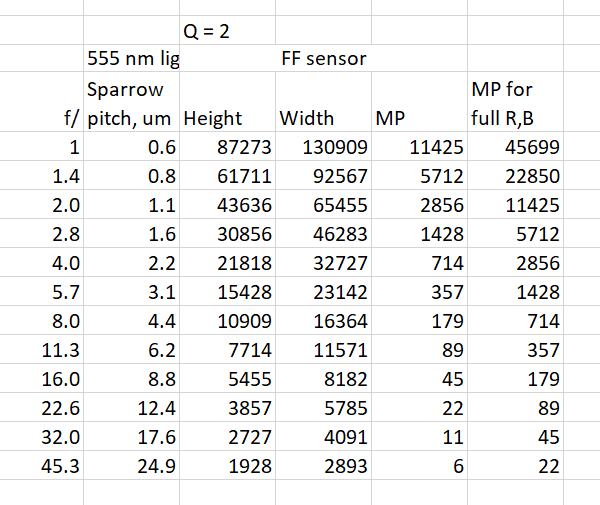
Here’s a link to a derivation of the metric:
https://www.nesdis.noaa.gov/CRSRA/files/Resolution_Metrics_ACCRES_rev2_OTR.pdf
Here’s a write-up I did about the standard:
https://blog.kasson.com/the-last-word/whats-your-q/
This is calculated assuming point sampling. Fill factors of greater than zero themselves act as AA filters.
Consumer diffraction-limited lenses are thin on the ground, but these numbers serve as an indication of the physical limits, absent techniques such as are used in making semiconductors and in microscopy.
HI Jim,
Not all satellite cameras are designed for Q=2. Q=2 just means that the images are guaranteed to be band-limited by diffraction. A lot of cameras are made in the Q ~= 1.5 range, some even at Q 2 unnecessary, e.g. jitter and smear. Since they knock out the high frequencies for you too (in a simplistic sense) there is no need to have the camera do it.
It’s kind of a set of differential equations – as you reduce Q, the larger aperture reduces exposure, which reduces the motion blurring. So slow (high Q) systems are really the worst for information gathering.
Hi, I‘m not a scientist, please explain with an example to us normal human beings in a real life meaning. Thank you very much.
(Like with a 45MP camera diffraction starts @f8, right? Wrong? Why?)
This post is not about where diffraction starts, but where it effectively ends. Diffraction affects all captures, even with the lens wide open. But, for most all lenses, when wide open, lens aberrations are much stronger, and diffraction is nothing to worry about. As you stop down the lens, in general lens aberrations get weaker. And, of course, diffraction gets stronger. At some point, you get to the stop where making it narrower will make the image blurrier, not sharper, because diffraction is the dominant source of lens blur. This is independent of sensor resolution, although the sensor adds its own blur that is dependent on the pixel aperture. At what stop this occurs is lens dependent, and where in the frame you look. On axis — in the center of the frame — the Zeiss Otus lenses are usually at their sharpest between f/2 and f/2.8. Some lenses are sharpest wide open. Most lenses need to be stopped down two or three stops from wide open to achieve maximum sharpness.
Okay, thanks for your words but thats not news to me, since I encounter diffrection related unsharpness in the studio, when I need to stop down beyond f11. Of course I see degration from 5.6 to 11 but then it gets really ugly. I consider 13 usable and 16 is hard to swallow, let alone 22.
I thought I could get some kind of an advice of where a 50MP or 46MP or las of late, a 61MP FF sensor gets unbearable, since I somehow interpreted the table above as such. But then, I‘m no theorist – I‘m a photographer first and foremost 😉
If you want a visual experience of diffraction on a 3.76 um pitch sensor, look here:
https://blog.kasson.com/gfx-100/a-visual-look-at-gfx-100-diffraction-blur/
F/16 is the first f-stop that totally eliminates diffraction. I wouldn’t call f/16 ugly.
If you look at the images in the post linked above, you can judge for yourself when diffraction gets unbearable. I would say that in many high-depth scenes, that f/22 is quite bearable.
Jim
Thank you so much – that is a great test! And well I think somewhere between f11 and f16 I would lose too many details. I‘ll keep stacking my images …
Thanks for your very unique phototech blog!