• site home
  • blog home
  • galleries
  • contact
  • underwater
  • the bleeding edge

the last word

Photography meets digital computer technology. Photography wins -- most of the time.

You are here: Home / The Last Word / Modeling the MTF of a perfect camera and real lens

Modeling the MTF of a perfect camera and real lens

May 21, 2014 JimK Leave a Comment

In the last post I showed MTF results from a simulation of a Bayer-CFA camera with a diffraction-limited lens. The camera had a 4.77 micrometer (um) pixel pitch. I had previously done an MTF analysis of the Zeiss Otus 55mm f/1.4 lens on a Sony alpha 7R, a camera with that pixel pitch.

I thought I’d try to model the MTF vs aperture of the real lens. I used double application of a pillbox (circular) kernel, with radius equal to:

R = k1 + (k2  /  fstop)

Where the constants k1 and k2 were selected for the closest match between the model and the real lens.

I changed the simulation to compute MTF based on luminance, assuming 650 nm light for the red plane, 550 nm light for the red plane, and 450 nm light for the red plane. Since I’m modeling and Adobe RGB sensor, luminance is 0.31111 * R + 0.62527 * G + 0.06322 * B.

I plotted MTF50, MTF30, MTF10 for the simulated camera and lens, and the first two for the real camera and lens. The match is fair:

mtfOtusandSim3xairy

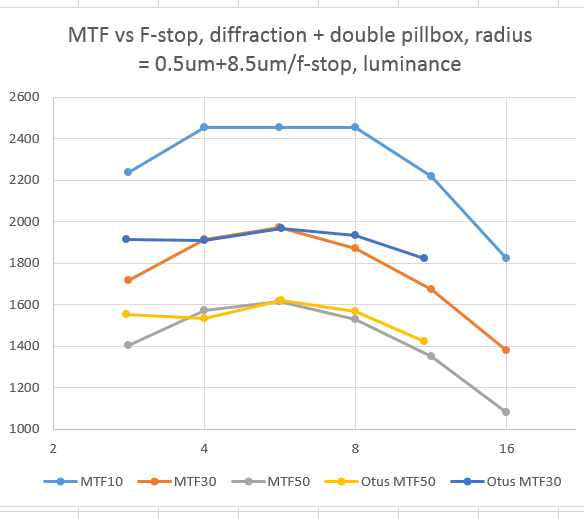
The reason why the MTF10 line flattens at the middle f-stops is that I didn’t allow the MTFs to exceed the Nyquist frequency, figuring that any energy above that frequency is useless at best. You will notice that the real lens does better than the model. There are differences in the way that the MTF curves for the real and simulated setups the real images were demosaiced by Lightroom, using their “secret sauce” and the simulated images were demosaiced using the less-sharp bilinear interpolation.

By the way, the above were calculated with a kernel for diffraction simulation three times the diameter of the first Airy zero. I tried to save some computer time as use a kernel twice the  diameter of the first Airy zero and got this, which is visibly not as accurate (that is to say, different) from f/8 on up:

mtfOtusandSimLum

The Last Word

← MTF of a perfect camera and lens Simulating a Lithium Niobate AA filter →

Leave a Reply Cancel reply

Your email address will not be published. Required fields are marked *

May 2025
S M T W T F S
 123
45678910
11121314151617
18192021222324
25262728293031
« Apr    

Articles

  • About
    • Patents and papers about color
    • Who am I?
  • How to…
    • Backing up photographic images
    • How to change email providers
    • How to shoot slanted edge images for me
  • Lens screening testing
    • Equipment and Software
    • Examples
      • Bad and OK 200-600 at 600
      • Excellent 180-400 zoom
      • Fair 14-30mm zoom
      • Good 100-200 mm MF zoom
      • Good 100-400 zoom
      • Good 100mm lens on P1 P45+
      • Good 120mm MF lens
      • Good 18mm FF lens
      • Good 24-105 mm FF lens
      • Good 24-70 FF zoom
      • Good 35 mm FF lens
      • Good 35-70 MF lens
      • Good 60 mm lens on IQ3-100
      • Good 63 mm MF lens
      • Good 65 mm FF lens
      • Good 85 mm FF lens
      • Good and bad 25mm FF lenses
      • Good zoom at 24 mm
      • Marginal 18mm lens
      • Marginal 35mm FF lens
      • Mildly problematic 55 mm FF lens
      • OK 16-35mm zoom
      • OK 60mm lens on P1 P45+
      • OK Sony 600mm f/4
      • Pretty good 16-35 FF zoom
      • Pretty good 90mm FF lens
      • Problematic 400 mm FF lens
      • Tilted 20 mm f/1.8 FF lens
      • Tilted 30 mm MF lens
      • Tilted 50 mm FF lens
      • Two 15mm FF lenses
    • Found a problem – now what?
    • Goals for this test
    • Minimum target distances
      • MFT
      • APS-C
      • Full frame
      • Small medium format
    • Printable Siemens Star targets
    • Target size on sensor
      • MFT
      • APS-C
      • Full frame
      • Small medium format
    • Test instructions — postproduction
    • Test instructions — reading the images
    • Test instructions – capture
    • Theory of the test
    • What’s wrong with conventional lens screening?
  • Previsualization heresy
  • Privacy Policy
  • Recommended photographic web sites
  • Using in-camera histograms for ETTR
    • Acknowledgments
    • Why ETTR?
    • Normal in-camera histograms
    • Image processing for in-camera histograms
    • Making the in-camera histogram closely represent the raw histogram
    • Shortcuts to UniWB
    • Preparing for monitor-based UniWB
    • A one-step UniWB procedure
    • The math behind the one-step method
    • Iteration using Newton’s Method

Category List

Recent Comments

  • JimK on How Sensor Noise Scales with Exposure Time
  • Štěpán Kaňa on Calculating reach for wildlife photography
  • Štěpán Kaňa on How Sensor Noise Scales with Exposure Time
  • JimK on Calculating reach for wildlife photography
  • Geofrey on Calculating reach for wildlife photography
  • JimK on Calculating reach for wildlife photography
  • Geofrey on Calculating reach for wildlife photography
  • Javier Sanchez on The 16-Bit Fallacy: Why More Isn’t Always Better in Medium Format Cameras
  • Mike MacDonald on Your photograph looks like a painting?
  • Mike MacDonald on Your photograph looks like a painting?

Archives

Copyright © 2025 · Daily Dish Pro On Genesis Framework · WordPress · Log in

Unless otherwise noted, all images copyright Jim Kasson.