• site home
  • blog home
  • galleries
  • contact
  • underwater
  • the bleeding edge

the last word

Photography meets digital computer technology. Photography wins -- most of the time.

You are here: Home / The Last Word / Optimizing aperture and focus distance, another example

Optimizing aperture and focus distance, another example

April 24, 2019 JimK 3 Comments

This is a continuation of a series of posts about blur management for landscape photography. The series starts here.

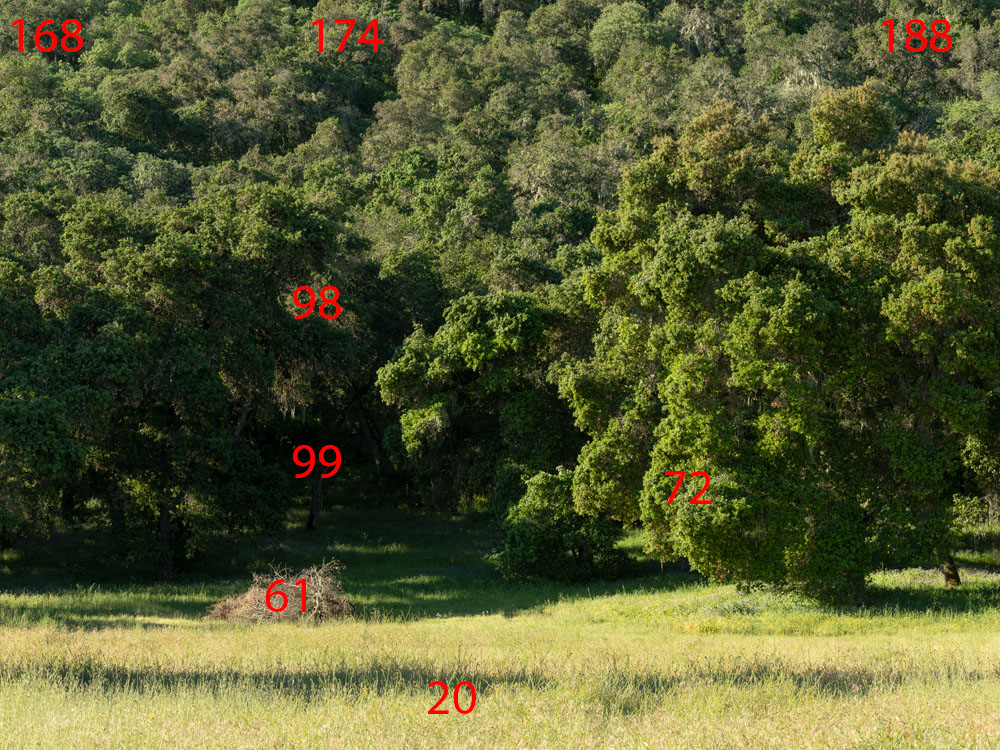
In the last post, I showed you the results of using a blur management optimizer that I wrote on a scene using the Fuji GFX 50R and a 45 mm lens. This post uses a different scene and the Fuji 110 mm f/2 lens. I measured object distances (with a Nikon Aculon laser rangefinder) and have marked them (with no correction for angle away from the lens axis, since the field of view is no small) in meters.

I ran the optimizer, telling it that all the measured points were equally important and were weighted 1.0, except for the top three points, which received a weight of 0.4, since there are so many of them. This is what I got:

The optimum f-stop is f/16! For most of the image — but not the foreground grass — the blur circle diameters are less than 20 micrometers (um), which is not great. The focal point is 10 meters in front of the burn pile.

If I decide that fuzzy grass in the foreground is going to be an issue, and weight that distance with a weight of 2 instead of 1, here’s what happens:

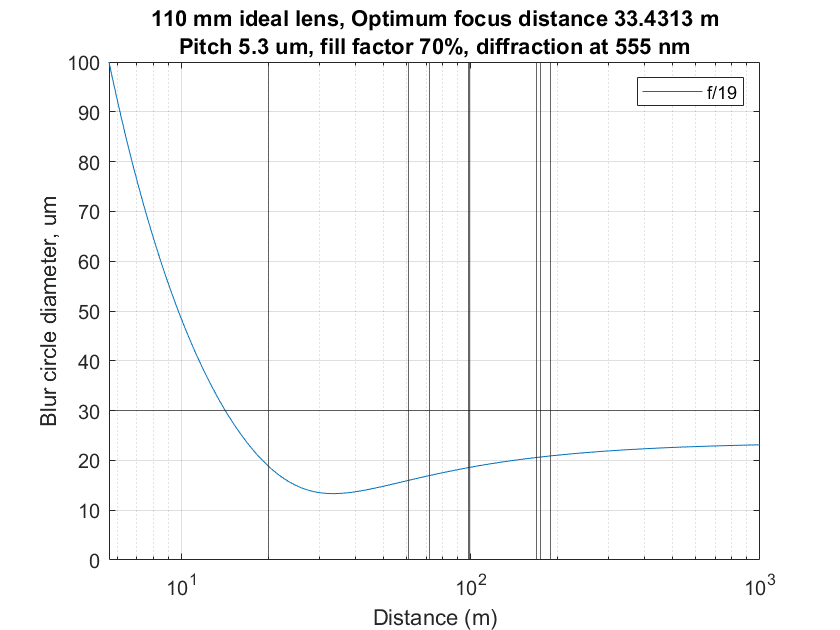
Now I’ve got to stop down another half stop (to f/19!) and focus closer. There’s a practical problem with this focus point. It’s difficult to impossible to set the focus distance of the Fuji 110/2 manually, and there isn’t a handy object in the scene at 33 meters to focus on. That gets the foreground grass to about a 20 um CoC, which is better but not great. The cost is the distant trees in the top are softer.

There is no way to get a really sharp shot of this scene with this equipment in one capture. And this is not an atypical situation.


The Last Word

← Optimizing aperture and focus distance, an example Nikon 14-30/4 S flare →

Comments

  1. Marc says

    January 23, 2020 at 10:18 pm

    Hi Jim,

    Very very interesting.

    I assume you used so many points for demonstration purposes. In a real life scenario I find it impractical to use so many points, and it also biases the relative sharpness of two points which you weigthed equally in the first place, the more points with similar distances you add (which was the reason you chose .4 for trees in the background) the more bias you get. Your example demonstrated this, the grass in the foreground has the same weight as the farest subject with equal weight but would not have been equally sharp due to additional points you selected. You all know this of course.
    I would probably be using your application with two subjects only, the closest and farest important subject, then it tells me f19 and the distance and how sharp (or unsharp) the two subjects are, the application gives me the option to iterate/redecide for two objects again. This assumes the application in installed in camera, the subject selection / distance metering is done by using the autofocus points, which you ideally move across the frame instead of using the center point (image composition already decided)so that the application can take the field curvature of the mounted lens automatically into account. Sharp or not sharp is indicated by a green, yellow or red color in the EVF, together with the two actual values, depending on your configuration settings in the camera.
    Your website is not only a valuable source of information but also kick-starter for dreams and desires.

    Best regards
    Marc

    Reply
  2. Frank C says

    November 26, 2021 at 10:56 pm

    Thanks so much for the series and explanation. This is super helpful. Finally an overview of dof and diffraction in one combined view.

    May I ask:
    Do you see the dof scale in the GFX useful at all or is it absolutely off? I was not able to tie it back to any other dof calculators. Do you have an idea what Fuji is doing?
    I do not necessarily aim for optimal sharpness but rather a practical guide in the field.

    Thanks again

    Kind regards
    Frank

    Reply
    • JimK says

      November 27, 2021 at 5:57 am

      The GFX internal DOF scale is accurate, by its internal standards, but it is not very precise. You can choose two CoC settings. I can’t remember the details — I don’t use it myself — but the coarser one is about 30 um and the finer one about 5 um.

      Reply

Leave a Reply Cancel reply

Your email address will not be published. Required fields are marked *

May 2025
S M T W T F S
 123
45678910
11121314151617
18192021222324
25262728293031
« Apr    

Articles

  • About
    • Patents and papers about color
    • Who am I?
  • How to…
    • Backing up photographic images
    • How to change email providers
    • How to shoot slanted edge images for me
  • Lens screening testing
    • Equipment and Software
    • Examples
      • Bad and OK 200-600 at 600
      • Excellent 180-400 zoom
      • Fair 14-30mm zoom
      • Good 100-200 mm MF zoom
      • Good 100-400 zoom
      • Good 100mm lens on P1 P45+
      • Good 120mm MF lens
      • Good 18mm FF lens
      • Good 24-105 mm FF lens
      • Good 24-70 FF zoom
      • Good 35 mm FF lens
      • Good 35-70 MF lens
      • Good 60 mm lens on IQ3-100
      • Good 63 mm MF lens
      • Good 65 mm FF lens
      • Good 85 mm FF lens
      • Good and bad 25mm FF lenses
      • Good zoom at 24 mm
      • Marginal 18mm lens
      • Marginal 35mm FF lens
      • Mildly problematic 55 mm FF lens
      • OK 16-35mm zoom
      • OK 60mm lens on P1 P45+
      • OK Sony 600mm f/4
      • Pretty good 16-35 FF zoom
      • Pretty good 90mm FF lens
      • Problematic 400 mm FF lens
      • Tilted 20 mm f/1.8 FF lens
      • Tilted 30 mm MF lens
      • Tilted 50 mm FF lens
      • Two 15mm FF lenses
    • Found a problem – now what?
    • Goals for this test
    • Minimum target distances
      • MFT
      • APS-C
      • Full frame
      • Small medium format
    • Printable Siemens Star targets
    • Target size on sensor
      • MFT
      • APS-C
      • Full frame
      • Small medium format
    • Test instructions — postproduction
    • Test instructions — reading the images
    • Test instructions – capture
    • Theory of the test
    • What’s wrong with conventional lens screening?
  • Previsualization heresy
  • Privacy Policy
  • Recommended photographic web sites
  • Using in-camera histograms for ETTR
    • Acknowledgments
    • Why ETTR?
    • Normal in-camera histograms
    • Image processing for in-camera histograms
    • Making the in-camera histogram closely represent the raw histogram
    • Shortcuts to UniWB
    • Preparing for monitor-based UniWB
    • A one-step UniWB procedure
    • The math behind the one-step method
    • Iteration using Newton’s Method

Category List

Recent Comments

  • JimK on Goldilocks and the three flashes
  • DC Wedding Photographer on Goldilocks and the three flashes
  • Wedding Photographer in DC on The 16-Bit Fallacy: Why More Isn’t Always Better in Medium Format Cameras
  • JimK on Fujifilm GFX 100S II precision
  • Renjie Zhu on Fujifilm GFX 100S II precision
  • JimK on Fuji 20-35/4 landscape field curvature at 23mm vs 23/4 GF
  • Ivo de Man on Fuji 20-35/4 landscape field curvature at 23mm vs 23/4 GF
  • JimK on Fuji 20-35/4 landscape field curvature at 23mm vs 23/4 GF
  • JimK on Fuji 20-35/4 landscape field curvature at 23mm vs 23/4 GF
  • Ivo de Man on Fuji 20-35/4 landscape field curvature at 23mm vs 23/4 GF

Archives

Copyright © 2025 · Daily Dish Pro On Genesis Framework · WordPress · Log in

Unless otherwise noted, all images copyright Jim Kasson.