the last word

Photography meets digital computer technology. Photography wins -- most of the time.

  • site home
  • blog home
  • galleries
  • contact
  • underwater
  • the bleeding edge
You are here: Home / a7RIV / 12 and 14-bit Sony a7RIV visual examples with ACP

12 and 14-bit Sony a7RIV visual examples with ACP

September 27, 2019 JimK 2 Comments

This is one in a series of posts on the Sony alpha 7 R Mark IV (aka a7RIV). You should be able to find all the posts about that camera in the Category List on the right sidebar, below the Articles widget. There’s a drop-down menu there that you can use to get to all the posts in this series; just look for “A7RIV”.

In earlier posts, I looked at the effects of using the Sony a7RIV is continuous compressed mode, which causes the camera to switch to 12-bit encoding of the sensor data. I posted both quantitative data and qualitative, visual examples.  The visual examples were made using a beta a7RIV profile in Lightroom. I received some flak for that; with some saying that the results were not valid with pre-release software. Today, I’m going to rectify that mistake, if indeed it was a mistake. I made a series of images at normal exposure, and at successively reduced exposure in continuous compressed mode, which gives 12-bit precision, and in continuous uncompressed mode, which gives 14-bit precision. I used the CV 65 mm f/2 Apo-Lanthar E-mount lens and base ISO.

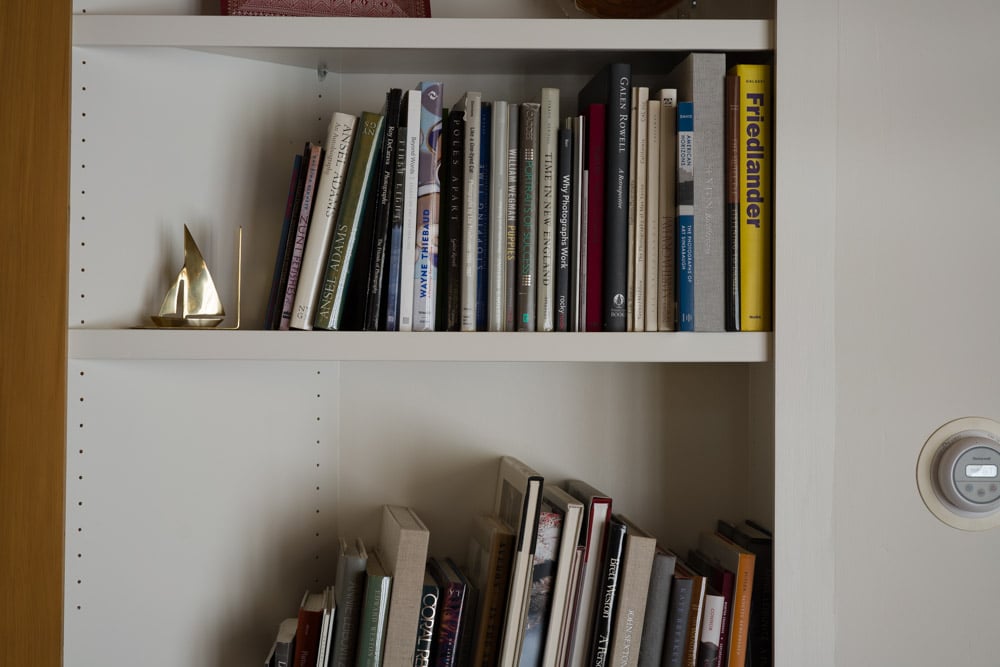
Here’s what the scene looked like:

14-bit, normal,with the beta profile

I developed all the images in Lightroom using Adobe Color Profile, white balancing to the spine of the book just to the left of the Thiebaud volume, and pushing the exposure control by one EV for every stop of underexposure. Everything else was left at the default settings.

Here is the normally-exposed pair at about 200% magnification:

14-bit, normal


12-bit, normal

They both look fine.

Here is the four stop underexposed pair.

14-bit, + 4 EV


12-bit, + 4 EV

The 12-bit image is noisier, but it’s not striking.

One more stop underexposed:

14-bit, + 5 EV


12-bit, + 5 EV


The differences are somewhat greater. There is some horizontal banding in the 12 bit image.

If we look at a six stop underexposed image and apply some shadow and highlight boost in addition to + 5 EV exposure boost, here’s what we see:

14-bit, + 5 EV and shadow +60. highlight boost


12-bit, + 5 EV and shadow +60. highlight boost

My take on all this is, as before, that using 12-bit precision is probably just fine for action, but that folks using continuous bracketing mode to increase dynamic range may wish to use uncompressed raw.


a7RIV

← Camera motion and Sony a7RIV pixel-shift a7RIV, a7RIII shadow noise w/ no sharpening or noise reduction, revisted →

Comments

  1. Den says

    November 12, 2019 at 2:57 am

    Jim, here’s a summary of your past findings on the A7R3. Looks like all of this applies to the R4 also – would that be correct?

    EFCS or silent shutter do not impact bit depth or DR on uncompressed raw at any ISO.

    Continuous shooting drops everything to 12bit RAW – always. You lose about 1 stop of DR across any ISO.

    14bit = Uncompressed Raw using single shot. EFCS or silent shutter. 14-bit in continuous bracketing mode for EFCS is also available with silent shutter.

    13bit = Lossy compressed RAW using single shot – not continuous shooting. EFCS or silent shutter. Slightly more read noise.

    12bit = compressed or uncompressed RAW with continuous shooting. EFCS or silent shutter. Noticeably more read noise.

    Only Mechanical shutter degrades sharpness – at slow shutter speeds 1/60 less.
    Leave EFCS on to reduce vibration and lag
    Turn off EFCS if you need smoothest bokeh above 1/500 shutter.
    Turn off EFCS if shooting above 1/2000 for best exposure uniformity.

    —-

    In addition, as the base ISO swtiched from 640 to 320 on the R4 – is that a fair explanation for high iso performance being about a stop worse comparatively?

    Reply

Trackbacks

  1. Sony a7RIV visual examples with 12 and 14 bit precision says:
    September 27, 2019 at 9:08 am

    […] [The images below were developed using the Adobe beta a7rIV profile. If you want to see what they look like with the release version of the Adobe Color Profile, look here.] […]

    Reply

Leave a Reply Cancel reply

Your email address will not be published. Required fields are marked *

March 2023
S M T W T F S
 1234
567891011
12131415161718
19202122232425
262728293031  
« Jan    

Articles

  • About
    • Patents and papers about color
    • Who am I?
  • Good 35-70 MF lens
  • How to…
    • Backing up photographic images
    • How to change email providers
  • Lens screening testing
    • Equipment and Software
    • Examples
      • Bad and OK 200-600 at 600
      • Excellent 180-400 zoom
      • Fair 14-30mm zoom
      • Good 100-200 mm MF zoom
      • Good 100-400 zoom
      • Good 100mm lens on P1 P45+
      • Good 120mm MF lens
      • Good 18mm FF lens
      • Good 24-105 mm FF lens
      • Good 24-70 FF zoom
      • Good 35 mm FF lens
      • Good 60 mm lens on IQ3-100
      • Good 63 mm MF lens
      • Good 65 mm FF lens
      • Good 85 mm FF lens
      • Good and bad 25mm FF lenses
      • Good zoom at 24 mm
      • Marginal 18mm lens
      • Marginal 35mm FF lens
      • Mildly problematic 55 mm FF lens
      • OK 16-35mm zoom
      • OK 60mm lens on P1 P45+
      • OK Sony 600mm f/4
      • Pretty good 16-35 FF zoom
      • Pretty good 90mm FF lens
      • Problematic 400 mm FF lens
      • Tilted 20 mm f/1.8 FF lens
      • Tilted 30 mm MF lens
      • Tilted 50 mm FF lens
      • Two 15mm FF lenses
    • Found a problem – now what?
    • Goals for this test
    • Minimum target distances
      • MFT
      • APS-C
      • Full frame
      • Small medium format
    • Printable Siemens Star targets
    • Target size on sensor
      • MFT
      • APS-C
      • Full frame
      • Small medium format
    • Test instructions — postproduction
    • Test instructions — reading the images
    • Test instructions – capture
    • Theory of the test
    • What’s wrong with conventional lens screening?
  • Previsualization heresy
  • Privacy Policy
  • Recommended photographic web sites
  • Using in-camera histograms for ETTR
    • Acknowledgments
    • Why ETTR?
    • Normal in-camera histograms
    • Image processing for in-camera histograms
    • Making the in-camera histogram closely represent the raw histogram
    • Shortcuts to UniWB
    • Preparing for monitor-based UniWB
    • A one-step UniWB procedure
    • The math behind the one-step method
    • Iteration using Newton’s Method

Category List

Recent Comments

  • Mal Paso on Christmas tree light bokeh with the XCD 38V on the X2D
  • Sebastian on More on tilted adapters
  • JimK on On microlens size in the GFX 100 and GFX 50R/S
  • Kyle Krug on On microlens size in the GFX 100 and GFX 50R/S
  • JimK on Hasselblad X2D electronic shutter scan time
  • Jake on Hasselblad X2D electronic shutter scan time
  • Piotr Chylarecki on Who am I?
  • JimK on Who am I?
  • Piotr Chylarecki on Who am I?
  • Stefan on Swebo TC-1 OOBE

Archives

Copyright © 2023 · Daily Dish Pro On Genesis Framework · WordPress · Log in

Unless otherwise noted, all images copyright Jim Kasson.