the last word

Photography meets digital computer technology. Photography wins -- most of the time.

  • site home
  • blog home
  • galleries
  • contact
  • underwater
  • the bleeding edge
You are here: Home / a7RIV / Sony a7RIV pixel-shift reconstruction

Sony a7RIV pixel-shift reconstruction

September 26, 2019 JimK 4 Comments

This is one in a series of posts on the Sony alpha 7 R Mark IV (aka a7RIV). You should be able to find all the posts about that camera in the Category List on the right sidebar, below the Articles widget. There’s a drop-down menu there that you can use to get to all the posts in this series; just look for “A7RIV”.

I’ve been using Sony’s Imaging Edge program to assemble the 16-image pixel-shifted stacks from the a7RIV. There is a control called Peripheral Edge NR that can be set between 0 and 1. The default is 0.5; that’s what I’ve used for all the shots I’ve posted up to now. To get an idea of what this control does, I looked at tight crops of the Siemens Star from this image:

a7RIV cropped 4:3


Edge Noise Reduction = 0


Edge Noise Reduction = 0.5


Edge Noise Reduction = 1

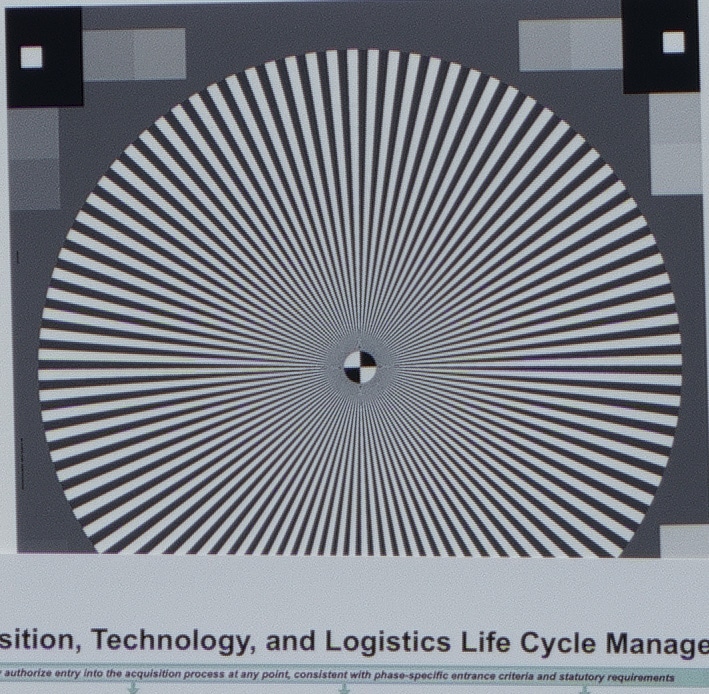
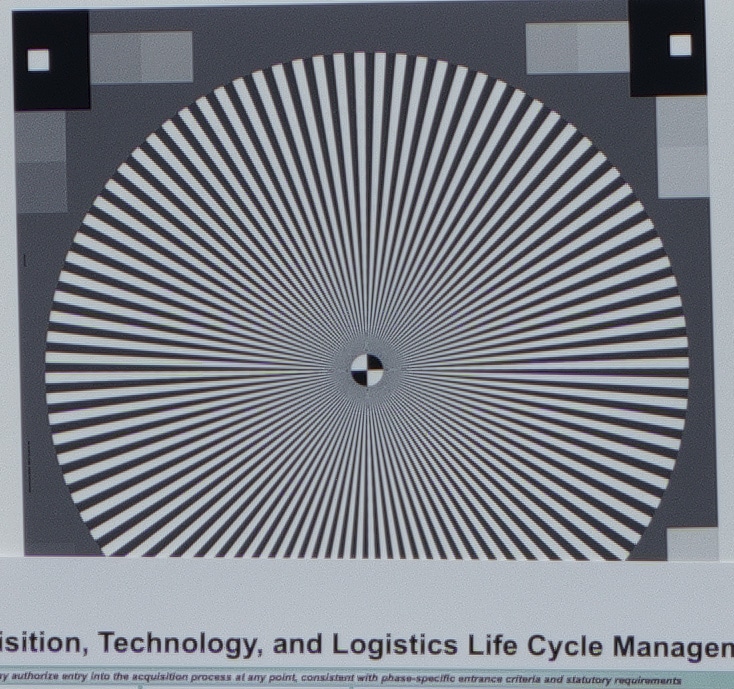
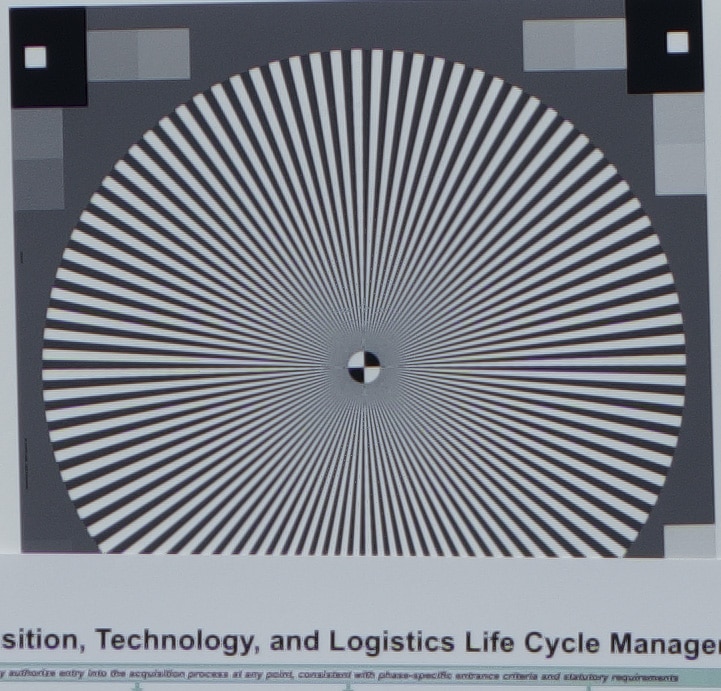
The effect is fairly subtle, but higher amounts of edge noise reduction cause blurring of the finest detail as well as reducing the noise there.

I looked at the slanted edge in upper left of the target to see if there was an overall softening of large steps:

Edge Noise Reduction = 0


Edge Noise Reduction = 0.5


Edge Noise Reduction = 1

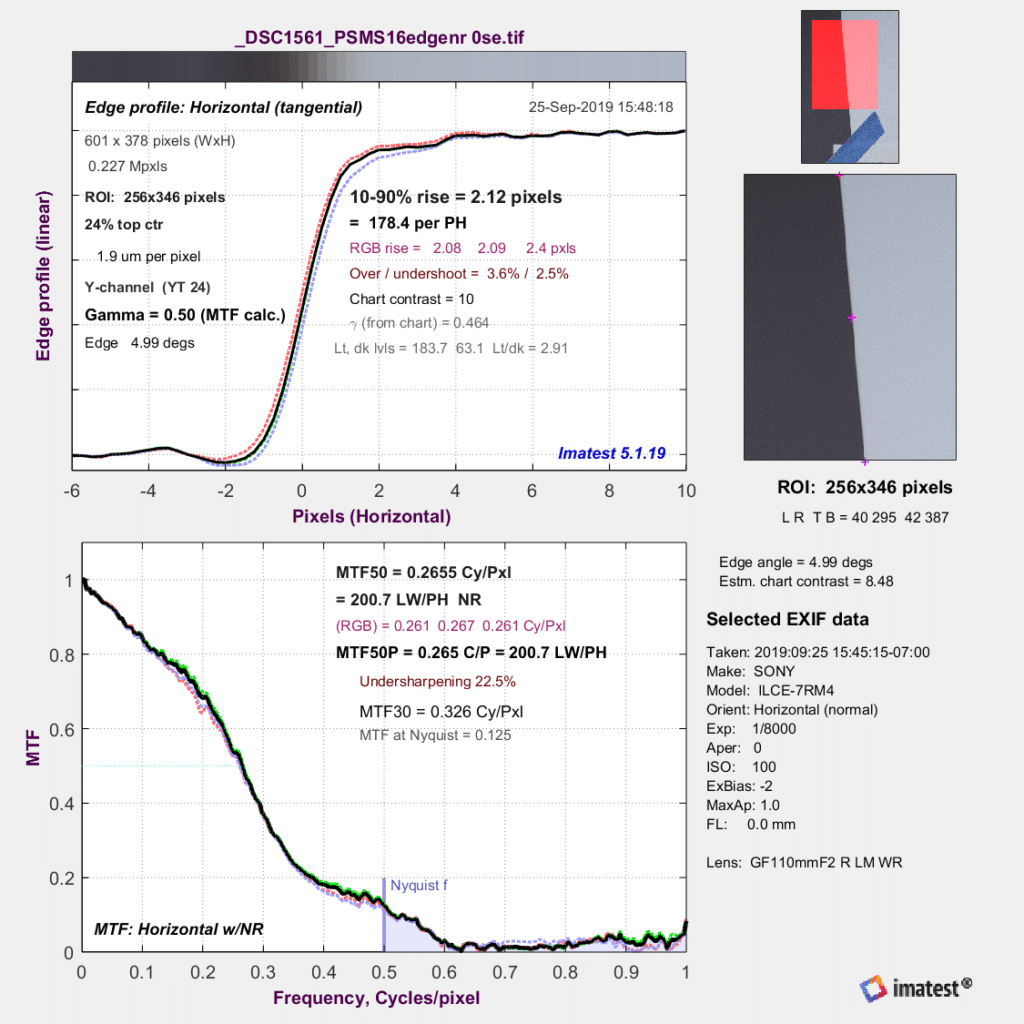
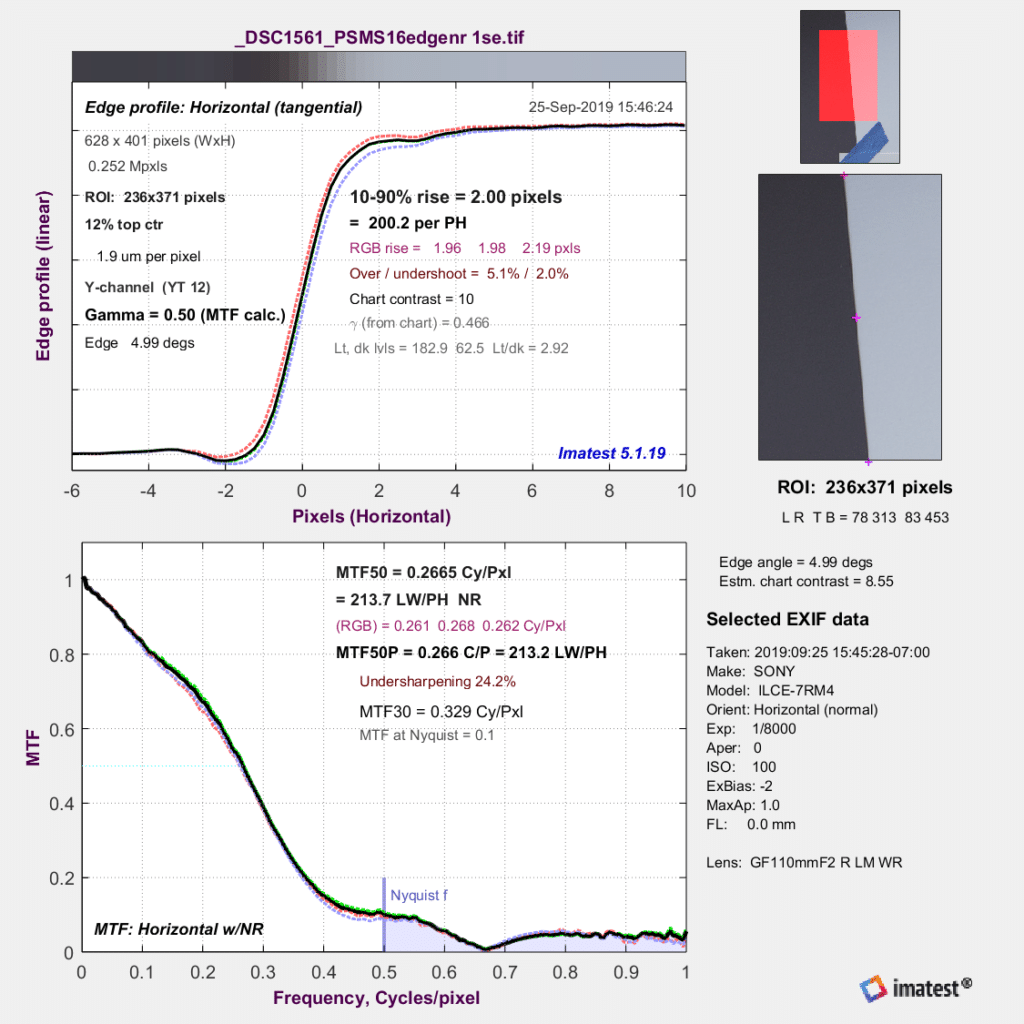
Only a tiny amount. The Edge Noise reduction effect is nonlinear.

You can see it better if I plot all three MTF’s in the same chart:

Let’s take a good look at the above MTF curves. The horizontal axis is cycles/pixel of the double-sized (244 megapixel) file that Imaging Edge spits out. That file has an effective pixel pitch of 1.9 micrometers (um). If we were to restate the curve in terms of the original pixels in each raw file, 0.5 cycles per pixel — the Nyquist frequency — would occur where 0.25 cycles per pixel is in the above graphs, and the MTF at that frequency would be about 0.6. Even with the Otus lenses, that is clearly higher than could be achieved without some sharpening. The undershoot also indicates sharpening. In the past, Imaging Edge horribly oversharpened the 4-shot pixel-shift sets from the a7RIII. The amount of sharpening that it is using now is more appropriate.

Note the low MTF at the Nyquist frequency in the above graphs. This indicates that the images will be resistant to aliasing, as we have seen in the visual results I presented earlier, and in the Siemens Star images above. I think this is due to the 3.8 um microlenses on the a7RIV, which give an effective fill factor of 400%.


a7RIV

← Sony a7RIV with pixel-shift vs Fujifilm GFX 100 Camera motion and Sony a7RIV pixel-shift →

Comments

  1. Jack Hogan says

    September 27, 2019 at 6:28 am

    Those MTF curves do indeed appear to show the signature of sharpening.

    What I don’t understand is the null around 2/3 cycles per pitch: we’d expect that around 1/2 c/p for half the pitch and 100% pixel fill factor. Unless the pitch in pixel shift is not half – or the a7rIV does not have 100% pixel fill factor.

    Reply
    • Ilya Zakharevich says

      September 27, 2019 at 9:41 pm

      Note that this zero is close to 1.22×Nyquist. (If I can remember correct whether this 1.22 should be in numerator or denominator, this) Looks like what Jim said in
          https://blog.kasson.com/the-last-word/blur-circle-size-estimation-with-encircled-energy/#comment-254213
      circular microlenses with about 100% diameter.

      Reply
  2. Jason Berge says

    February 18, 2020 at 9:58 pm

    Hi Jim,

    Might I suggest you try “pixelshift2dng”

    The Sony software is a steaming pile of garbage.

    Does the combining and spits out a DNG, much more flexible than the .tif out of Imageing Edge.

    Cheers,
    Jason Berge.

    Reply
    • JimK says

      February 19, 2020 at 7:20 am

      I do use that program. I agree that it is excellent.

      Reply

Leave a Reply Cancel reply

Your email address will not be published. Required fields are marked *

March 2023
S M T W T F S
 1234
567891011
12131415161718
19202122232425
262728293031  
« Jan    

Articles

  • About
    • Patents and papers about color
    • Who am I?
  • Good 35-70 MF lens
  • How to…
    • Backing up photographic images
    • How to change email providers
  • Lens screening testing
    • Equipment and Software
    • Examples
      • Bad and OK 200-600 at 600
      • Excellent 180-400 zoom
      • Fair 14-30mm zoom
      • Good 100-200 mm MF zoom
      • Good 100-400 zoom
      • Good 100mm lens on P1 P45+
      • Good 120mm MF lens
      • Good 18mm FF lens
      • Good 24-105 mm FF lens
      • Good 24-70 FF zoom
      • Good 35 mm FF lens
      • Good 60 mm lens on IQ3-100
      • Good 63 mm MF lens
      • Good 65 mm FF lens
      • Good 85 mm FF lens
      • Good and bad 25mm FF lenses
      • Good zoom at 24 mm
      • Marginal 18mm lens
      • Marginal 35mm FF lens
      • Mildly problematic 55 mm FF lens
      • OK 16-35mm zoom
      • OK 60mm lens on P1 P45+
      • OK Sony 600mm f/4
      • Pretty good 16-35 FF zoom
      • Pretty good 90mm FF lens
      • Problematic 400 mm FF lens
      • Tilted 20 mm f/1.8 FF lens
      • Tilted 30 mm MF lens
      • Tilted 50 mm FF lens
      • Two 15mm FF lenses
    • Found a problem – now what?
    • Goals for this test
    • Minimum target distances
      • MFT
      • APS-C
      • Full frame
      • Small medium format
    • Printable Siemens Star targets
    • Target size on sensor
      • MFT
      • APS-C
      • Full frame
      • Small medium format
    • Test instructions — postproduction
    • Test instructions — reading the images
    • Test instructions – capture
    • Theory of the test
    • What’s wrong with conventional lens screening?
  • Previsualization heresy
  • Privacy Policy
  • Recommended photographic web sites
  • Using in-camera histograms for ETTR
    • Acknowledgments
    • Why ETTR?
    • Normal in-camera histograms
    • Image processing for in-camera histograms
    • Making the in-camera histogram closely represent the raw histogram
    • Shortcuts to UniWB
    • Preparing for monitor-based UniWB
    • A one-step UniWB procedure
    • The math behind the one-step method
    • Iteration using Newton’s Method

Category List

Recent Comments

  • JimK on Sony 135 STF on GFX-50R, sharpness
  • K on Sony 135 STF on GFX-50R, sharpness
  • Mal Paso on Christmas tree light bokeh with the XCD 38V on the X2D
  • Sebastian on More on tilted adapters
  • JimK on On microlens size in the GFX 100 and GFX 50R/S
  • Kyle Krug on On microlens size in the GFX 100 and GFX 50R/S
  • JimK on Hasselblad X2D electronic shutter scan time
  • Jake on Hasselblad X2D electronic shutter scan time
  • Piotr Chylarecki on Who am I?
  • JimK on Who am I?

Archives

Copyright © 2023 · Daily Dish Pro On Genesis Framework · WordPress · Log in

Unless otherwise noted, all images copyright Jim Kasson.