• site home
  • blog home
  • galleries
  • contact
  • underwater
  • the bleeding edge

the last word

Photography meets digital computer technology. Photography wins -- most of the time.

You are here: Home / The Last Word / a7R vs D810 resolution — DCRAW development

a7R vs D810 resolution — DCRAW development

May 29, 2015 JimK 11 Comments

I scratched my head about yesterday’s results, which seemed to show that the Otus 55/1.4 ZF.2 had greater resolution on the Sony alpha 7R (a7R) than on the Nikon 810. from the comments, some of you were just as confused as I.  One of you nailed the problem, which was developing the images in Lightroom (Lr).

You see, Lr does some funny things without informing the user. One of them is to apply sharpening based on the camera and the lens. This fun-loving program will do that even if you turn sharpening off. When I mounted the Otus on the D810, the camera passed the lens data and the f-stop to the metadata, and Lr apparently looked at that metadata and was gentle with the sharpening. When I mounted the Otus on the a7R with an adapter, Lr had no idea what lens was on the camera, or what f-stop it was set to. So it applied some kind of generic sharpening, which, as it turns out, was pretty aggressive.

I needed to use another raw converter, one that would do as it was told. DCRAW is such a converter. It has no batch mode, and I had more than 200 images to convert, so I wrote a Matlab script to call DCRAW and tell it to use AHD for demosaicing:

matlabdcraw

I then turned Imatest loose on the TIFF files that DCRAW generated.

For vertical edges:

dcrawotusstrobemtf50v

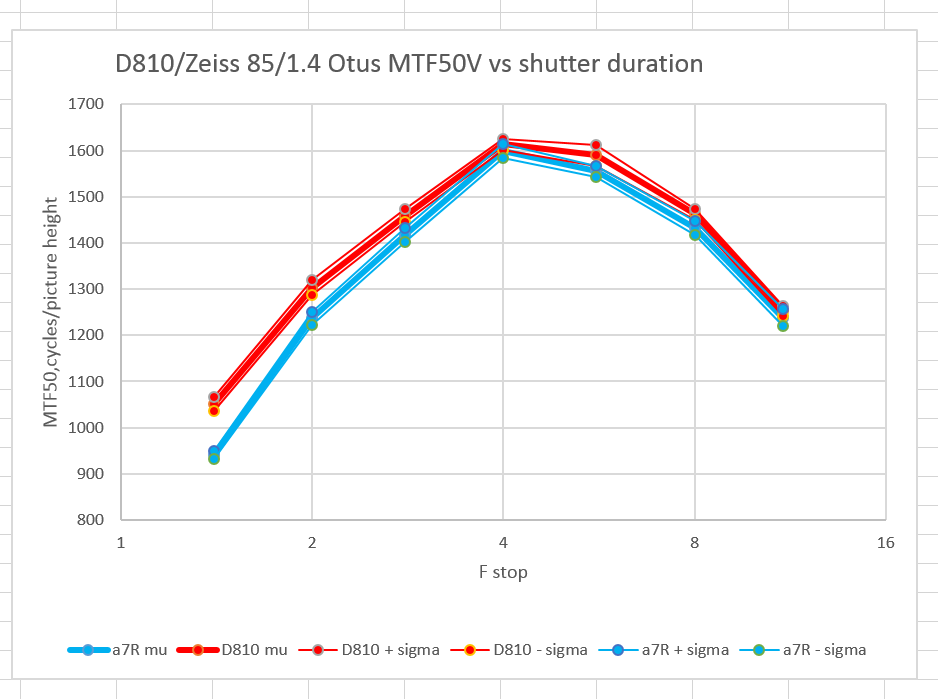
Now the two camera are essentially the same, except at f/1.4 and f/2, where the Nikon wins. Note that the absolute numbers are lower in both cases. That’s because sharpening increases the MTF50 numbers as measured by the slanted edge method.

For horizontal edges:

dcrawotusstrobemtf50h

That’s kind of weird. The Nikon falls down wide open, but comes on strong as you stop down.

I suspect that the slightly better Nikon results are due to the fact that the lens is designed for the sensor stack thickness of the Nikon cameras, and that the Sonys have a slightly different thickness. If that’s true, the effect at the corners should be greater.


The Last Word

← a7R vs D810 resolution — Lightroom development a7R vs D810 resolution — moderate shutter speeds →

Comments

  1. Andre Y says

    May 29, 2015 at 11:30 am

    Thanks for running the tests again Jim. I’m glad you got to the bottom of this! And it goes to show how tricky it can be to run apples-to-apples comparisons.

    Reply
  2. Max Berlin says

    May 29, 2015 at 12:09 pm

    A good friend of mine pointed out (before all of this) that a line isn’t always a line. And Jim’s new results show this to be the case. Jim, is there a percentage difference for the bottom set of data at f4? Dare I say it looks close to 19% ?

    Thanks Andre for guessing the right culprit.

    Reply
  3. Jack Hogan says

    May 30, 2015 at 5:47 am

    Good show, Jim. Wouldn’t a horizontal edge be more affected (as opposed to a vertical one) by what I assume is vertical vibration induced by shutter shock?

    Reply
  4. CarVac says

    May 30, 2015 at 7:05 am

    This is why I’m annoyed by all of the “fair comparisons” between cameras using ACR.

    Based on what I see in DPReview’s test scene ACR demosaicing for the Phase One IQ180 seems to use something similar to the LMMSE method in various GPL’d converters (like the GPL demosaic packs in LibRaw, and RawTherapee) which greatly reduces chroma moire (and also chroma noise as a nice side-effect), whereas most of the other cameras use a more basic demosaicing algorithm.

    As a side note, there’s pretty much no reason anyone should consider demosaicing other than LMMSE or Amaze, both of which are in LibRaw and RawTherapee. I don’t know how they compare on a slanted-edge test, but LMMSE really quelches color error while Amaze gives incredible sharpness and eliminates maze-style moire.

    Reply
  5. Chris Livsey says

    May 30, 2015 at 8:14 am

    For the IQ backs the inside knowledge of Phase in C1 processing could give them a fair advantage, they built it. I find different software prioritises different aspects of the image visible even from my lowly P20.
    Is it even possible to find a level playing field for these cameras to play on?

    Reply
    • Jim says

      May 30, 2015 at 10:26 am

      Maybe not, Chris. And the difficulties of getting repeatable results at 36 MP with lenses like the Otus are daunting for someone like me without a dedicated testing lab.

      Reply
    • Jack Hogan says

      June 1, 2015 at 12:05 am

      My suggestion is to work directly off the raw files, no demosaicing at all (dcraw -D). One can then either white balance the 4 channels and use them as one full resolution grayscale image – or use a tool like MTF Mapper to get MTF slanted edges and Curves for the individual raw channels. Both methods are about equally accurate (the grayscale version is about the same as the average of the four channels) and should give readings of the linear spatial resolution information contained in just the raw data, no processing. One easy example here if camera white balance is properly set in-camera http://www.strollswithmydog.com/how-to-get-mtf-curves-for-your-camera-and-lens/

      Reply

Trackbacks

  1. a7R vs D810 resolution — Lightroom development | The Last Word says:
    May 29, 2015 at 11:10 am

    […] [Warning: the data presented in this post is highly misleading because of he way that Lightroom sharpens during raw development, For a truer picture, read the next post.] […]

    Reply
  2. A quantatative test done by a guru shows A7r sharper than D810 | sonyvnikon says:
    May 29, 2015 at 12:11 pm

    […] http://blog.kasson.com/?p=10472#comment-193960 […]

    Reply
  3. a7R vs D810 resolution — moderate shutter speeds | The Last Word says:
    May 31, 2015 at 9:05 am

    […] saw in the preceding post that, once we deep-sixed Lightroom’s capricious sharpening, the a7R and the D810 offered […]

    Reply
  4. Mixing and matching lenses and cameras | The Last Word says:
    October 5, 2015 at 10:45 am

    […] there is one thing to consider when doing lens testing: the raw developer. Lightroom looks at the lens data and applies sharpening based on that, which can tilt the playing field in confounding ways. The solution is to use a dumber raw developer […]

    Reply

Leave a Reply Cancel reply

Your email address will not be published. Required fields are marked *

May 2025
S M T W T F S
 123
45678910
11121314151617
18192021222324
25262728293031
« Apr    

Articles

  • About
    • Patents and papers about color
    • Who am I?
  • How to…
    • Backing up photographic images
    • How to change email providers
    • How to shoot slanted edge images for me
  • Lens screening testing
    • Equipment and Software
    • Examples
      • Bad and OK 200-600 at 600
      • Excellent 180-400 zoom
      • Fair 14-30mm zoom
      • Good 100-200 mm MF zoom
      • Good 100-400 zoom
      • Good 100mm lens on P1 P45+
      • Good 120mm MF lens
      • Good 18mm FF lens
      • Good 24-105 mm FF lens
      • Good 24-70 FF zoom
      • Good 35 mm FF lens
      • Good 35-70 MF lens
      • Good 60 mm lens on IQ3-100
      • Good 63 mm MF lens
      • Good 65 mm FF lens
      • Good 85 mm FF lens
      • Good and bad 25mm FF lenses
      • Good zoom at 24 mm
      • Marginal 18mm lens
      • Marginal 35mm FF lens
      • Mildly problematic 55 mm FF lens
      • OK 16-35mm zoom
      • OK 60mm lens on P1 P45+
      • OK Sony 600mm f/4
      • Pretty good 16-35 FF zoom
      • Pretty good 90mm FF lens
      • Problematic 400 mm FF lens
      • Tilted 20 mm f/1.8 FF lens
      • Tilted 30 mm MF lens
      • Tilted 50 mm FF lens
      • Two 15mm FF lenses
    • Found a problem – now what?
    • Goals for this test
    • Minimum target distances
      • MFT
      • APS-C
      • Full frame
      • Small medium format
    • Printable Siemens Star targets
    • Target size on sensor
      • MFT
      • APS-C
      • Full frame
      • Small medium format
    • Test instructions — postproduction
    • Test instructions — reading the images
    • Test instructions – capture
    • Theory of the test
    • What’s wrong with conventional lens screening?
  • Previsualization heresy
  • Privacy Policy
  • Recommended photographic web sites
  • Using in-camera histograms for ETTR
    • Acknowledgments
    • Why ETTR?
    • Normal in-camera histograms
    • Image processing for in-camera histograms
    • Making the in-camera histogram closely represent the raw histogram
    • Shortcuts to UniWB
    • Preparing for monitor-based UniWB
    • A one-step UniWB procedure
    • The math behind the one-step method
    • Iteration using Newton’s Method

Category List

Recent Comments

  • JimK on Goldilocks and the three flashes
  • DC Wedding Photographer on Goldilocks and the three flashes
  • Wedding Photographer in DC on The 16-Bit Fallacy: Why More Isn’t Always Better in Medium Format Cameras
  • JimK on Fujifilm GFX 100S II precision
  • Renjie Zhu on Fujifilm GFX 100S II precision
  • JimK on Fuji 20-35/4 landscape field curvature at 23mm vs 23/4 GF
  • Ivo de Man on Fuji 20-35/4 landscape field curvature at 23mm vs 23/4 GF
  • JimK on Fuji 20-35/4 landscape field curvature at 23mm vs 23/4 GF
  • JimK on Fuji 20-35/4 landscape field curvature at 23mm vs 23/4 GF
  • Ivo de Man on Fuji 20-35/4 landscape field curvature at 23mm vs 23/4 GF

Archives

Copyright © 2025 · Daily Dish Pro On Genesis Framework · WordPress · Log in

Unless otherwise noted, all images copyright Jim Kasson.