• site home
  • blog home
  • galleries
  • contact
  • underwater
  • the bleeding edge

the last word

Photography meets digital computer technology. Photography wins -- most of the time.

You are here: Home / The Last Word / Skew in the field

Skew in the field

March 25, 2014 JimK Leave a Comment

I went back to the firehouse yesterday to see if my new shoot-from-the-side plan would survive contact with the enemy. Last night I processed the images, and there were a few surprises.

14-03-24_160008_M=B_R=8_S=4-Edit

The first was that I was losing more than 8% of the vertical pixels to the perspective correction in Lightroom. I thought about how why things were different than when I did the testing earlier. Then, I let Lightroom automatically correct the whole frame, and measured how much I lost in the central target area, which only occupies the center of the image. I figured, the geometry being linear, that I’d lose the same proportion across the whole frame. Maybe that’s right, but what I didn’t figure is that, with the target’s aspect ratio at 4:3 and the frame’s at 3:2, that I’d lose more because of that.

14-03-24_163321_M=B_R=8_S=4-Edit

There’s another difference, and I’ll have to research this. When I did the testing, I let Lightroom have its way with the perspective of the image, and when I worked on the real pictures, I did it manually, and entirely with the “horizontal” control.

14-03-24_153704_M=B_R=8_S=4-Edit

I don’t like the way that Lightroom’s perspective control makes parts of the image smaller. If you use the skew tool in Photoshop, you can control what parts of the image are res’d down and what parts are res’d up in the interpolation. I don’t like to throw away pixels, and that gives me more freedom to decide which ones are more important. However, if you do it in Photoshop, it’s permanent. I’ll go back and so some testing there.

14-03-24_162238_M=B_R=8_S=4-Edit

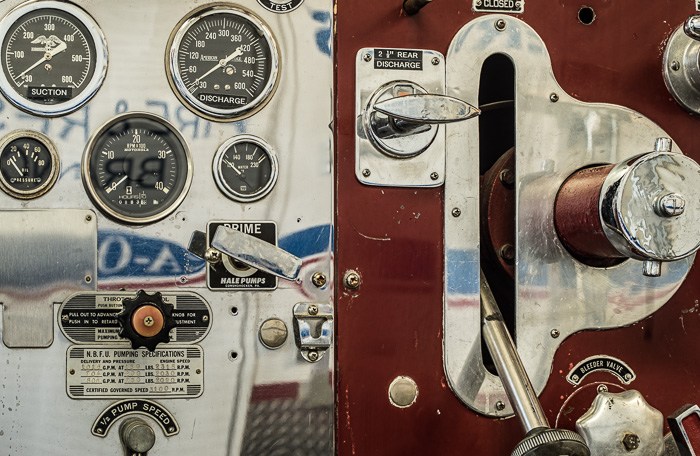
There’s another aspect to the perspective manipulation. Just as doing it in a view or tech camera by shifting, it’s not a perfect simulation. Even when round things are made round in camera or in post, a cylinder sticking up out of the subject plane is still going to be viewed from the side – you’re still going to be able to see the shaft, not just the end.

The Last Word

← Testing shift vs skew Stitching the firehouse pictures →

Leave a Reply Cancel reply

Your email address will not be published. Required fields are marked *

July 2025
S M T W T F S
 12345
6789101112
13141516171819
20212223242526
2728293031  
« Jun    

Articles

  • About
    • Patents and papers about color
    • Who am I?
  • How to…
    • Backing up photographic images
    • How to change email providers
    • How to shoot slanted edge images for me
  • Lens screening testing
    • Equipment and Software
    • Examples
      • Bad and OK 200-600 at 600
      • Excellent 180-400 zoom
      • Fair 14-30mm zoom
      • Good 100-200 mm MF zoom
      • Good 100-400 zoom
      • Good 100mm lens on P1 P45+
      • Good 120mm MF lens
      • Good 18mm FF lens
      • Good 24-105 mm FF lens
      • Good 24-70 FF zoom
      • Good 35 mm FF lens
      • Good 35-70 MF lens
      • Good 60 mm lens on IQ3-100
      • Good 63 mm MF lens
      • Good 65 mm FF lens
      • Good 85 mm FF lens
      • Good and bad 25mm FF lenses
      • Good zoom at 24 mm
      • Marginal 18mm lens
      • Marginal 35mm FF lens
      • Mildly problematic 55 mm FF lens
      • OK 16-35mm zoom
      • OK 60mm lens on P1 P45+
      • OK Sony 600mm f/4
      • Pretty good 16-35 FF zoom
      • Pretty good 90mm FF lens
      • Problematic 400 mm FF lens
      • Tilted 20 mm f/1.8 FF lens
      • Tilted 30 mm MF lens
      • Tilted 50 mm FF lens
      • Two 15mm FF lenses
    • Found a problem – now what?
    • Goals for this test
    • Minimum target distances
      • MFT
      • APS-C
      • Full frame
      • Small medium format
    • Printable Siemens Star targets
    • Target size on sensor
      • MFT
      • APS-C
      • Full frame
      • Small medium format
    • Test instructions — postproduction
    • Test instructions — reading the images
    • Test instructions – capture
    • Theory of the test
    • What’s wrong with conventional lens screening?
  • Previsualization heresy
  • Privacy Policy
  • Recommended photographic web sites
  • Using in-camera histograms for ETTR
    • Acknowledgments
    • Why ETTR?
    • Normal in-camera histograms
    • Image processing for in-camera histograms
    • Making the in-camera histogram closely represent the raw histogram
    • Shortcuts to UniWB
    • Preparing for monitor-based UniWB
    • A one-step UniWB procedure
    • The math behind the one-step method
    • Iteration using Newton’s Method

Category List

Recent Comments

  • Jonby on How focus-bracketing systems work
  • JimK on Of fidelity, photography, audio, and wine
  • JimK on Of fidelity, photography, audio, and wine
  • AVN on Of fidelity, photography, audio, and wine
  • Markus on In photography, and in life, work and joy can, and should, coexist
  • JimK on Fuji 120/4 GF at 1:1 with tubes — visuals
  • Christopher Roberton on Fuji 120/4 GF at 1:1 with tubes — visuals
  • Pieter Kers on Visualising lens aberrations — one at a time, Siemens Star
  • JimK on Visualizing aberrations — caveats
  • Stepan Kana on Visualizing aberrations — caveats

Archives

Copyright © 2025 · Daily Dish Pro On Genesis Framework · WordPress · Log in

Unless otherwise noted, all images copyright Jim Kasson.