• site home
  • blog home
  • galleries
  • contact
  • underwater
  • the bleeding edge

the last word

Photography meets digital computer technology. Photography wins -- most of the time.

You are here: Home / a7RIV / Camera resolution and 4K viewing

Camera resolution and 4K viewing

October 14, 2019 JimK 6 Comments

For some time, there has been a strongly vocal body of opinion that the benefits of high-resolution cameras can improve even severely downsized presentations. For the purposes of this discussion, I’ll say that any camera with more than 42 MP is a high-resolution camera. With the advent of the Fuji GFX 100 and the Sony a7RIV, this discussion has heated up again, and I’d light to add a little light to the heat.

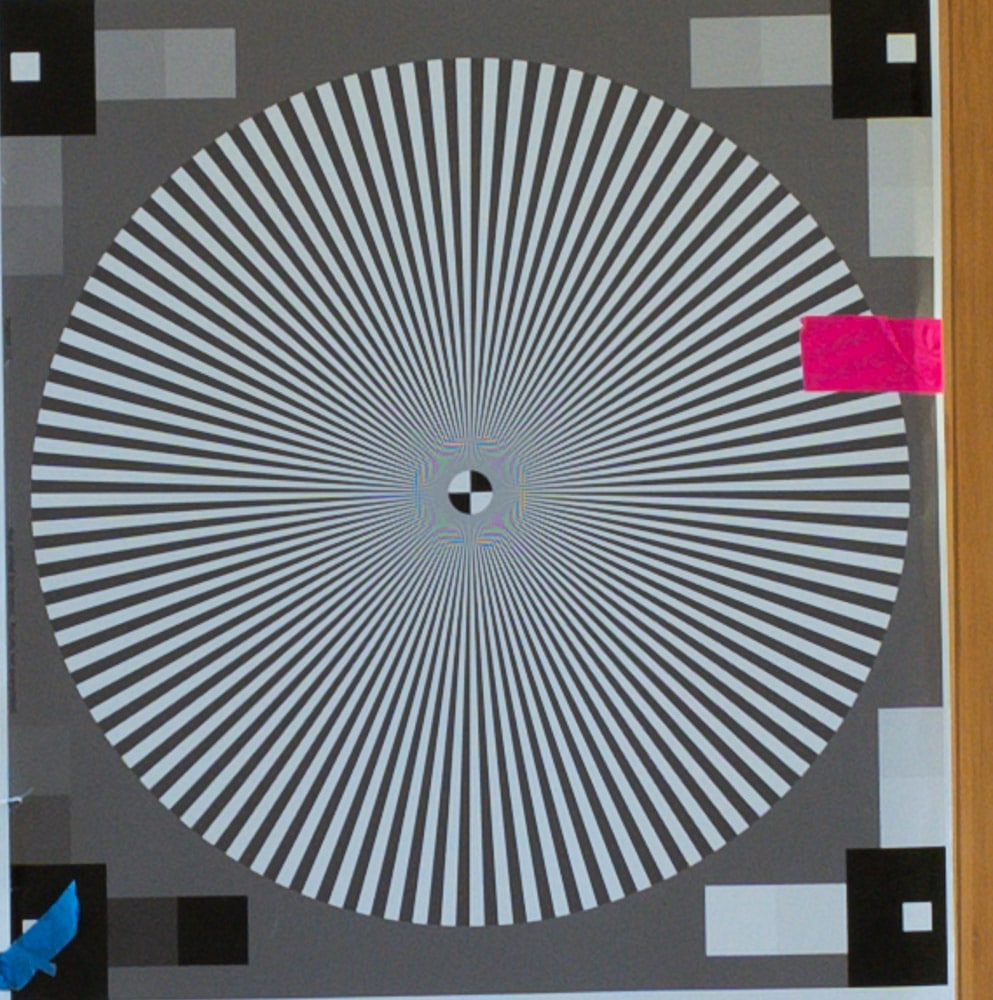
I made images of a 22-inch low-contrast Siemens Star with both the a7S and a7RIV. I know some of you would prefer natural-world examples, and I may get to them, but for now I’m going with the star. It is the best way I know — short of numbers and graphs — to understand resolution and aliasing simultaneously. I used a Zeiss Otus 55 mm f/1.4 lens at f/4, with the target about 50 feet away. This lens is capable of delivering detail that neither sensor can fully resolve, and thus the lens should not be the limiting factor here.

Other details:

  • EFCS
  • ISO 100
  • 2-second self timer
  • Focused at taking aperture at highest magnification, lowest peaking for a7RIV, medium peaking for a7S
  • RRS legs, C1 head
  • Three shots with each setup, with the best picked for this presentation
  • Developed in Lightroom, PV 5
  • Adobe Color profile
  • White balanced to gray surround on target
  • Sharpening set to 0

Here’s a sample shot:


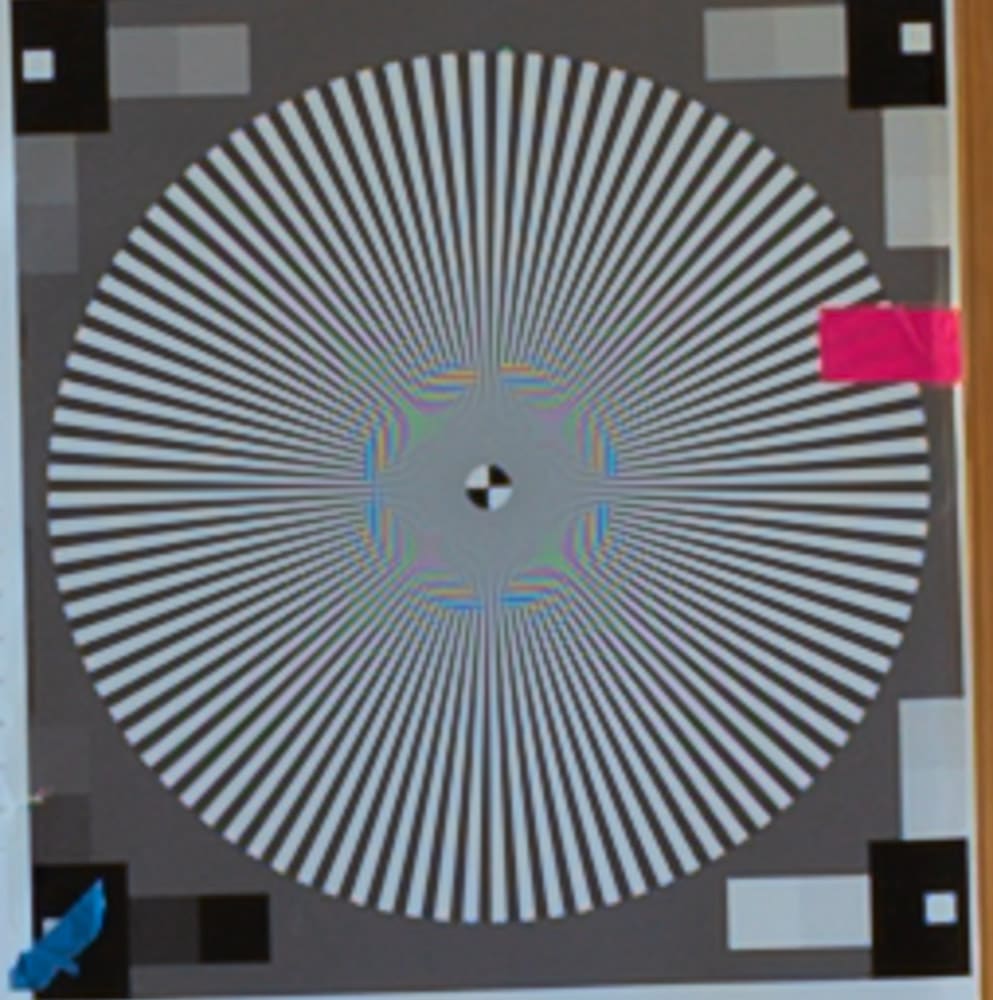
Now let’s look at some tight crops. The a7RIV one is shown here at about 150% magnification. The a7S one has more magnification so that the field of view (FOV) is the same. By the way, be sure to look at these images with your browser set to 100%, or else you’ll be looking at your browser’s resampling.

a7RIV crop from full frame


a7S crop from full frame

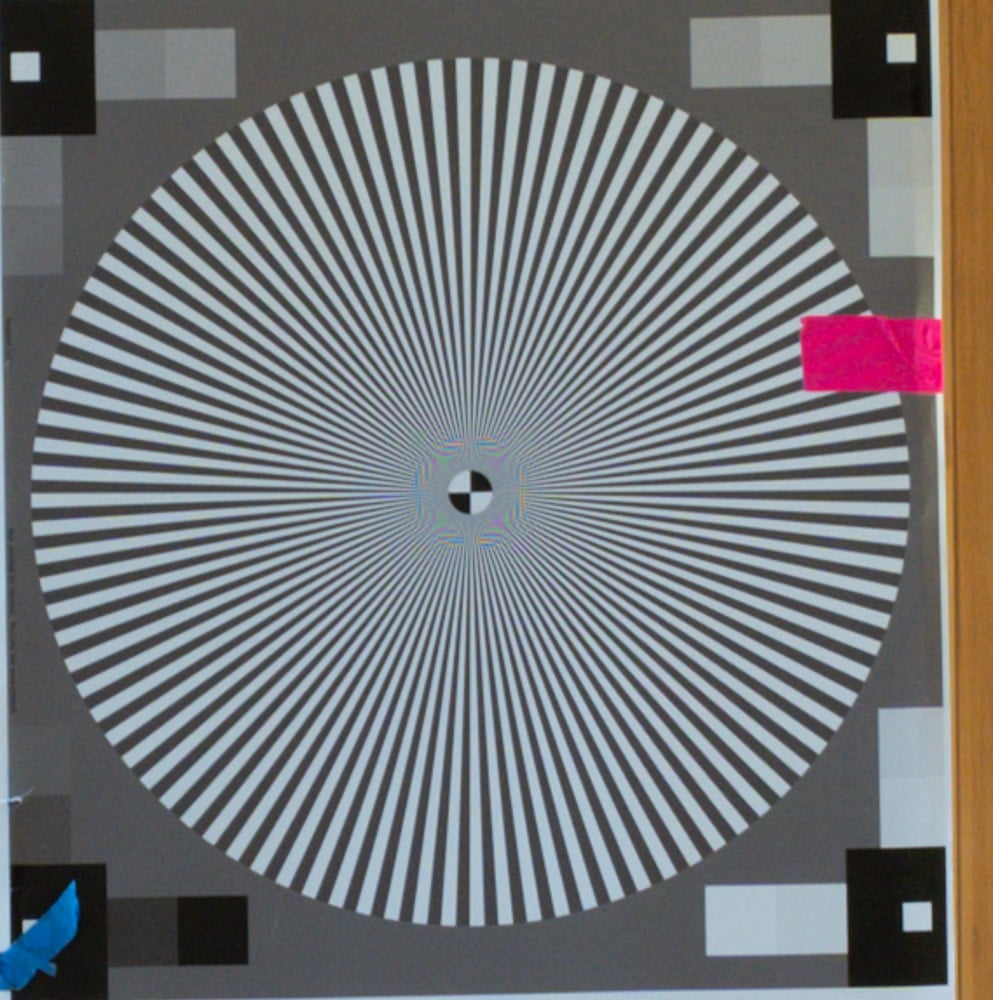
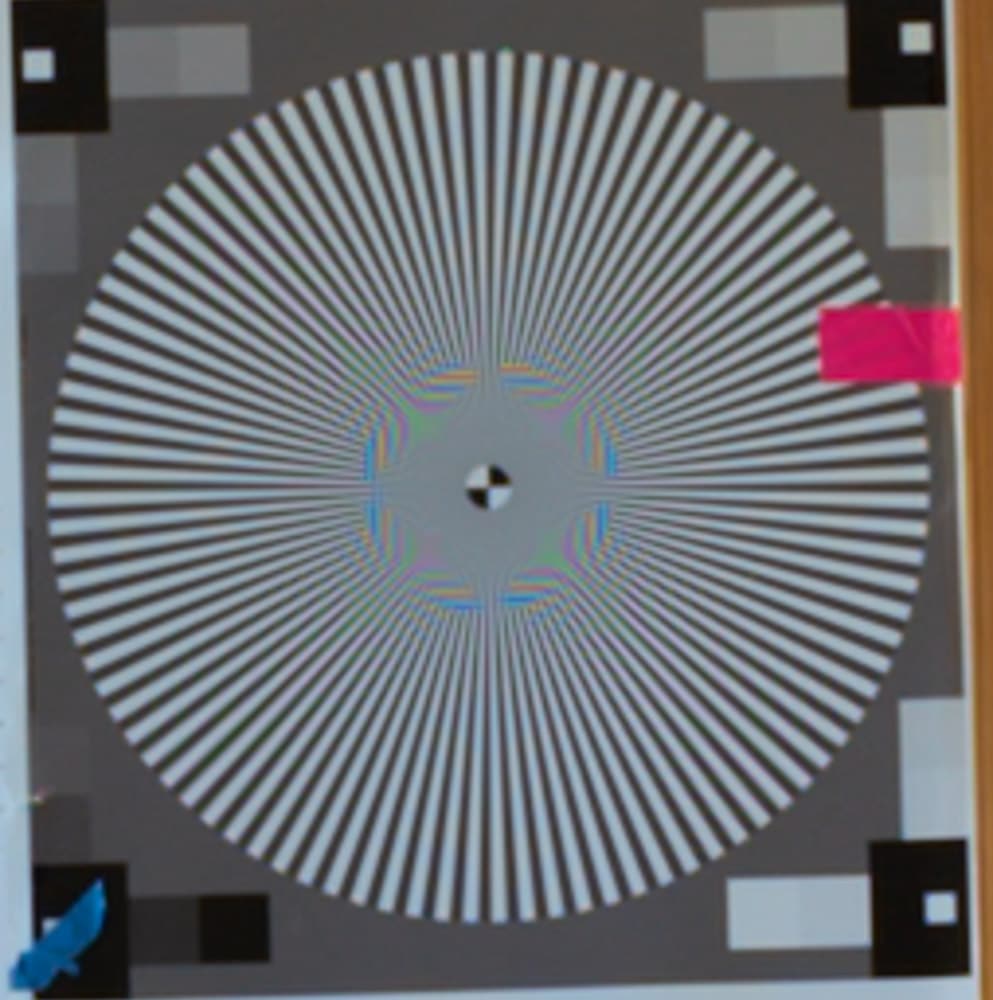
It is clear that the a7RIV has much higher resolution. But that’s not news. Now let’s look at what happens when I export both file from Lightroom as TIFFs (no sharpening on export) with the dimensions limited to at most 3840×2160 pixels, and crop to the same field of view.


a7RIV crop from 4K image


a7S crop from 4K image

There are some sharpness changes between the two images, but the big difference is that the chroma aliasing is much worse in the a7S image. There is some luminance aliasing in both the a7S and a7RIV images.


a7RIV crop from full frame, sharpening amount 30, radius 1, detail 0.

Note that the magnification in the two images immediately above is larger than the ones above those, because the 4K images are smaller than the native resolution of either camera. Also, I should point out that, because of aspect ratio differences between 4K and full frame, the uncropped versions of the two images immediately above were not 3840 pixels wide, although they were 2160 pixels high.

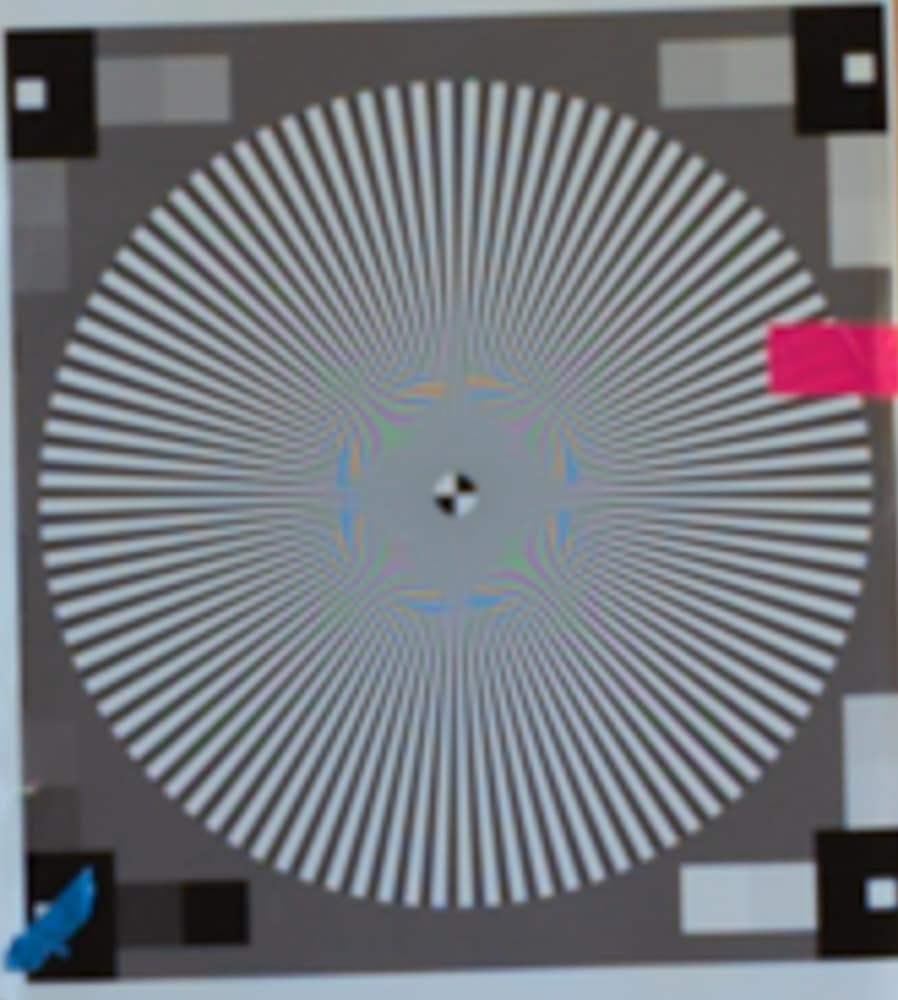
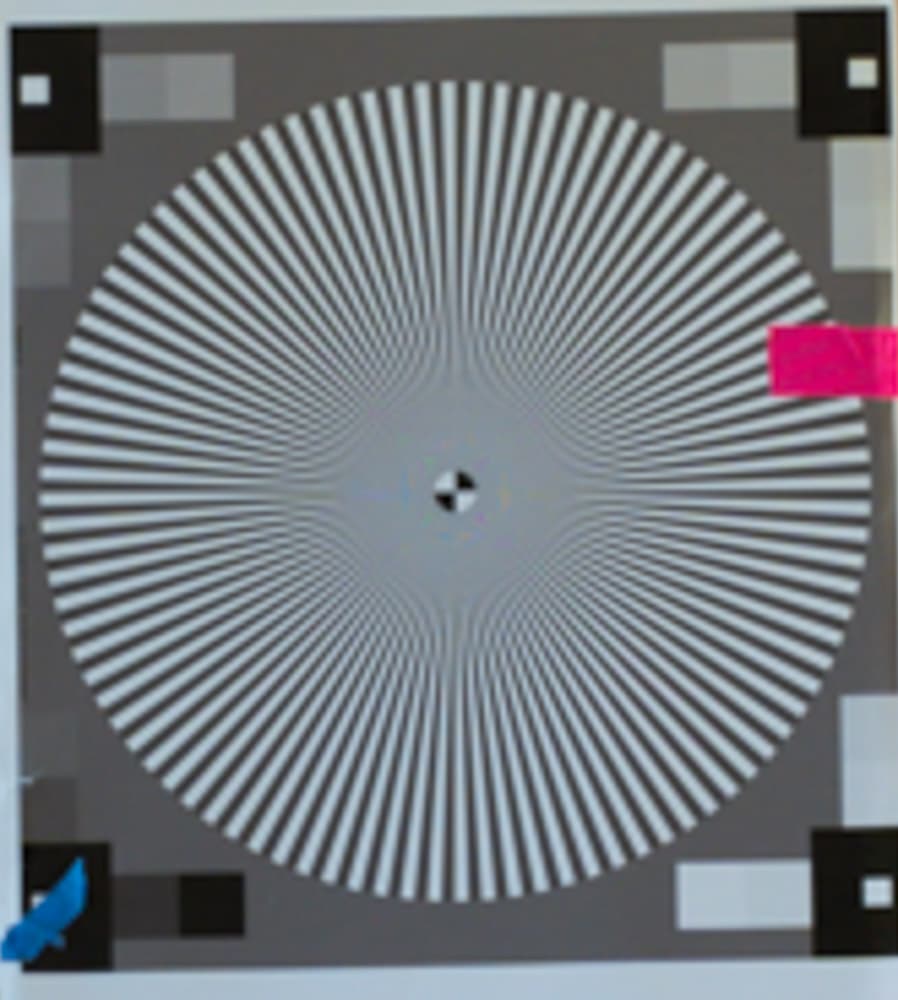
What difference does sharpening make? Here are the same set of images with sharpening strength set to 30, radius 1, and detail 0. Note that sharpening with a radius of 1 pixel is a larger filter in terms on micrometers than a 1 pixel radius for the a7RIV, but if we’re trying to clear up sensor aperture blur rather than lens blur, that’s appropriate. You could argue for a stronger or larger kernel for the a7S because it has an anti-aliasing filter, but I didn’t go that far.


a7S crop from full frame, sharpening amount 30, radius 1, detail 0.


a7RIV crop from 4K, sharpening amount 30, radius 1, detail 0.


a7S crop from 4K, sharpening amount 30, radius 1, detail 0.


I don’t think that changes any of my conclusions, which are:

  • The color aliasing differences are obvious and important
  • The luminance differences are probably insignificant in real-world images

There are lots of places to take this study. Off the top of my head:

  1. What happens with other demosaicing algorithms, especially Adobe’s new Enhance Details?
  2. What if I use different downsampling algorithms, especially ones that mimic screen resizing in image editors?
  3. What if the lower-resolution image were from the a7III?
  4. What happens in dim light, with noise reduction employed (in an earlier simulation study, I found that favored the high-resolution camera).


a7RIV, The Last Word

← Fuji GFX 100 IBIS performance with 32-64 mm zoom Camera resolution and 4K viewing with Enhance Details →

Trackbacks

  1. Camera resolution and 4K viewing with Enhance Details says:
    October 14, 2019 at 4:43 pm

    […] This is the second in a series of posts on the effect of camera resolution on the quality of downsampled images. The series starts here. […]

    Reply
  2. Camera resolution and 4K viewing — downsampling algorithms says:
    October 16, 2019 at 3:33 pm

    […] This is the third in a series of posts on the effect of camera resolution on the quality of downsampled images. The series starts here. […]

    Reply
  3. Camera resolution and 4K viewing — natural images, QImage downsampling says:
    October 17, 2019 at 3:24 pm

    […] This is the sixth in a series of posts on the effect of camera resolution on the quality of downsampled images. The series starts here. […]

    Reply
  4. Camera resolution and 4K viewing — a7S, a7III, a7RIII, a7RIV says:
    October 18, 2019 at 3:30 pm

    […] This is the seventh in a series of posts on the effect of camera resolution on the quality of downsampled images. The series starts here. […]

    Reply
  5. Camera resolution and 4K viewing — a7S, a7III, a7RIII, a7RIV, downsampled says:
    October 19, 2019 at 10:12 am

    […] This is the eighth in a series of posts on the effect of camera resolution on the quality of downsampled images. The series starts here. […]

    Reply
  6. Camera resolution and 4K viewing — summary says:
    October 19, 2019 at 4:47 pm

    […] This is the ninth in a series of posts on the effect of camera resolution on the quality of downsampled images. The series starts here. […]

    Reply

Leave a Reply Cancel reply

Your email address will not be published. Required fields are marked *

May 2025
S M T W T F S
 123
45678910
11121314151617
18192021222324
25262728293031
« Apr    

Articles

  • About
    • Patents and papers about color
    • Who am I?
  • How to…
    • Backing up photographic images
    • How to change email providers
    • How to shoot slanted edge images for me
  • Lens screening testing
    • Equipment and Software
    • Examples
      • Bad and OK 200-600 at 600
      • Excellent 180-400 zoom
      • Fair 14-30mm zoom
      • Good 100-200 mm MF zoom
      • Good 100-400 zoom
      • Good 100mm lens on P1 P45+
      • Good 120mm MF lens
      • Good 18mm FF lens
      • Good 24-105 mm FF lens
      • Good 24-70 FF zoom
      • Good 35 mm FF lens
      • Good 35-70 MF lens
      • Good 60 mm lens on IQ3-100
      • Good 63 mm MF lens
      • Good 65 mm FF lens
      • Good 85 mm FF lens
      • Good and bad 25mm FF lenses
      • Good zoom at 24 mm
      • Marginal 18mm lens
      • Marginal 35mm FF lens
      • Mildly problematic 55 mm FF lens
      • OK 16-35mm zoom
      • OK 60mm lens on P1 P45+
      • OK Sony 600mm f/4
      • Pretty good 16-35 FF zoom
      • Pretty good 90mm FF lens
      • Problematic 400 mm FF lens
      • Tilted 20 mm f/1.8 FF lens
      • Tilted 30 mm MF lens
      • Tilted 50 mm FF lens
      • Two 15mm FF lenses
    • Found a problem – now what?
    • Goals for this test
    • Minimum target distances
      • MFT
      • APS-C
      • Full frame
      • Small medium format
    • Printable Siemens Star targets
    • Target size on sensor
      • MFT
      • APS-C
      • Full frame
      • Small medium format
    • Test instructions — postproduction
    • Test instructions — reading the images
    • Test instructions – capture
    • Theory of the test
    • What’s wrong with conventional lens screening?
  • Previsualization heresy
  • Privacy Policy
  • Recommended photographic web sites
  • Using in-camera histograms for ETTR
    • Acknowledgments
    • Why ETTR?
    • Normal in-camera histograms
    • Image processing for in-camera histograms
    • Making the in-camera histogram closely represent the raw histogram
    • Shortcuts to UniWB
    • Preparing for monitor-based UniWB
    • A one-step UniWB procedure
    • The math behind the one-step method
    • Iteration using Newton’s Method

Category List

Recent Comments

  • JimK on Goldilocks and the three flashes
  • DC Wedding Photographer on Goldilocks and the three flashes
  • Wedding Photographer in DC on The 16-Bit Fallacy: Why More Isn’t Always Better in Medium Format Cameras
  • JimK on Fujifilm GFX 100S II precision
  • Renjie Zhu on Fujifilm GFX 100S II precision
  • JimK on Fuji 20-35/4 landscape field curvature at 23mm vs 23/4 GF
  • Ivo de Man on Fuji 20-35/4 landscape field curvature at 23mm vs 23/4 GF
  • JimK on Fuji 20-35/4 landscape field curvature at 23mm vs 23/4 GF
  • JimK on Fuji 20-35/4 landscape field curvature at 23mm vs 23/4 GF
  • Ivo de Man on Fuji 20-35/4 landscape field curvature at 23mm vs 23/4 GF

Archives

Copyright © 2025 · Daily Dish Pro On Genesis Framework · WordPress · Log in

Unless otherwise noted, all images copyright Jim Kasson.